
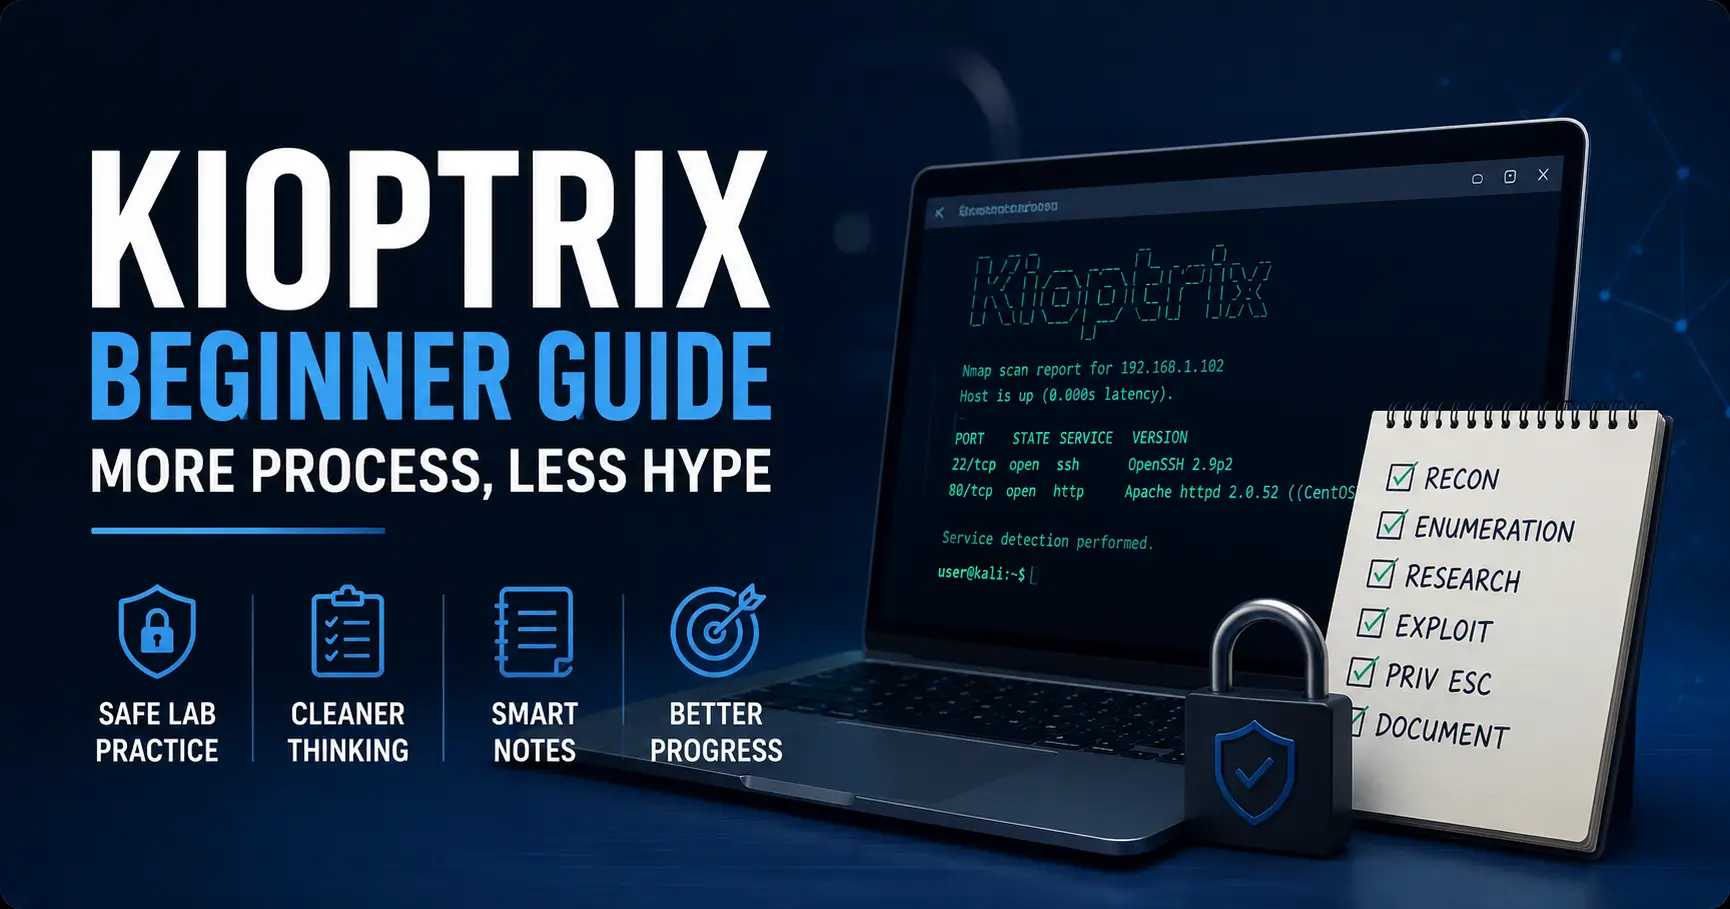
Beginner ethical hacking guide
Kioptrix Level for Beginners
Who Need More Process and Less Hype
Kioptrix can feel like a dark room full of blinking tools, half-remembered commands, and walkthrough tabs multiplying like kitchen magnets. For a beginner, the hard part is not only finding a vulnerable service. It is learning how to think calmly when the screen throws back unfamiliar output.
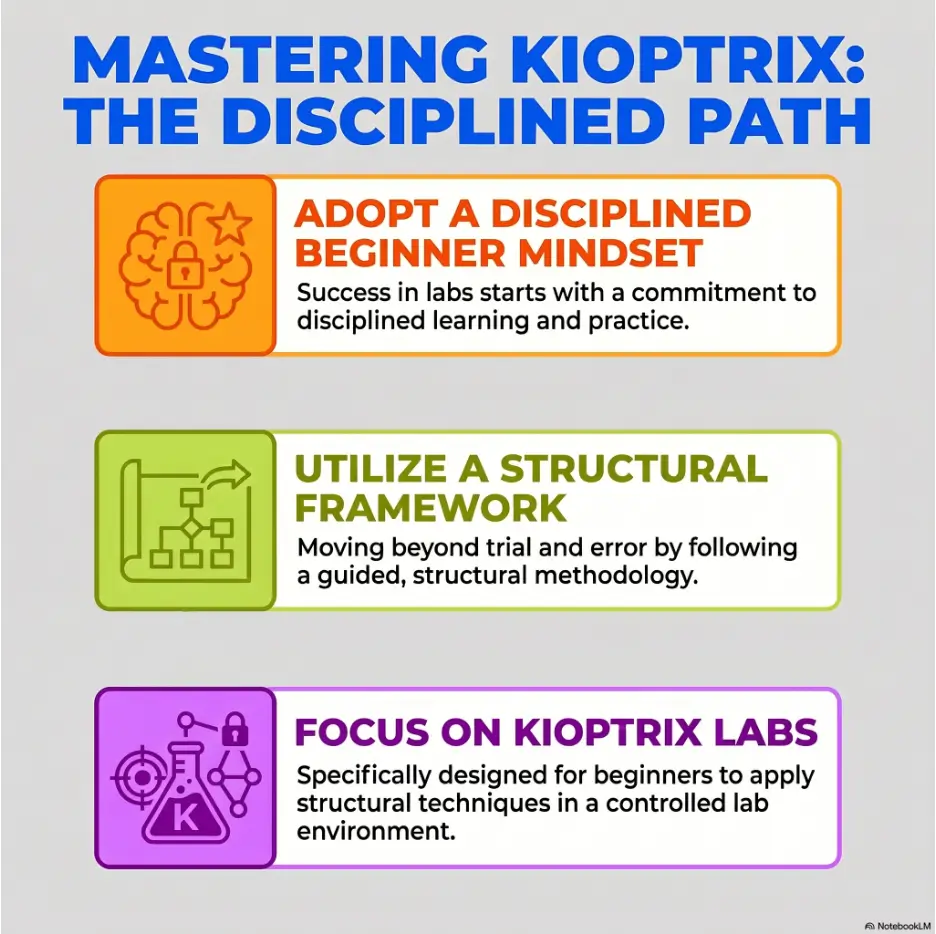
This guide treats Kioptrix as a legal practice lab, not a trophy hunt. You will learn how to set up a safe routine, map the target, document evidence, research responsibly, and turn every attempt into a repeatable decision instead of a lucky click.
No drama. No “become elite overnight” smoke machine. Just a sturdy beginner workflow that helps you understand what happened, why it happened, and what to try next when the machine refuses to cooperate.
Safer practice
Keep your work inside a private, authorized lab and avoid risky habits early.
Cleaner thinking
Use recon, notes, and small tests before reaching for exploit chatter.
Better progress
Build a repeatable routine you can use on future labs, study groups, and portfolio notes.
✨ The promise: by the end, Kioptrix should feel less like a locked castle and more like a practice notebook with doors.
Snapshot
This article is for US and UK beginners learning ethical hacking through legal lab machines. It solves the “I have tools, but no process” problem by giving you a safe Kioptrix practice routine, note system, beginner decision flow, and stopping points so you can learn without wandering into risky or random behavior.
Table of Contents
Safety First: Keep Kioptrix Inside the Lab
Kioptrix is useful because it gives beginners a place to practice penetration testing concepts without bothering real people, real businesses, or real networks. That boundary is not a footnote. It is the floorboard under the whole lesson.
When you are new, tools can make ordinary curiosity feel powerful very quickly. A scan that seems harmless to you may look hostile to someone else. A command copied from a walkthrough may behave differently outside a lab. Permission is not paperwork perfume. It is the difference between study and trouble.
So the first skill is not exploitation. The first skill is containment. Before you open a terminal, decide where your practice begins, where it ends, and what devices must never be touched.
Use only machines you own and run locally
For beginner Kioptrix practice, use lab machines you intentionally downloaded and run on your own computer or private lab host. Treat the vulnerable machine as a training dummy in a closed room, not a hint that similar systems on the internet are fair game.
This matters because many beginner tools are designed to discover, fingerprint, or test systems. They do not know your intention. They do what you ask. A cautious learner gives those tools a fenced yard.
If you need a broader beginner roadmap before choosing a box, your own study path can point toward a related guide such as a Kioptrix labs beginner roadmap, but keep the actual testing inside your authorized practice environment.
Separate practice from personal devices
A vulnerable machine is supposed to be vulnerable. That is the whole point. Do not casually place it on the same network where your family laptop, work machine, phone, printer, smart TV, and router are all sitting around like guests at a dinner party.
A safer beginner setup uses an isolated virtual network, a host-only network, or another private segment where your attacker VM and target VM can talk to each other without inviting the rest of your home into the experiment.
Key takeaway
A safe Kioptrix lab is not “whatever boots.” It is a small, intentional practice space where the vulnerable machine, your testing machine, and your notes are the only actors on stage.
Do not test public or workplace systems
Do not scan public IPs, school networks, office networks, client systems, cloud assets, or “interesting” devices you do not own. Do not assume that curiosity gives you a pass. It does not.
If you are learning at work, get written authorization and a defined scope before touching anything. If you are learning at home, keep the practice machine local. If you are not sure whether you have permission, assume you do not.
Safety / Disclaimer
This article is for ethical learning in private, authorized lab environments. Do not scan, probe, exploit, or test systems you do not own or do not have explicit written permission to assess. The goal is to build legal, careful security thinking, not unauthorized access.
Permission is the curriculum
Beginners sometimes treat authorization as a boring rule pasted onto the front of exciting material. That is backwards. Authorization is part of the craft. Professional security work is defined by scope, documentation, communication, and restraint.
Kioptrix gives you a chance to practice that mindset early. You can write down what is in scope, what is out of scope, when you started, what you changed, and what you learned. That habit will matter long after the first shell prompt loses its sparkle.
Who Kioptrix Helps, and Who Should Pause
Kioptrix is often called beginner-friendly, but beginner-friendly does not mean beginner-magic. It still expects you to understand enough networking, Linux, and web basics to make sense of clues. If those ideas are foggy, Kioptrix can still help, but you will need to slow the pace.
The best learner for Kioptrix is not the person with the most tools installed. It is the person willing to observe, write things down, ask “what does this output mean?” and resist the urge to sprint toward a copied command.
Best for beginners who want structure before speed
If you want a practice machine that rewards method, Kioptrix is a useful starting point. You can learn how to discover services, inspect old software, compare clues, and practice note-taking without needing a huge enterprise lab.
It is especially helpful if you are tired of tutorials that say “run this” without explaining why. Kioptrix gives you enough friction to practice decision-making. That friction is not failure. It is the part that teaches.
Good for students and career changers
Students, help desk workers, IT generalists, career changers, and OSCP-curious learners can all use Kioptrix to build a practical base. The point is not to memorize a single box. The point is to build habits you can reuse across beginner labs.
For example, a help desk worker may already understand IP addresses, ports, and user accounts, but not vulnerability research. A student may understand theory but not terminal output. A career changer may need confidence that does not come from motivational wallpaper. Kioptrix can meet each of those readers, but only if the session has structure.
Readiness checklist
- You know what an IP address is.
- You understand that ports represent services listening for connections.
- You can move around a Linux terminal without panic.
- You can copy output into notes and label it clearly.
- You are willing to stop and research before running unknown code.
Pause if networking basics still feel invisible
If you do not yet understand IP ranges, NAT, host-only networks, ports, DNS, HTTP, or basic Linux permissions, pause before trying to “beat” Kioptrix. You do not need to become a network engineer first, but you do need enough vocabulary to read the room.
A useful pause does not mean quitting. It means spending one or two sessions learning the boring-looking pieces that make the lab understandable. For many beginners, that short detour saves weeks of frustration.
A focused primer such as networking basics for hacking labs can support the Kioptrix process without turning your study plan into an endless shelf of prerequisites.
The Beginner Trap: Kioptrix Is Not a Race
The fastest way to make Kioptrix less useful is to treat it like a speedrun. Yes, reaching root can be exciting. The terminal prompt changes, the room lights up, and for a moment the keyboard feels like a brass section. Then the question arrives: can you explain what happened?
If the answer is no, the box gave you a screenshot, not a skill. That is not a moral failure. It is simply a weak learning loop.
Why rushing to root teaches the wrong lesson
Rushing teaches you to value outcome over method. It nudges you toward command collecting, exploit name memorization, and tab-hopping through walkthroughs. Those habits may produce a win on one machine, but they do not transfer cleanly to the next one.
A better beginner goal is to build a chain of reasoning. “I found this service. I checked this behavior. I researched this version. I tested this assumption. The result supported or weakened my idea.” That chain is portable. A copied command is usually not.
What you miss when you copy commands
When you copy commands without understanding them, you skip the most valuable parts: input, output, assumptions, side effects, and alternatives. You also miss the tiny details that explain why one approach works in a lab and fails somewhere else.
Beginner labs often reward careful reading. A service banner, a default page, a directory name, a permission bit, a forgotten file, or an error message may matter more than the loudest exploit title in search results.
Key takeaway
For a beginner, “I can explain my failed attempt” is often more valuable than “I copied the successful one.” Explanation is the muscle. The root prompt is only the mirror.
Short Story: The Screenshot Was Not the Skill
Maya spent a Saturday afternoon on her first Kioptrix box. By dinner, she had three browser tabs open, two terminal windows cluttered with output, and one triumphant screenshot showing success.
On Sunday, she tried to explain the path to a friend. The story fell apart. She remembered the final command, but not why she chose it. She remembered being excited, but not what the earlier scans had shown.
The next weekend, she restarted the same machine. This time she wrote one sentence after every result: “This suggests…” or “This does not prove…” It felt slower, almost annoyingly slow.
But when she finished, she could tell the whole path from discovery to decision. The second screenshot looked the same. The learner did not.
Lab Setup Without the Headache Spiral
Lab setup is where many beginners lose an afternoon before learning anything about security. The machine will not get an IP. The attacker VM cannot reach the target. The host-only adapter has the wrong range. The browser refuses to load a page. Suddenly, “ethical hacking” becomes “why is this dropdown gray?”
A clean setup routine protects your attention. It turns the lab from a pile of knobs into a small practice instrument.
Choose a safe virtualization setup
Most beginners use a virtualization tool such as VirtualBox or VMware. The exact tool matters less than the network mode, snapshots, and your ability to keep the vulnerable machine isolated.
A common beginner pattern is one attacker VM, often Kali or another Linux distribution, and one Kioptrix target VM on the same private network. You want them to communicate with each other. You do not want your target machine wandering around the wider network like a raccoon in a pantry.
If you are comparing options, a resource such as VirtualBox vs VMware vs Proxmox for lab practice can help you choose a setup that fits your machine and patience level.
Keep notes on network details
Write down the VM names, network mode, IP range, discovered target IP, attacker IP, date, and any changes you make. This feels excessive until something breaks. Then it feels like a lantern.
Beginners often say, “I’ll remember.” You probably will not. Lab details look obvious while you are staring at them and strangely slippery two days later.
| Setup detail | What to record | Why it matters |
|---|---|---|
| Attacker VM | Name, OS, network adapter | Helps you repeat the same test environment |
| Target VM | Machine name, source, snapshot status | Confirms you are testing the intended lab box |
| Network mode | Host-only, NAT, isolated segment, or equivalent | Prevents accidental testing outside the lab |
| IP range | Example: private lab subnet only | Helps you identify what belongs in scope |
| Changes made | Adapter changes, resets, snapshots | Makes troubleshooting possible without guessing |
Use snapshots as an undo button
Snapshots are useful because labs are messy. You can test something, break something, get lost, and return to a known state. That is healthy. But snapshots should support learning, not replace understanding.
Before a serious practice session, take a clean snapshot of the target and, if needed, your attacker VM. Label snapshots with plain names such as “fresh import,” “before web testing,” or “before privilege escalation practice.” Future-you will quietly applaud.
Avoid the small setup mistake
The small mistake that ruins the whole afternoon is assuming the lab network is correct before checking it. Do not jump into tools until you know both machines are where you think they are.
Use a simple setup checklist before each session: start VMs, confirm network mode, identify your own IP, identify the target IP, confirm the target is reachable, and write it down. That five-minute ritual prevents a surprising amount of terminal theater.
Beginner lab setup checklist
- Open your attacker VM and target VM only.
- Confirm both are on the intended private lab network.
- Record your attacker machine IP address.
- Discover and record the target machine IP address.
- Confirm the target responds inside the lab.
- Take or verify a clean snapshot before risky changes.
- Write the session start time and goal in your notes.
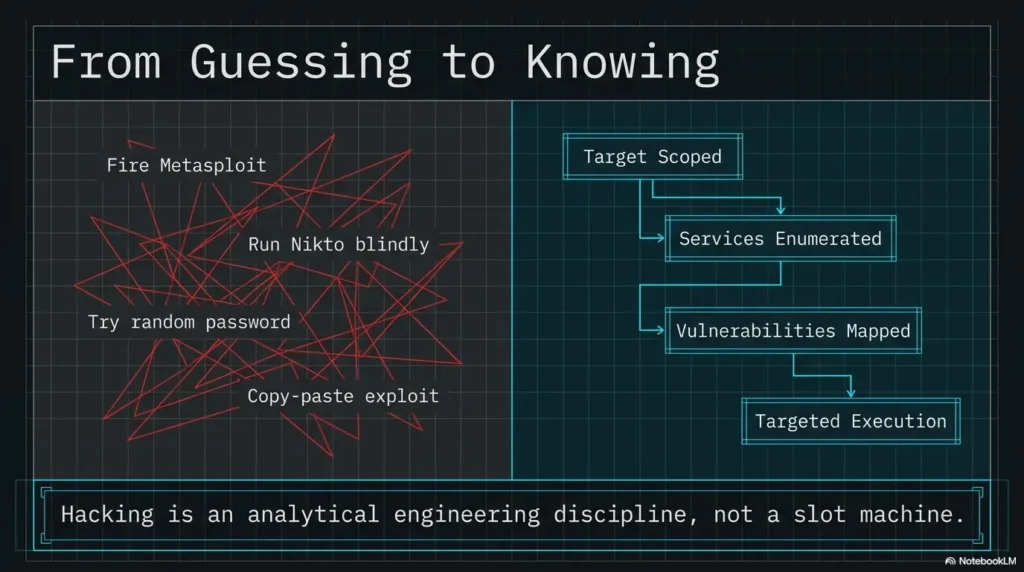
Recon First: Make the Machine Speak Before You Guess
Reconnaissance is the polite art of asking the lab machine what it is willing to reveal. It is not glamorous. It is not cinematic. It is the part where the fog begins to take shape.
Beginners often want to skip recon because it feels passive. But recon is where you prevent random behavior. You are building a map before choosing a road.
Identify what is alive
Start by confirming which hosts exist on the lab network. Your goal is not to scan the world. Your goal is to find the Kioptrix target in your tiny, authorized lab segment.
Record the target IP, the method you used to identify it, and any uncertainty. If more than one host appears, identify your attacker machine and avoid confusing it with the target.
Record open services before vulnerabilities
Once the target is identified, record open ports and services. Do not immediately ask, “What exploit works?” Ask, “What is exposed?” That shift keeps your thinking grounded.
For each open service, write a plain-English line. For example: “Web service appears available,” “File sharing may be exposed,” or “Remote login service is open.” You do not need perfect language. You need a useful map.
Key takeaway
Recon is not a hunt for magic words. It is a disciplined inventory. Before you decide what matters, list what exists.
Separate interesting from actionable
Not every clue deserves action. Some output is background noise. Some is interesting but not yet useful. Some needs confirmation. Beginners get stuck when they treat every shiny result as a command invitation.
Use three labels in your notes: “confirmed,” “possible,” and “ignore for now.” Confirmed findings are directly observed. Possible findings need research. Ignore-for-now items may matter later, but not enough to derail the current thread.
| Note label | Meaning | Beginner example |
|---|---|---|
| Confirmed | You directly observed it | A port is open and a service responds |
| Possible | It may matter, but needs checking | A banner suggests older software |
| Ignore for now | Not useful enough yet | A noisy scan message with no clear path |
Do not jump from one scan result to exploits
A single scan result is not a verdict. It is a clue. Before acting on it, ask whether the result is accurate, whether the service actually behaves that way, and whether you have enough context.
This is where beginners start becoming analysts. You are no longer asking tools to impress you. You are asking them to help you decide.
Kioptrix beginner process map
1. Boundaries
Confirm lab-only scope.
2. Map
Find hosts and services.
3. Inspect
Study behavior and clues.
4. Test
Try one hypothesis at a time.
5. Review
Write what changed.
Service Enumeration: Where Beginners Actually Learn
Service enumeration is the place where Kioptrix starts teaching in complete sentences. A port number tells you a door exists. Enumeration asks what kind of door, what is written on it, whether it opens, and whether someone left a note under the mat.
This stage rewards curiosity and patience. It is also safer to discuss conceptually because the beginner lesson is about observation, not handing out a bag of sharp instruments.
Look closer at web, SSH, SMB, and old services
Many beginner lab machines expose familiar services: web servers, remote login services, file sharing, databases, or older network services. Your job is to learn what each one says about the machine.
For web services, inspect pages, headers, server messages, forms, links, comments, and default files. For file sharing, understand whether shares are visible, whether access is allowed, and what error messages tell you. For remote login services, note presence without assuming credentials exist.
The goal is not to attack everything. The goal is to understand which services invite deeper inspection.
Read banners, but do not worship them
A banner may show a software name or version. That can be useful. It can also be misleading, incomplete, hidden behind defaults, or irrelevant without context.
Beginners sometimes see a version string and immediately search for an exploit. Better: write down the banner, compare it with service behavior, and ask what evidence would confirm the service is actually vulnerable in this lab.
Compare version clues with behavior
Version clues matter most when behavior supports them. An old-looking web server may still have no easy path. A boring page may hide a misconfiguration. A service with no banner may still reveal useful behavior through errors, access control, or default content.
Think of enumeration as interviewing the machine. One answer rarely tells the whole story. You are listening for consistency.
Enumeration decision table
| Finding | Ask next | Good note |
|---|---|---|
| Open web service | What pages, headers, forms, and errors appear? | “Web service exposes default page and server header.” |
| File sharing service | Can shares be listed or accessed in the lab? | “Share listing denied, but service confirms presence.” |
| Old version clue | Does behavior match known issues? | “Version clue needs confirmation before testing.” |
Boring output is often the map
Beginners want the dramatic clue. Real learning often hides in boring output: status codes, denied access, default pages, repeated names, odd timestamps, ordinary headers, and plain error messages.
When output looks boring, do not throw it away immediately. Ask what it rules out. A failed attempt can narrow the path. An error message can tell you whether your assumption was wrong, your syntax was wrong, or your target was different than expected.
For focused practice on this stage, you might pair this article with a Kioptrix recon routine and use the same note categories each time.
Vulnerability Research Without Copy-Paste Fog
Vulnerability research is where beginners often leave the trail. Search results can turn one service clue into twenty tabs, six exploit names, and a headache with a keyboard attached.
The safer and smarter approach is to research concepts before commands. You are trying to understand whether a weakness fits your observed service, version, configuration, and lab goal.
Search for concepts before commands
If you find an old web stack, first learn what the relevant technology does. If you find a file sharing service, learn how access control normally works. If you find a version clue, learn what class of weakness it may indicate.
This protects you from copy-paste fog. You can still use tools and references, but you are no longer blindly asking the internet to drive.
For general web testing concepts, the OWASP Web Security Testing Guide is a respected reference. It is not a Kioptrix walkthrough, which is precisely why it can help you think in categories instead of recipes.
Confirm the vulnerability fits
A vulnerability name is not enough. Ask whether the service version matches, whether the configuration is relevant, whether the vulnerable component is reachable, and whether the exploit assumptions match your lab.
For example, an exploit may require authentication, a writable directory, a specific module, or a particular operating system behavior. If you skip those notes, you may waste an hour blaming the lab when your assumption was the part that broke.
Read exploit notes for assumptions
Exploit notes, advisories, and write-ups often include assumptions. Beginners tend to skim those parts because they are eager for the command. That is like reading a recipe and skipping the oven temperature.
Before running any proof-of-concept code in your lab, ask: What does it do? What service does it contact? What input does it require? What could change on the target? What result would count as success? What result would count as failure?
Show me the nerdy details
A beginner-friendly vulnerability check can be framed as four layers: service identity, version clue, reachable behavior, and exploit condition. Service identity asks what is actually listening. Version clue asks what software family and release may be involved. Reachable behavior asks whether the vulnerable component can be touched in this lab. Exploit condition asks whether the known weakness requires a setting, module, permission, or user state you have not confirmed.
This layered approach prevents a common error: treating search results as evidence. Search results are leads. Evidence comes from your lab observations.
Do not run code you cannot explain
This rule is both ethical and practical. If you cannot explain what code does at a basic level, do not run it. In a legal lab, the risk is usually contained, but the habit is still poor.
At minimum, read the comments, inputs, network behavior, expected output, and assumptions. If the code is short, inspect the flow. If it is long and unfamiliar, step back and find a safer conceptual explanation first.
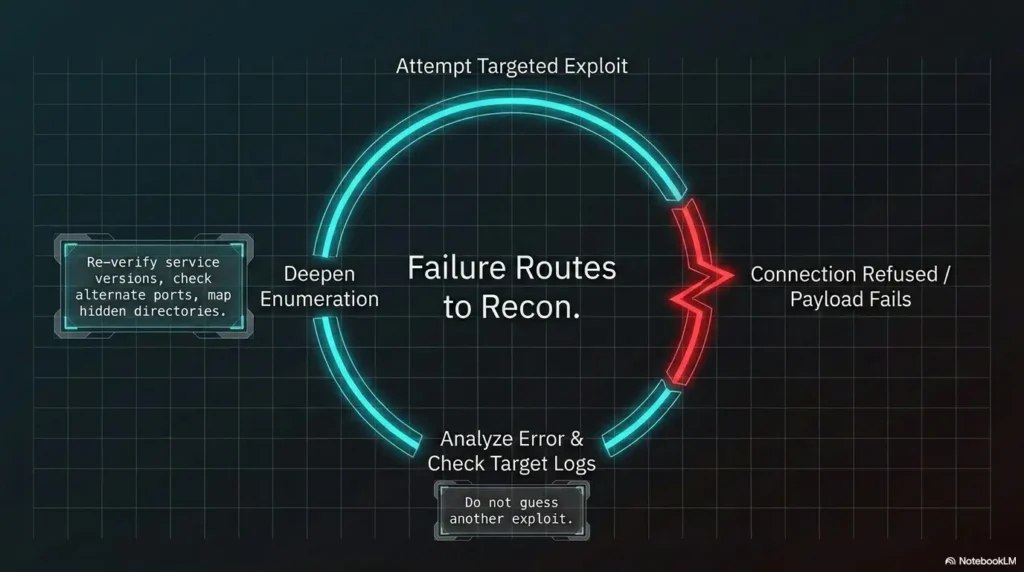
Exploitation as a Learning Checkpoint, Not a Firework Show
Exploitation in a legal lab is not the moment you become interesting. It is the moment your earlier reasoning gets tested. If your notes were loose, this stage becomes noisy. If your notes were clear, each attempt becomes a small experiment.
That shift matters. You are not trying random tricks until one works. You are checking whether a specific hypothesis is true.
Treat each attempt as a hypothesis test
Before an exploitation attempt in your lab, write one sentence: “I think this may work because…” Then write one sentence after: “The result suggests…” This tiny habit can transform a messy session into a useful learning record.
If the attempt fails, you have not wasted the session. You have learned that your assumption needs revision, your setup may be wrong, or the clue is not as strong as it looked.
Write down what changed
After each attempt, record what changed on your side and on the target side. Did a page respond differently? Did a connection open? Did an error message change? Did a file appear? Did nothing happen?
“Nothing happened” is still a result. It may mean the target is patched, the service is not vulnerable, the exploit assumptions are wrong, your syntax is wrong, your network is wrong, or your mental model is wrong. Your notes should help you sort those possibilities.
Key takeaway
The best beginner exploitation note is not “worked” or “failed.” It is “what I expected, what happened, and what I will change next.”
Stop when results do not match the story
When the result does not match your assumption, stop. Do not stack five more commands on top of confusion. That is how beginners create a swamp and then blame the boots.
Return to the previous confirmed finding. Ask whether the service was identified correctly. Ask whether the vulnerability applies. Ask whether the lab network is still functioning. Ask whether the exploit required a condition you skipped.
Did the machine change, or did your story change?
Pattern interrupt: after a surprising result, ask whether the machine changed or your story changed. Did your action alter the target, or did new evidence simply reveal that your earlier assumption was weak?
This question is quietly powerful. It keeps you from forcing the lab to fit your favorite theory. In security work, humility is not decorative. It is operational.
Privilege Escalation Is Only Halftime
Getting an initial foothold in a lab can feel like the end of the story. In many Kioptrix-style learning paths, it is only halftime. Now you need to understand the local system, permissions, users, processes, services, and misconfigurations.
Privilege escalation teaches a different kind of attention. External recon asks, “What is exposed?” Local enumeration asks, “What can this user see, touch, run, write, or influence?”
Inventory users, permissions, and processes
Once inside a legal lab machine, slow down again. Identify the current user, basic system information, interesting files, permissions, running processes, local services, scheduled tasks, and writable locations.
Do not immediately hunt exotic techniques. Many beginner lab paths rely on ordinary misconfigurations, weak permissions, outdated kernels, exposed credentials, or simple administrative mistakes.
Look for misconfigurations before exotic techniques
Misconfigurations are the bread and butter of learning. They are also easier to explain in a write-up. A beginner who understands why a permission is risky is building stronger foundations than a beginner who memorizes a flashy technique without context.
Ask plain questions. Can this user run anything with higher privileges? Are there writable paths connected to privileged behavior? Are credentials stored where they should not be? Are old services running locally? Are file permissions too generous?
Privilege escalation evidence tracker
- Current user and group membership
- Operating system and kernel clues
- Writable directories and unusual permissions
- Interesting configuration files
- Local services and processes
- Any credential-like material found during authorized lab review
- Every escalation idea tested and its result
Track evidence before escalation paths
Privilege escalation becomes chaotic when you collect techniques before evidence. Instead, let evidence suggest the path. If you see a permission issue, research that class of issue. If you see a version clue, verify relevance. If you see a credential, document where it came from and what it can access in the lab.
This prepares you for better reporting later. A clean report says more than “I got root.” It explains the weakness, evidence, impact, and remediation idea in plain language.
Why “got a shell” is only halftime
An initial shell is access, not understanding. The second half is learning what that access means. What can the user do? What can they not do? What local weakness made escalation possible? What would a defender need to fix?
If you want to strengthen this stage, a focused guide such as Kioptrix privilege escalation patterns can help you organize local enumeration without turning the session into a command avalanche.
Common Mistakes That Keep Beginners Stuck
Most beginner Kioptrix problems are not caused by lack of intelligence. They are caused by small habits that compound: poor notes, skipped assumptions, too many changes, early walkthroughs, and tool worship.
The good news is that habits are adjustable. You do not need a new personality. You need a better loop.
Mistake 1: skipping notes because “I’ll remember”
You will remember the excitement and forget the sequence. Write notes as you go. Short notes are fine. Messy notes are fine. Missing notes are expensive.
Use timestamps if you tend to wander. Add screenshots with names that mean something. “scan-result-web-service” beats “Screenshot 47” every time.
Mistake 2: treating tools as answers
Tools are instruments. They extend your observation, but they do not replace judgment. A scanner can suggest possibilities. It cannot understand your lab goal, your ethical boundary, or your reasoning quality.
When a tool gives output, translate it into plain English. If you cannot translate it yet, that is your next study task.
Mistake 3: changing too many things at once
Beginners often change network settings, tool options, target assumptions, and exploit choices all in the same minute. Then they cannot tell what caused the new result.
Change one thing at a time. Record it. Test again. This may feel slow, but it prevents the dreaded “somehow it works now” outcome, which is secretly another form of confusion.
Mistake 4: reading walkthroughs too early
Walkthroughs are useful after you have struggled productively. They are less useful when they become your steering wheel. If you read too early, you may borrow someone else’s reasoning before building your own.
Try a timebox. Work for 60 to 90 minutes. Write your current hypothesis. Then, if truly stuck, read only enough of a hint to identify the next concept. Close the walkthrough and return to your notes.
Key takeaway
A hint should restore your thinking, not replace it. Read enough to get unstuck, then make your own next decision.
Mistake checklist
| Mistake | Symptom | Fix |
|---|---|---|
| No notes | You cannot repeat your own path | Write one line per result |
| Tool worship | You trust output you cannot explain | Translate findings into plain English |
| Too many changes | Results become impossible to interpret | Change one variable at a time |
| Early walkthrough | You finish but cannot explain | Use hints after a timed attempt |
When to Seek Help or Stop
Good learners ask for help. Careful learners also know when to stop. In cybersecurity practice, stopping can be a professional skill, not a sign of weakness.
You should seek help when the blocker is conceptual, environmental, or safety-related. You should stop immediately if you realize your testing has moved outside your authorized lab.
Ask for help when lab networking blocks you
If the attacker VM and target VM cannot communicate, do not spend four hours randomly flipping adapters. Ask for help with the exact setup: virtualization tool, network mode, host operating system, target machine, attacker machine, and what you already tried.
Clear setup questions get better answers. “It doesn’t work” gives helpers fog. “Both VMs are on host-only network X, attacker has this private IP, target does not appear during discovery” gives them a flashlight.
Get guidance when output has no meaning yet
If you cannot explain what a tool result means, ask a concept question before asking for the next command. For example, “What does this type of service usually do?” is often better than “What exploit should I run?”
Beginner-friendly communities, study groups, and lab-focused forums can help, especially when you show your notes and describe your reasoning. Avoid asking people to solve the box for you. Ask them to help you understand the clue.
For a more general professional frame, the NIST Cybersecurity Framework can help beginners see that security work is not only exploitation. It includes identifying, protecting, detecting, responding, and recovering.
Stop if you leave the authorized lab
If you discover that your commands are touching a public IP, a school network, a workplace system, a neighbor’s device, or anything outside your own lab, stop immediately. Do not keep testing “just to see.”
Reset your network boundary. Review your notes. Confirm the lab target. When in doubt, ask a qualified instructor or mentor before continuing.
Help request template
- “I am practicing inside my local Kioptrix lab.”
- “My attacker VM is using this network mode.”
- “My target VM is using this network mode.”
- “I expected this result.”
- “I actually got this result.”
- “Here are the two things I already checked.”
- “Can you help me understand the concept or next diagnostic step?”
For broader safety guidance aimed at people and organizations, CISA offers accessible cybersecurity resources that can help beginners connect lab learning to responsible defensive habits.
FAQ
Is Kioptrix still good for beginners?
Yes, Kioptrix can still be useful for beginners when treated as a process lab. It is best for learning recon, enumeration, note-taking, basic vulnerability research, and careful testing inside an authorized environment.
Do I need Kali Linux to practice Kioptrix?
You do not strictly need Kali, but many beginners use it because common security tools are already available. The bigger issue is understanding your tools, network setup, and lab boundaries.
Is Kioptrix legal to use?
Kioptrix is intended for legal lab practice when you download and run it in your own authorized environment. It is not permission to scan or test public, school, workplace, or third-party systems.
Which Kioptrix level should beginners start with?
Most beginners should start with the earliest Kioptrix level and focus on documenting the process rather than finishing quickly. If you need a broad overview, a guide to Kioptrix levels can help you choose a reasonable path.
What should I know before trying Kioptrix?
You should understand basic IP addressing, ports, virtual machines, Linux navigation, web requests, and the idea of authorized scope. You can learn while practicing, but total fog makes the session frustrating.
Should I use walkthroughs while learning Kioptrix?
Use walkthroughs as hints after a real attempt, not as a script from the beginning. Read enough to understand the next concept, then return to your own notes and reasoning.
How long should a beginner spend on one Kioptrix machine?
A beginner can spend several short sessions on one machine. A useful session may last 60 to 90 minutes and focus on one goal, such as mapping services, researching one clue, or writing a clean summary.
What should I write in my Kioptrix notes?
Record the machine name, lab setup, target IP, services found, clues, hypotheses, tests, results, screenshots, dead ends, and final lessons. Write enough that you can repeat your path a week later.
Run One Clean Practice Session Today
The next step is not to master Kioptrix. The next step is to run one clean practice session. Set a timer for 90 minutes. Choose one authorized Kioptrix lab machine. Write down your scope. Confirm your network. Find the target. Map the services. Stop before the session becomes soup.
Your goal is not a heroic finish. Your goal is a repeatable beginning. That is how beginners become steady: one bounded session, one clear note, one better question.
15-minute next step
- Create a new note titled with the machine name and date.
- Write one sentence defining your lab-only scope.
- Record your VM network mode and attacker IP.
- Find the target IP inside the lab.
- List open services without researching exploits yet.
- End with three lines: what worked, what failed, what to test next.
If you do only that, you have already practiced the core habit: turning uncertainty into organized evidence. The hype can wait outside. Inside the lab, the notebook gets the first chair.
Last reviewed: 2026-06