Open the practical working record to connect this guide to your scope, evidence and next decision.
Find the first failing audio component
Check host output and VM audio settings, then the guest device and active audio service. Dummy Output is a symptom with multiple possible causes, not a unique diagnosis. Preserve configuration and change one relevant setting at a time. Do not purge broad package groups merely to make the symptom disappear. Reference and scope.
VirtualBox Audio Recovery Guide
Kali VirtualBox No Sound After Update:A Step-by-Step Fix Guide
Separate host audio, virtual hardware and guest services before reinstalling packages.
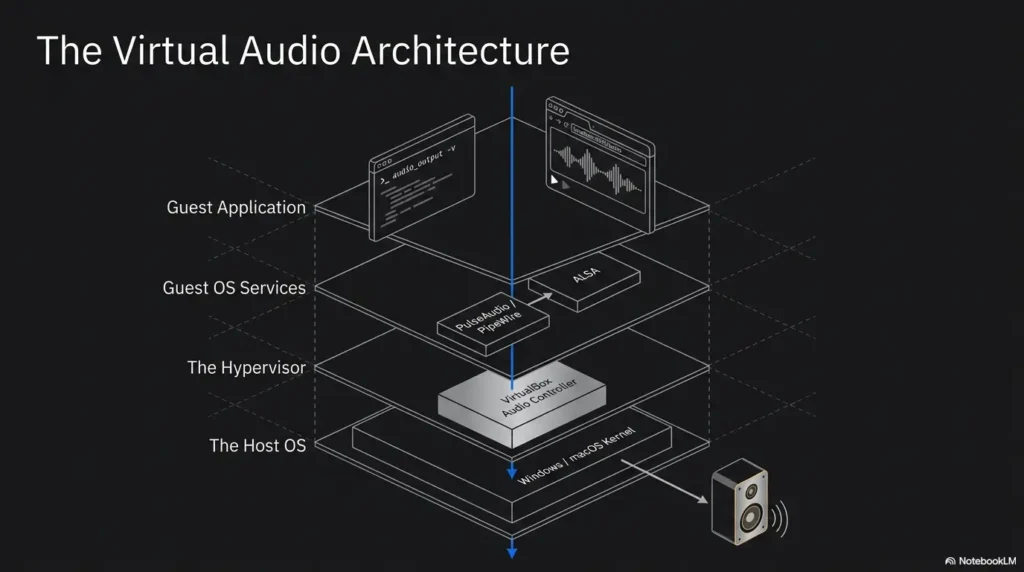
This usually does not mean your virtual machine is ruined. Audio in a Kali VirtualBox guest passes through several layers: the host operating system, VirtualBox’s emulated controller, the Linux kernel, ALSA, PipeWire or PulseAudio, the active output profile, and finally the application. One quiet layer silences the entire chain.
The safest repair strategy is therefore diagnostic rather than dramatic. You will test one layer at a time, stop when sound returns, and avoid turning a small configuration fault into an evening-long reinstall.
Find the broken layer
Separate VirtualBox hardware, Linux detection, and user-session problems.
Use current commands
Check PipeWire, WirePlumber, ALSA, and legacy PulseAudio without mixing fixes blindly.
Protect the VM
Make reversible changes and preserve your Kali tools, notes, and lab configuration.
Best first move: fully power off the VM, verify one audio controller, and test detection before reinstalling anything. 🔊
Snapshot
This guide is for: U.S. or UK Kali Linux users running Kali as a VirtualBox guest on Windows, macOS, or Linux. It helps you identify whether post-update silence comes from VirtualBox settings, missing virtual hardware, PipeWire services, an incorrect output profile, damaged packages, or a kernel regression. By the end, you will have a clear repair branch rather than a pile of unrelated terminal commands.
Table of Contents
Before you change the audio stack
Finish or save active work, close running scans, and create a VirtualBox snapshot before package repairs or configuration resets. Discarding a saved state can erase the VM’s unsaved session, while deleting configuration directories without a backup can remove useful custom settings. This guide uses cautious, reversible steps, but no generic troubleshooting article can account for every host, desktop environment, or third-party repository.

Confirm the Failure Before Changing Anything
Start by proving that you have a system-wide audio failure. A silent browser tab, a muted website, or a disconnected Bluetooth headset can imitate a broken Kali audio stack rather convincingly.
Test system audio, browser audio, and headphones separately
Open Kali’s sound settings and confirm that the output volume is above zero. Then play a local sound test rather than relying only on YouTube or another browser-based source.
speaker-test -c 2 -t wavYou should hear alternating front-left and front-right test audio. Stop the command with Ctrl+C.
If the terminal test works but a browser does not, inspect the browser tab, site permissions, per-application volume, and selected playback stream. If neither works, continue down the system troubleshooting path.
Check for a real device or “Dummy Output”
Dummy Output is not simply another speaker choice. It usually means the desktop audio layer has no usable sink to present. The reason may be missing virtual hardware, a failed kernel driver, a stopped audio service, or a profile that never activated.
- A named VirtualBox or analog output appears: focus on profiles, defaults, mute states, and application routing.
- Only Dummy Output appears: check hardware detection and PipeWire services first.
- No sound panel devices appear at all: investigate the user-session audio services and package state.
- Sound works through one output but not another: the core audio stack is probably healthy.
Record what changed before the silence began
Write down whether you recently updated Kali packages, installed a new kernel, upgraded VirtualBox on the host, resumed an old saved state, changed desktop environments, or modified audio packages. This is not paperwork for paperwork’s sake. It narrows your rollback options later.
Before deeper repairs, create a snapshot using your normal VirtualBox workflow. The site’s VirtualBox snapshot strategy for security labs can help you separate clean recovery points from disposable test states.
Key takeaway
Do not begin with package removal. First determine whether the failure affects one app, one output, the desktop audio service, or the virtual sound card itself.
The VirtualBox Audio Setting That Quietly Resets
VirtualBox must expose an emulated sound card before Kali can load a driver for it. If that virtual device is disabled, no amount of PipeWire restarting inside Kali will create one.
Power off the VM instead of saving its state
Shut Kali down from its desktop or terminal, then verify that VirtualBox shows the machine as Powered Off. Do not leave it in a saved or suspended state while changing virtual hardware.
A saved state preserves much of the VM’s running hardware context. Correcting the audio settings while repeatedly resuming that state can leave you testing yesterday’s broken device arrangement in today’s settings window.
If the VM is already saved, use VirtualBox’s option to discard the saved state only after confirming that no unsaved work matters. This does not delete the virtual disk, but it does remove the suspended session.
Confirm Enable Audio and Enable Audio Output
- Select the powered-off Kali VM in VirtualBox.
- Open Settings, then Audio.
- Turn on Enable Audio.
- Confirm that audio output is enabled.
- Leave the host audio driver on its default or automatically selected option for the first test.
The Audio settings determine whether the guest sees a sound card and whether its output is passed to the host. VirtualBox supports several emulated controllers, although the options shown can vary by release and host platform.
Compare Intel HD Audio, ICH AC97, and SoundBlaster 16
| Controller | When to try it | What to watch |
|---|---|---|
| Intel HD Audio | A sensible first choice for a current Kali Linux guest | Confirm that lspci and aplay -l detect it after a cold boot |
| ICH AC97 | A compatibility test when Intel HD Audio is not detected or behaves poorly | Older emulation may require a different guest driver path |
| SoundBlaster 16 | Primarily for older or specialized guest operating systems | Usually not the first choice for a modern Kali desktop |
Change only one controller at a time. Fully boot Kali, run the detection commands in the next section, and record the result before trying another controller. Rapid controller roulette creates noise in your notes without producing useful evidence.
For a broader lab-platform comparison, see how to choose a hypervisor for a Kioptrix lab. Switching hypervisors should be a considered lab decision, not the first reaction to one silent VM.
Check Whether Kali Can See the Virtual Sound Card
Once VirtualBox is configured, move inside Kali and test the lower half of the chain. These commands tell you whether the virtual PCI device exists and whether ALSA has created playback hardware for it.
Run the three-command audio check
lspci -nnk | grep -A3 -i audio
aplay -l
cat /proc/asound/cards
The first command asks the PCI layer whether VirtualBox exposed an audio controller. The second asks ALSA for playback devices. The third provides a compact list of sound cards registered by the kernel.
Read the result before choosing a fix
| What you see | Likely failure layer | Next move |
|---|---|---|
No audio controller in lspci | VirtualBox virtual hardware | Power off, recheck Enable Audio and controller selection |
Controller in lspci, no card in aplay -l | Kernel driver or ALSA detection | Check driver binding, kernel logs, and an older kernel |
Card listed in aplay -l, Dummy Output in desktop | PipeWire, WirePlumber, or profile | Restart user services and inspect wpctl status |
| Card and output both listed, still silent | Mute, routing, host mixer, or application | Inspect profiles, ALSA channels, and host volume controls |
Check the bound driver and recent kernel messages
The -k option in the first command should show a kernel driver in use. Depending on the emulated controller, you may see a driver associated with Intel HDA or AC97 audio.
sudo dmesg | grep -iE 'snd|audio|hda|ac97' | tail -n 50Look for repeated probe failures, missing modules, device initialization errors, or messages that appeared during the current boot. A single harmless warning is not a verdict. Repeated failures tied to the detected controller carry more weight.
Key takeaway
If lspci cannot see audio, stay in VirtualBox settings. If ALSA sees the card, stop changing controllers and move upward to PipeWire and output profiles.
PipeWire or PulseAudio? Identify What Is Running
Many outdated fixes assume every Kali desktop still runs a standalone PulseAudio daemon. Current Kali XFCE and GNOME installations generally use PipeWire with pipewire-pulse providing PulseAudio compatibility. Kali’s KDE setup may differ, so inspection beats assumption. Kali’s own guidance warns against removing pipewire-pulse from a PipeWire-based installation.
Identify the active audio stack
pactl info | grep -E 'Server Name|Server String'
wpctl status
systemctl --user status pipewire pipewire-pulse wireplumber --no-pager
If pactl reports a PipeWire-backed PulseAudio server and wpctl status displays devices, sinks, and streams, you are working with the PipeWire stack. If the service names are missing but PulseAudio is clearly running, use the PulseAudio branch instead of forcing PipeWire commands onto it.
Restart PipeWire and WirePlumber safely
Run these commands as your normal desktop user. Do not add sudo, because these are user-session services.
systemctl --user restart pipewire pipewire-pulse wireplumber
systemctl --user status pipewire pipewire-pulse wireplumber --no-pager
wpctl status
If WirePlumber is installed but disabled, enable it for the current user session:
systemctl --user --now enable wireplumberWirePlumber’s official documentation describes it as a user-session service and documents the same enablement pattern.
Read failed service logs instead of restarting forever
journalctl --user -u pipewire -u pipewire-pulse -u wireplumber -b --no-pager | tail -n 120Errors involving configuration parsing, missing libraries, permission failures, repeated crashes, or conflicting session managers point toward package or user-configuration repair. A service that is active and stable shifts attention to device profiles and routing.
Show me the nerdy details
ALSA sits close to the kernel and exposes the detected playback hardware. PipeWire manages audio nodes and streams above that hardware. WirePlumber acts as the policy and session manager, deciding which devices and profiles should become active. The pipewire-pulse service accepts requests from software written for the PulseAudio protocol.
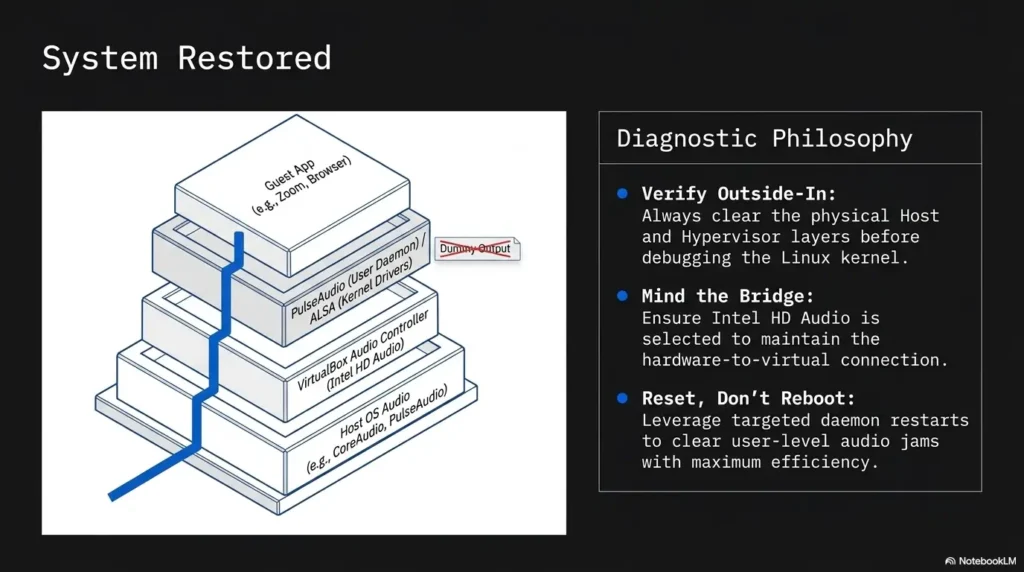
That is why aplay -l can show a healthy card while the desktop still displays Dummy Output. The kernel and ALSA may be fine, while the session manager has failed to publish a usable sink.
Fix the Output Profile, Default Device, and Volume
A detected card can remain silent when its profile is set to Off, the wrong output becomes the default, or an ALSA channel is muted beneath the desktop volume slider.
Find the device, sink, and current default
wpctl statusUnder Audio, look for devices and sinks. An asterisk usually marks the current default. If a virtual analog output is listed but another sink is selected, note the desired sink ID and set it as default:
wpctl set-default SINK_ID
wpctl set-volume @DEFAULT_AUDIO_SINK@ 70%
wpctl set-mute @DEFAULT_AUDIO_SINK@ 0
Replace SINK_ID with the numeric ID shown on your machine. Do not copy an ID from somebody else’s screenshot, because PipeWire object numbers are session-specific.
Change an Off profile to Analog Stereo Output
Open Kali’s sound settings or install a graphical PulseAudio-compatible control panel if your desktop does not expose profile controls clearly:
sudo apt update
sudo apt install pavucontrol
pavucontrol- In Configuration, find the VirtualBox audio card.
- Change Off to an analog stereo output profile.
- In Output Devices, select the correct port and unmute it.
- In Playback, confirm that the test application is routed to that output.
If HDMI, a disconnected headset, or another remembered device became the default, route the playing application back to the virtual analog output.
Unmute Master, Speaker, and PCM in ALSA
alsamixerPress F6 to choose the VirtualBox sound card if several devices appear. Move through Master, Speaker, Headphone, Front, and PCM channels with the arrow keys. A channel marked MM is muted; press M to unmute it. Increase levels cautiously rather than pushing everything to maximum.
Illustrative example: the card exists, but the profile is asleep
A Kali user updates the guest, reboots, and finds Dummy Output. VirtualBox audio is enabled, lspci shows an Intel audio controller, and aplay -l lists one playback card. That evidence clears VirtualBox and the kernel.
systemctl --user status shows all three PipeWire services running, but wpctl status has no active analog sink. In pavucontrol, the card profile is set to Off.
Changing it to Analog Stereo Output immediately creates a sink. The browser begins playing sound without a reboot, package reinstall, or controller change.
The practical lesson is simple: hardware detection tells you which repairs you can stop considering.
Key takeaway
When ALSA lists the card and PipeWire services are active, inspect the card profile, default sink, per-application route, and ALSA mute state before touching packages.
Repair Kali Audio Packages Without Rebuilding the VM
Package repair belongs after settings, detection, services, and profiles. It is useful when an upgrade was interrupted, dependencies remain unfinished, service binaries are missing, or logs show configuration and library failures.
Finish an interrupted Kali upgrade
sudo apt update
sudo dpkg --configure -a
sudo apt --fix-broken install
sudo apt full-upgrade
Read the proposed package changes before confirming them, especially if you use third-party repositories or have pinned packages. A surprisingly large removal list is a reason to stop and inspect your repository configuration.
Restore the standard PipeWire audio package set
Kali’s official troubleshooting guidance recommends installing the pipewire-audio metapackage when a PipeWire transition or upgrade leaves sound incomplete.
sudo apt install --mark-auto pipewire-audio
sudo apt install --reinstall pipewire pipewire-pulse wireplumber pipewire-alsa alsa-utils
Restart the user services after installation, then reboot once if package scripts, kernel modules, or session components require a clean login.
systemctl --user restart pipewire pipewire-pulse wireplumber
sudo reboot
Reset corrupted user configuration without deleting it
Local PipeWire or WirePlumber overrides can survive package reinstallations. Rename them rather than erasing them so you have a rollback path. Run only the lines for directories that exist. The GNU mv -T -i options prevent nesting inside an existing backup directory and ask before replacing it; if a backup already exists, decline replacement and choose a new backup name. Check each result before logging out.
mv -T -i ~/.config/pipewire ~/.config/pipewire.backup
mv -T -i ~/.config/wireplumber ~/.config/wireplumber.backup
mv -T -i ~/.local/state/wireplumber ~/.local/state/wireplumber.backup
Log out and back in, or reboot, so the audio stack creates fresh defaults. If this fixes the problem, compare your backup files with the new configuration before restoring any custom rule.
Skip bare-metal firmware fixes unless the VM truly needs them
Firmware packages for a physical Intel laptop sound device are usually irrelevant to an emulated VirtualBox controller. Kali’s documentation distinguishes Intel SOF firmware advice as a bare-metal scenario. Installing unrelated firmware may not break anything, but it also does not repair a virtual card that VirtualBox failed to expose.
A methodical Kali setup makes package problems easier to isolate. The Kali lab setup checklist provides a useful baseline for repositories, updates, snapshots, and testing habits.
Test Kernel, Guest Additions, and Host-Side Clues
If the correct virtual controller appears but ALSA cannot create a card, or audio returns only under a previous boot, the kernel becomes a serious suspect. If another VM is also silent, step outside Kali and inspect the host.
Boot the last working Kali kernel before removing anything
uname -r
dpkg -l 'linux-image*' | grep '^ii'
Record the current kernel. Reboot and open the GRUB advanced options menu, then select an older installed kernel for one controlled test.
- Audio works on the older kernel: preserve both kernels and investigate a regression or module change.
- Audio fails on both: return to VirtualBox, packages, profiles, and host checks.
- The controller vanishes only on the new kernel: collect
dmesgand journal output before reporting the issue.
Do not purge the new kernel merely because one test points toward it. Keeping a bootable fallback is more useful than immediately narrowing your escape route.
Understand what Guest Additions does and does not control
Guest Additions improves integration features such as display resizing, shared clipboard behavior, shared folders, and pointer handling. Ordinary virtual audio output is primarily delivered through VirtualBox’s emulated sound hardware and the guest’s audio drivers.
lsmod | grep -E 'vboxguest|vboxsf|vboxvideo'It is still worth checking Guest Additions after a kernel update because mismatched integration modules may signal a wider VM update problem. Just do not assume reinstalling Guest Additions is the universal audio cure.
Run five host-side checks
- Play audio directly on the Windows, macOS, or Linux host.
- Open the host volume mixer and confirm that VirtualBox is not muted.
- Close audio-production, meeting, remote-desktop, or communication apps that may hold an output device exclusively.
- Cold-boot another VM and test its audio.
- Update VirtualBox carefully and keep the Extension Pack on the same version if you use it.
The Extension Pack is not normally required for basic guest audio. Version matching is general VirtualBox housekeeping, not a reason to purchase or install an add-on solely to fix speakers.
Compare with a temporary VM or live session
A small temporary Linux VM can answer an expensive question quickly: is the problem specific to your Kali installation, or does VirtualBox audio fail across the host?
| Comparison result | What it suggests |
|---|---|
| Temporary VM has sound | Your Kali guest configuration, packages, or kernel need attention |
| Every VM is silent | VirtualBox installation, host driver, host mixer, or exclusive-device access |
| Only saved-state VMs are silent | Discard saved state and cold-boot before deeper repair |
| Older Kali kernel works | Possible kernel or module regression inside the guest |
Key takeaway
One comparison VM can separate a guest repair from a host repair faster than another hour of random package commands.
Avoid the Fixes That Waste Time and Money
Most Kali VirtualBox sound failures can be diagnosed with built-in commands and reversible configuration changes. Paid tools or professional support become reasonable only when the problem affects essential work, multiple VMs, complex host audio hardware, or a managed environment.
Common mistakes that turn silence into a rebuild
- Changing three audio controllers without testing detection after each change.
- Removing
pipewire-pulsebecause an old forum answer says it conflicts with PulseAudio. - Running
systemctl --user,pavucontrol, or desktop audio tools withsudo. - Deleting the virtual disk instead of discarding a saved state.
- Reinstalling Kali before checking the host volume mixer.
- Installing physical-device firmware for a problem involving an emulated VirtualBox sound card.
- Removing every older kernel before testing whether one still provides working audio.
- Assuming silence means Guest Additions must be reinstalled.
Free troubleshooting versus paid help
| Approach | Best for | What you spend | Decision rule |
|---|---|---|---|
| Built-in diagnostics | One personal Kali VM with a recent update | Your time | Start here in nearly every case |
| Fresh test VM | Separating host and guest faults | Disk space and setup time | Worth doing before reinstalling the main VM |
| Alternative host audio device | Host jack, Bluetooth, or interface-specific failures | Low to moderate hardware cost | Buy only after confirming the host device is the failed layer |
| Professional remote support | Managed labs, business systems, accessibility needs, or repeated failures | Service fee | Consider when downtime costs more than diagnosis |
| Different hypervisor | Recurring compatibility problems across several guest features | Migration time, possible license or support cost | Compare the whole lab workflow, not audio alone |
What to ask before paying for technical support
- Does the provider support your exact host OS, VirtualBox release, and Kali desktop?
- Will they work from logs and snapshots rather than immediately reinstalling the VM?
- Can they explain what data or remote access they require?
- Will the session produce a written list of changes and rollback steps?
- Do they understand that your VM may contain sensitive lab notes, captures, or credentials?
- Is the quoted fee capped, hourly, or tied to a defined troubleshooting outcome?
For a wider troubleshooting discipline, the Kioptrix troubleshooting guide explains how to preserve evidence, narrow variables, and avoid circular testing.
Use This Clean Troubleshooting Order
The audio chain is easier to repair when you move from the outside inward, then from the hardware layer upward. The following order prevents you from repairing software that never received a virtual device in the first place.
The Seven-Layer Sound Recovery Flow
1. Cold power-off
Do not resume the same saved hardware state.
2. VirtualBox settings
Enable audio and test one controller.
3. PCI and ALSA
Use lspci, aplay, and proc card data.
4. User services
Inspect PipeWire, pipewire-pulse, and WirePlumber.
5. Profile and route
Activate analog output, set default, and unmute.
6. Packages and kernel
Repair only after collecting evidence.
7. Comparison test
Use another VM or older kernel to isolate the fault.
Stopping rule: once sound returns, document the successful change and stop modifying the stack.
The practical runbook
- Save your work and create a snapshot.
- Shut Kali down until VirtualBox reports Powered Off.
- Enable audio output and select one controller.
- Boot Kali and run
lspci,aplay -l, andcat /proc/asound/cards. - If hardware exists, inspect and restart the active user audio services.
- Use
wpctl status, sound settings,pavucontrol, andalsamixerto correct routing and mute states. - Finish incomplete package operations and restore the standard audio package set only when evidence supports it.
- Test an older kernel if detection changed after a kernel update.
- Test another VM to isolate the host from the guest.
- Stop after the first confirmed fix and record it.
Keep a one-screen recovery record
Copy this template into your lab notes. A short record prevents future troubleshooting from starting at zero.
Host OS:
VirtualBox version:
Kali desktop:
Current kernel:
VM state before test:
Audio controller:
lspci result:
aplay -l result:
Audio server:
Failed service:
Working output profile:
Change that restored sound:
Snapshot name:
The same evidence-first habit is useful beyond audio. For network failures, the Kali Linux DNS troubleshooting guide follows a similar path from symptom to layer-specific test.
FAQ: Kali VirtualBox Sound Problems After an Update
Why does Kali show Dummy Output in VirtualBox?
Dummy Output means the desktop audio system has not published a usable playback sink. Check whether VirtualBox exposes a controller with lspci, whether ALSA detects it with aplay -l, and whether PipeWire and WirePlumber are active. The result determines whether you should repair virtual hardware, a kernel driver, or the user-session audio layer.
Which VirtualBox audio controller works best with Kali Linux?
Intel HD Audio is a reasonable first test for a current Kali guest. ICH AC97 can be used as a compatibility alternative. SoundBlaster 16 is mainly a legacy option. The useful answer is the controller that appears in both lspci and aplay -l and produces stable output on your host.
How do I restart PipeWire audio in Kali?
Run systemctl --user restart pipewire pipewire-pulse wireplumber as your normal desktop user. Then inspect the services with systemctl --user status and run wpctl status. Do not prefix user-session service commands with sudo.
Can a Kali kernel update break VirtualBox sound?
Yes, a new kernel or module combination can change device detection or expose a regression. Boot an older installed kernel from GRUB for a controlled comparison. If audio returns, keep the working kernel available and collect logs from both boots before changing packages.
Do I need VirtualBox Guest Additions for audio?
Basic audio normally depends on the emulated sound controller and Linux audio drivers rather than Guest Additions. Guest Additions may still deserve attention after a kernel update because mismatched modules indicate a broader integration issue, but reinstalling it is not the first audio fix.
Why is the virtual sound card detected but still silent?
The card may have an Off profile, the wrong sink may be default, a playback stream may be routed elsewhere, or ALSA may have muted Master or PCM. Check wpctl status, pavucontrol, and alsamixer before reinstalling packages.
Should I reinstall PulseAudio on a current Kali installation?
Not automatically. First use pactl info and service status commands to identify the stack. XFCE and GNOME installations commonly use PipeWire with pipewire-pulse compatibility, while another desktop or older installation may differ. Removing compatibility packages blindly can make the audio system less complete.
Why does sound work in one VirtualBox VM but not another?
The silent VM may use a different controller, saved state, kernel, audio server, profile, or local configuration. The working VM proves that the host and VirtualBox installation can produce sound, so compare the two guests rather than changing the host first.
Can I fix Kali audio without reinstalling the virtual machine?
Usually, yes. A full power-off, controller check, service restart, profile correction, package repair, or older-kernel test resolves many post-update failures. Reinstallation should follow evidence that the guest is broadly damaged, not one missing sound output.
Your 15-Minute Next Step
Do not begin with a reinstall. Fully power off the Kali VM, verify that VirtualBox audio output is enabled, choose one controller, and cold-boot the guest.
Then run this compact diagnostic set:
lspci -nnk | grep -A3 -i audio
aplay -l
pactl info | grep -E 'Server Name|Server String'
systemctl --user status pipewire pipewire-pulse wireplumber --no-pager
wpctl status
If no PCI audio device appears, return to VirtualBox settings. If PCI audio appears but ALSA has no card, test the driver and previous kernel. If ALSA lists the card but the desktop remains silent, restart the user services and correct the profile, default sink, and mute state.
Finally, play one browser video or run speaker-test. When sound returns, stop. Write down the successful change beside the snapshot name. That small note is the breadcrumb that turns the next update from a maze into a five-minute repair.
Last reviewed: 2026-08
Technical guidance updated: 2026-10-13. Restored separate executable command lines, made configuration backups collision-aware, removed stray citation markers, and repaired table-of-contents navigation.
If the default sink changed but one app is still silent
In wpctl set-default SINK_ID, replace SINK_ID with the current playback node ID from wpctl status; do not type the placeholder or reuse an ID from another machine. IDs can change after a restart.
The default targets new streams that need automatic connection. If an existing browser stream stays silent, inspect its playback routing in pavucontrol or restart that application’s playback before resetting the whole audio stack. See the packaged wpctl manual for command behavior.
Run user-session commands as the logged-in desktop user. Adding sudo to systemctl --user can address the wrong user manager. Also check the Kali audio troubleshooting note before removing pipewire-pulse. No audio reproduction test on your VM was performed for this article.
Editorial review: 16 October 2026. Examples are illustrative; this review does not represent an audit or live control test.
Kali VM audio path test card
Use this when: you are a learner diagnosing sound in a specific virtual machine. Copy these fields into your notes and replace each prompt with a dated response. Keep assumptions and unresolved questions visible.
Edit here, then select and copy the text to your own notes before leaving. This field has no submission or storage function; reloading resets it. Do not enter passwords, tokens or private client information. The 12,000-character limit applies to this working note.
Next action: Find the first failing component before reinstalling unrelated packages. Mark the relevant row confirmed, provisional or unresolved. Keep the supporting record, responsible person and next check beside it so another reader can continue the work without treating an assumption as a result.
This is a blank practice record, not a report of a test performed by Kioptrix. Add the actual versions, approved conditions and observations from your own session.
Worksheet change record — October 20, 2026
Added this kali vm audio path test card with four article-specific fields and an evidence-based next action. Existing source notes retain their own review dates. This addition is not a fresh verification of every statement or a newly executed test.
Audio routing: test the same source and destination
Illustrative example — not a performed lab test.
- Observation
- A host plays a local sample; the guest sees an audio device, but one browser tab remains silent.
- Supported interpretation
- Host playback and guest device visibility passed their narrow checks.
- Still unresolved
- Whether the browser is muted, routed to another sink or affected by the media itself.
- Next authorized check
- Use the same harmless sample in a second guest application. Record the selected sink and application mute state before changing virtual hardware. A second-app success narrows the investigation to the first application path.
Practice-aid update: October 20, 2026. Added the illustrative decision case and editable note. No new VM execution or full-article revalidation is claimed.