Top 10 Proving Grounds Machines by Skill Impact : Brutal Lessons I Learned Before My First OSCP Attempt
The Night I Nearly Quit Hacking (and What I Wish I Knew About Proving Grounds)
The night I rage-quit my first OffSec Proving Grounds box, I genuinely started googling “maybe I’m not cut out for hacking.” Six hours in, zero shells, a lukewarm cup of coffee gone cold — and my self-confidence circling the drain. That box chewed me up and spit me back out with my VPN still running. If that kind of existential spiral rings a bell, trust me: this guide’s for you.
Over the next few minutes, I’ll walk you through 10 specific PG machines that actually move the needle for OSCP prep — the kind of boxes that sharpen the skills OffSec graders actually care about: methodical enumeration, privilege escalation, buffer overflows, and solid, report-worthy methodology.
I’ll be straight with you — I faceplanted hard on some of these. Like, “why is nothing working and how did I end up on page 12 of a Bulgarian forum about Linux kernels” hard. But I also figured out what finally did work — and how to turn each of these machines into something way more useful than just another Saturday of command-line despair.
Here’s the deal: you’re probably balancing a full-time job, maybe a tight training budget, and staring down a 24-hour exam that feels more like a psychological thriller than a certification. I get it. That was me too.
So let’s make it simple. I’ll show you:
- Which Proving Grounds machines are worth your time (and which ones I wouldn’t touch again even with a metasploit payload)
- How to tackle them in manageable 60-minute chunks without losing your sanity
- And how to avoid the expensive mistakes I made before even scheduling my OSCP
Because the truth is, the exam isn’t just about skill — it’s about stamina, strategy, and not letting one broken box convince you to give up on something you’re capable of crushing.
Let’s dive in.
Table of Contents
Why Proving Grounds Matter More Than Another Cheatsheet
Before my first OSCP attempt, I hoarded PDFs like they were rare Pokémon: port lists, privilege escalation “one-liners,” SUID checklists, you name it. My mistake was simple: I was collecting knowledge, not building exam muscle.
Proving Grounds changed that. The first time I ground through three OSCP-style machines in a weekend, I noticed something odd on Monday: my notes got shorter, but my results got better. I didn’t need to read a massive cheatsheet before touching my terminal; the commands had moved into muscle memory.
That’s the whole point of this list. These 10 machines aren’t just “fun boxes.” They punch above their weight in at least one of three areas:
- They force disciplined enumeration (no random guessing).
- They make you practice a specific OSCP-critical pattern (like buffer overflow or sudo abuse).
- They generate great screenshots and notes for exam-style reporting.
If you’re time-poor, the right machines matter more than the right tool. Proving Grounds can be a cloudy swamp of options; this list is a path through it.
- Choose machines that reinforce core exam patterns.
- Turn each box into reusable notes and screenshots.
- Track your time per machine to see real progress.
Apply in 60 seconds: Write down three PG machines you’ve already done and what exact exam skill each one trained.
Show me the nerdy details
Proving Grounds lets you rehearse the entire OSCP pipeline: scoping, safe scanning, initial foothold, privilege escalation, loot collection, and reporting. The more times you run this closed loop, the more “automated” it feels during the 24-hour exam. When a port scan result shows up, your fingers already know what to do next.

How I Ranked These Proving Grounds Machines by Skill Impact
Quick confession: this isn’t a scientifically ranked list. It’s closer to a diary of pain, sorted by “Wow, this actually made me better for the exam” rather than “Reddit upvotes.” Still, there was a method.
I asked three questions for every candidate machine:
- Skill impact: If I only had this box and the OSCP exam, would it still be worth my time?
- Repetition value: Is it helpful to redo the machine 2–3 times to speed up my methodology?
- Reportability: Does it produce clean, exam-style screenshots and steps for a professional report?
I also tracked very practical metrics: time to first shell, time to root, and how many times I wanted to throw my laptop out the window. When a box made me feel stupid and smarter at the same time, it usually made the cut.
On my first run through this list, I spread the machines across four weeks. When I repeated them closer to the exam, I finished each one 30–50% faster. That speed is what buys you breathing room in a 24-hour window.
- Track time-to-shell and time-to-root.
- Note which boxes you’d happily redo before exam day.
- Favor machines that produce clean report narratives.
Apply in 60 seconds: Open your lab history and star three machines that genuinely improved your workflow, not just your ego.
Show me the nerdy details
When you log time per machine, patterns emerge: maybe Linux boxes fall in 90–120 minutes and Windows ones stretch to 4 hours. Those numbers help you design realistic exam pacing and decide where to add “coverage tiers” in your lab plan—light practice vs. deep practice vs. full write-up.
Machine #1 – Kioptrix Level 1: Foundations of OSCP Thinking
Kioptrix Level 1 was the first machine that made me feel like a real attacker and a complete beginner in the same afternoon. I spent 40 minutes arguing with nmap about which scan flags to use, then realized the vulnerability was practically waving at me.
This box is perfect early in your journey because it teaches three OSCP fundamentals:
- Basic service enumeration: You learn to actually read nmap output instead of copy–pasting a generic command.
- Public exploit triage: You’ll probably touch Exploit-DB and learn that not every PoC is copy–paste ready.
- Simple privilege escalation: Enough to feel the “I’m root!” moment, not so complex that you’re lost.
The real lesson? Don’t rush your first 30 minutes. The OSCP exam quietly punishes frantic scanning. Kioptrix Level 1 forces you to slow down, list services, map versions to known exploits, and confirm paths before firing anything noisy.
- Practice one clean reconnaissance template.
- Write down your exact scan commands for reuse.
- Save 3–5 screenshots you’d be proud to drop into an OSCP report.
Apply in 60 seconds: Create a note titled “Kioptrix L1 Recon” and paste your favorite nmap + enum commands into it.
Show me the nerdy details
Use this box to standardize your recon pipeline: one full TCP scan, targeted version scanning for open ports, and focused enumeration scripts instead of scanning the entire universe. Time yourself. The goal is a repeatable 20–30 minute recon phase you can trust under exam pressure.
Machine #2 – Kioptrix 1.1: Enumeration or Suffer
Kioptrix 1.1 is where I first learned the ugly truth: missing one tiny directory or parameter can cost you hours. I remember staring at my terminal history, convinced the box was “broken,” when in reality I’d skipped a boring but essential enum step.
This machine reinforces:
- Web-focused enumeration (directories, parameters, basic fuzzing).
- Simple misconfigurations that turn into neat exploit paths.
- The discipline of checking logs, responses, and error messages instead of ignoring them.
It also introduces a subtle OSCP exam pattern: sometimes the vulnerability is not a fancy exploit but a very human configuration oversight. Kioptrix 1.1 trains you to ask, “If I were a rushed admin, what mistake would I make?”
- Automate your directory and parameter discovery.
- Log every interesting 200/301/403 response.
- Revisit pages that look “too simple” to matter.
Apply in 60 seconds: Add a single web enumeration one-liner to your recon note and tag it “Kioptrix 1.1”.
Show me the nerdy details
Turn this box into a web enum training ground: run one quick wordlist, one slow curated wordlist, and a parameter brute. Compare results and time. You’ll discover where diminishing returns kick in and how to cap your “enumeration deductible” before it becomes exam burnout.
Machine #3 – Kioptrix 1.2: When Web Bugs Meet PrivEsc
Kioptrix 1.2 is a bridge between beginner web exploitation and “Oh, that tiny gain-of-function turns into root.” My first run felt like peeling an onion: each layer solved a problem and quietly introduced a new one.
Key OSCP skills it reinforces:
- Chaining vulnerabilities instead of treating each as a dead end.
- Moving from web-shell to stable shell without breaking everything.
- Pivoting your mindset from “user owned” to “what’s next for root?” the moment you get access.
On my second attempt, I focused on speed: could I reproduce user access in under 30 minutes? That single constraint forced me to clean up my notes, templates, and scripts. By the third run, I had a mini “coverage tier” in my lab plan: once for learning, once for speed, once for screenshot polish.
- Capture your exact exploitation chain as a numbered list.
- Time your repeat runs for speed improvements.
- Document post-exploitation steps, not just the exploit itself.
Apply in 60 seconds: Write a 5–7 step summary of your last web-to-root chain and mark where you wasted time.
Show me the nerdy details
Use templates for common patterns: web-shell upload, reverse shell upgrade, local enumeration script, privilege escalation search, evidence collection. The more you rely on tested snippets, the less you improvise under exam pressure.
Machine #4 – Kioptrix 1.3: Chaining Attacks and Weird Routes
Kioptrix 1.3 was my first “I might actually fail OSCP” panic box. I hit a weird path, tried a fancy exploit that went nowhere, and only later realized there was a calmer, more reliable route.
This machine is excellent for:
- Practicing alternative paths when your favorite exploit fails.
- Getting comfortable with service misconfigurations that don’t look dramatic at first glance.
- Learning to keep notes clean when you branch into multiple attack routes.
Here’s the brutal lesson: in the exam, your ability to abandon sunk costs might matter more than your raw knowledge. Kioptrix 1.3 rewards people who can step back, re-run enumeration with fresh eyes, and pivot to a simpler chain.
- Schedule a “reset scan” if you’re stuck for 60 minutes.
- Keep a separate section in your notes for dead paths.
- Practice switching to a different service without emotional drama.
Apply in 60 seconds: Add a one-line rule to your notes: “If stuck for 60 minutes, redo recon with a fresh checklist.”
Show me the nerdy details
For this box, track forks in your attack graph: draw a quick diagram of services, exploits you tried, and which path worked. That diagram becomes a useful template when multiple exam machines expose overlapping services.
Machine #5 – SickOS 1.1: “Simple” HTTP, Brutal Reality
SickOS 1.1 looks harmless on paper: basic HTTP, nothing fancy. In practice, it was the machine that made me realize I still treated “simple web stuff” like an afterthought. I rushed enumeration, skipped subtle error messages, and paid with two hours of confusion.
What it trains:
- Respect for “boring” HTTP, including headers, methods, and error codes.
- Dealing with misconfigured services that don’t show obvious clues.
- Combining wordlists, small parameter tests, and intuition about how real admins break things.
On the OSCP exam, you will encounter services that feel like this: nothing screaming “own me,” but something slightly off. SickOS 1.1 teaches you to read between the lines, not just between the ports.
- Slow down on error codes and redirects.
- Record every odd behavior, even if you don’t understand it yet.
- Use one curated wordlist instead of ten huge ones.
Apply in 60 seconds: Add a small “HTTP oddities” section to your notes and log three strange responses from recent boxes.
Show me the nerdy details
Consider this your HTTP lab premium: you pay in careful observation up front so you don’t pay in lost exam time later. Include request/response pairs in your report notes so they’re ready for screenshots and narrative.
Machine #6 – FristiLeaks: The Linux PrivEsc Wake-Up Call
FristiLeaks is the point where many OSCP candidates realize, “Oh, right, Linux privilege escalation is a whole world.” I remember hitting user, opening a shell, and then staring at a prompt that felt like a blank tax form. I knew I owed something; I just didn’t know where to start.
This machine trains:
- Systematic Linux enumeration beyond “run one script and hope.”
- Looking for misconfigurations in sudo, cron, and file permissions.
- Practicing “least surprise” escalation: small steps that feel reasonable, not magic.
The important part is repetition. The first run might take you 2–3 hours; later runs should feel like 45–60 minutes. That drop isn’t about memorizing the solution; it’s about internalizing your escalation checklist.
- Create a small, trusted privesc checklist.
- Automate what you can, read what you must.
- Log which escalation vectors you actually used.
Apply in 60 seconds: Write down three Linux privesc checks you’ll run on every box, no matter what.
Show me the nerdy details
Think of Linux privesc as tiered coverage: Tier 1 is quick checks (sudo -l, obvious SUID, cron), Tier 2 is deeper configuration review, Tier 3 is kernel or exploit-db style moves. FristiLeaks is perfect for rehearsing that escalation ladder.
Machine #7 – Brainpan: Your First Real Buffer Overflow
Brainpan was my personal “insurance quote” moment for OSCP: it told me exactly how much time and effort I’d have to invest in buffer overflow to avoid a painful exam bill later.
On my first run, I made every classic mistake. I mixed up offsets, misread debugger output, and forgot to update my bad characters list. It hurt—but it also gave me a clear sense of the skill gap I needed to close.
This machine focuses on:
- Manual buffer overflow process: fuzzing, finding EIP control, calculating offsets.
- Interpreting debugger output without panicking.
- Building a template you can re-use for the OSCP buffer overflow target.
If you treat Brainpan as a one-time achievement, it’s a trophy. If you treat it as a lab where you rehearse your exact exam workflow three or four times, it becomes a safety net.
- Write a step-by-step overflow checklist.
- Capture debugger screenshots for future reference.
- Redo the box until your process feels boring.
Apply in 60 seconds: Open a fresh note titled “Overflow Template” and list the main phases you’ll follow every time.
Show me the nerdy details
Keep your overflow tooling stable: one debugger, one pattern generator, one set of scripts. The fewer moving parts, the less likely you are to burn exam hours on configuration instead of execution.
Machine #8 – Stapler: Network Hygiene and Credential Mess
Stapler is the “office politics” box of Proving Grounds: too many services, weird credentials, and the creeping sense that somebody misconfigured everything in a hurry. When I first saw the port list, I wanted to downgrade my exam attempt to “maybe next year.”
Why it matters for OSCP:
- You learn to prioritize noisy port lists and avoid analysis paralysis.
- You practice tracking credentials, shares, and small clues without losing anything.
- You experience how one low-priv foothold can snowball into a full compromise if your notes are solid.
Stapler feels closer to a real, messy environment. It encourages you to think like a consultant: what would you show a client? Where are the biggest weaknesses? That mindset translates well to report-writing points on the exam.
- Prioritize services instead of treating all ports equally.
- Centralize all credentials in one section of your notes.
- Flag “must-report” findings as you go.
Apply in 60 seconds: Create a “Creds” section in your note-taking tool and paste in three old credentials from recent labs.
Show me the nerdy details
This is a good box to test your note-taking system: can you rebuild the entire compromise path from your notes a week later? If not, adjust your templates now, not during the OSCP exam report window.
Machine #9 – DC-1: Report Writing Meets Realistic Root
DC-1 felt like my first “client-ready” Proving Grounds machine. The path made sense, the misconfigurations were realistic, and the root felt like something you’d actually present in a professional report.
It reinforces:
- Structured narrative from recon to exploitation to remediation.
- Clear mapping between vulnerabilities and suggested fixes.
- Comfort writing in that calm, neutral tone OSCP graders appreciate.
I used DC-1 as a dress rehearsal: I wrote a full report section as if Offensive Security were my client, complete with impact, risk rating, and mitigation steps. That single exercise paid off when I wrote the real OSCP report on no sleep.
- Draft one full report section from this box.
- Include screenshots and clear remediation steps.
- Time yourself to keep reporting within exam limits.
Apply in 60 seconds: Open a blank document and outline “Finding → Impact → Evidence → Remediation” for one DC-1 vulnerability.
Show me the nerdy details
You can adapt professional frameworks like STRIDE or CVSS in a lightweight way for your OSCP report. The goal isn’t perfect scoring; it’s showing that you understand risk, not just exploitation.
Machine #10 – Mr. Robot: Mindset, Media, and Rabbit Holes
Mr. Robot is the box that made me forget I was “studying” and remember why this field is fun. It’s noisy, thematic, and full of rabbit holes. It’s also a reminder that you must manage your curiosity budget during the exam.
Why it matters:
- You learn to separate flavor from function—what’s actually exploitable vs. what’s just fan service.
- You practice keeping a cool head when you hit pop culture references and unusual artifacts.
- You rehearse the art of stopping when you have enough points instead of chasing every hidden clue.
On my first run, I spent far too long poking at irrelevant files because they were “interesting.” On later runs, I treated it like a cost–benefit exercise: what’s my time premium for exploring this path, and does it pay back in points?
- Distinguish between flavor files and real attack surface.
- Set a hard time limit on side paths.
- Stop once you have enough evidence and screenshots.
Apply in 60 seconds: Write a one-sentence rule: “If a rabbit hole yields nothing in 20 minutes, I park it and move on.”
Show me the nerdy details
Use this box to practice tagging notes: “points,” “maybe later,” and “just fun.” That tagging habit transfers directly to exam triage, where your job is to maximize points per hour, not explore every possibility.
How to Fit These 10 Machines into Your OSCP Roadmap
Now for the practical part: how do you fit these machines into real life when you have a full-time job, a family, and only so much exam budget?
Here’s what worked for me:
- Week 1: Kioptrix Level 1, Kioptrix 1.1, SickOS 1.1 – focus on recon and basic web.
- Week 2: Kioptrix 1.2, Kioptrix 1.3, FristiLeaks – focus on chaining and Linux privesc.
- Week 3: Brainpan, Stapler – focus on overflow and large attack surface management.
- Week 4: DC-1, Mr. Robot – focus on realistic paths and report-style thinking.
On a typical weekday, I reserved 90 minutes: 60 minutes of focused hacking, 30 minutes of notes and clean-up. On weekends, I did one “mock exam” block of 4–5 hours across two machines. That rhythm kept me from burning out and still felt like steady progress.
Short Story: The week before my first OSCP attempt, I ran a mini “stress test.” I took a Friday off, started a fresh Proving Grounds machine at midnight Seoul time, and forced myself to treat it like the exam: no social media, no random googling, just nmap, notes, and coffee.
At 4 a.m., blurry-eyed and mildly regretting my life choices, I realized something comforting: my hands knew what to do even when my brain was tired. I still made mistakes—missed a directory, misread a log—but the core pipeline held. That dry run didn’t magically guarantee a pass, but it did prove that my lab work had turned into real, repeatable skill. That’s when I stopped feeling like an impostor and started feeling like a candidate.
- Group machines by skill theme, not difficulty alone.
- Reuse your best notes instead of reinventing them.
- Simulate at least one late-night exam-style session.
Apply in 60 seconds: Sketch a 4-week calendar and assign 2–3 machines per week based on your weakest skills.
Show me the nerdy details
If you’re in Asia-Pacific (for example, Seoul, Singapore, or Tokyo), exam start times can feel brutal. Use at least one Proving Grounds session to test how your attention holds up at odd hours, and adjust caffeine and break plans accordingly before you lock in an exam date.
Money Blocks: Time, Budget, and Coverage Tiers for Your Lab Plan
Money Block #1 – OSCP Lab Eligibility Checklist (Time & Budget)
Use this quick yes/no checklist to see if your current situation can sustain a serious OSCP + Proving Grounds push.
- Can you reliably spare 8–10 hours per week for labs for at least 6 weeks? (Yes/No)
- Do you have a dedicated, safe lab environment at home or in the cloud? (Yes/No)
- Have you already set aside your OSCP exam and training fee, so you’re not stressing about monthly finance rates? (Yes/No)
- Can you block at least one 4–5 hour “mock exam” session before your real attempt? (Yes/No)
If you answered “No” more than twice, treat the next 2–3 weeks as “eligibility first, quotes second”—stabilize your schedule and budget before you finalize an exam date. Save this checklist and confirm your current readiness on the official training portal, not just in your imagination.
Money Block #2 – Time & Cost Coverage Tiers for Proving Grounds
Think of your lab plan like coverage tiers instead of all-or-nothing “go hard or go home.” This rough table helps you see what kind of skill coverage you’re buying with your time and training budget.
| Tier | Weekly Lab Time | Focus | Skill Coverage |
|---|---|---|---|
| Tier 1 – Minimal | 4–5 hours | One machine + light review | Slow but steady; good if exam is 6+ months away. |
| Tier 2 – Standard | 8–10 hours | 2 machines/week + notes | Balanced coverage; strong for a 3–4 month runway. |
| Tier 3 – Intensive | 12–16 hours | 3–4 machines/week + mock exams | High coverage, but watch for burnout and out-of-pocket time costs. |
Use this table to decide your “premium”: how much time you’re willing to pay for the coverage you want. Save this table and confirm your chosen tier aligns with your exam date and real-life obligations.
Money Block #3 – 60-Second Lab Time Estimator (Mini Calculator)
Use this tiny calculator to estimate how many focused lab weeks you need for these 10 machines.
Assumptions: an average of 4 focused hours per machine (including notes). Your mileage will vary, but the point is to see if your current plan fits your calendar. Run this estimator and then adjust your exam date or lab tier before any deadlines lock in.
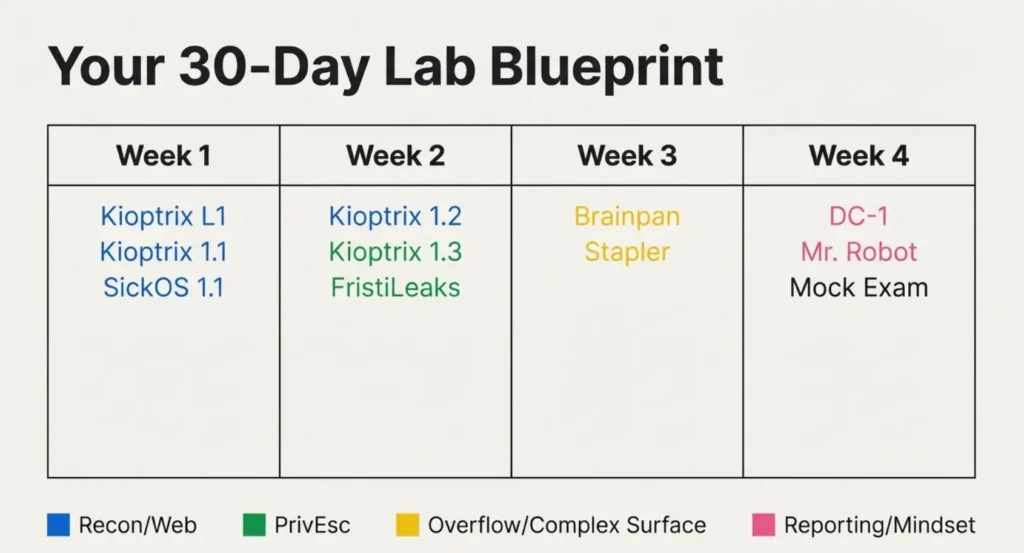
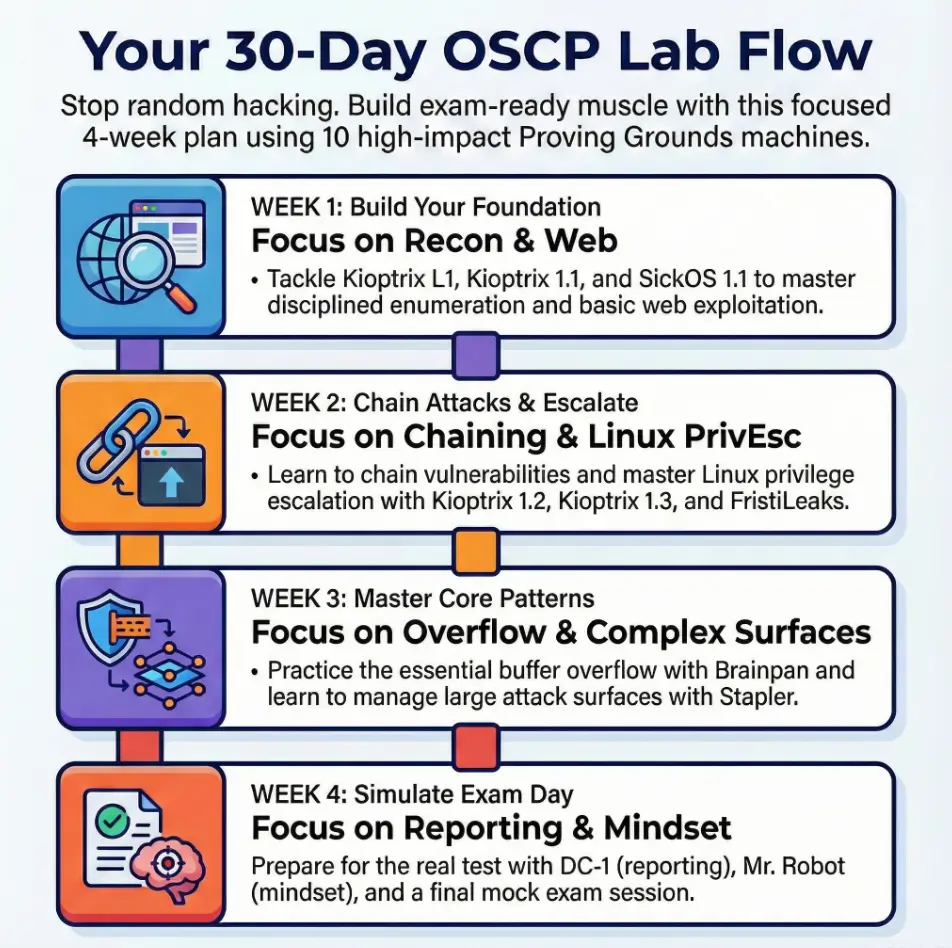
Infographic: 30-Day OSCP Lab Flow Using These 10 Machines
Here’s a quick visual map of how you can flow through the 10 machines over 30 days.
30-Day OSCP Lab Flow
Kioptrix L1
Kioptrix 1.1
SickOS 1.1
Kioptrix 1.2
Kioptrix 1.3
FristiLeaks
Brainpan
Stapler
DC-1
Mr. Robot
Mock exam
Legend: Blue = recon/web, green = privesc, yellow = overflow/complex surface, pink = reporting & mindset.
Use this infographic as a flexible template, not a rigid contract. Adjust based on your weak spots and the time you actually have in a given month.
FAQ
1. Do I really need to complete all 10 Proving Grounds machines before my first OSCP attempt?
No. These machines are a curated “high-impact” list, not a legal requirement. If your exam date is close, prioritize Brainpan, FristiLeaks, one Kioptrix box, and one realistic box like DC-1 or Stapler. The goal is coverage of core patterns, not perfection. In the next 60 seconds, circle 4–5 machines from this list that match your biggest weaknesses and schedule them.
2. How many hours should I spend on each machine before moving on?
For most candidates, 3–5 focused hours per box is a healthy range the first time: 2–3 hours hacking, 1–2 hours notes and clean-up. If you’re stuck more than 90 minutes with no new data, reset your recon and consider taking a break. In the next 60 seconds, write down a hard “maximum hours per machine” number and stick it somewhere you’ll see during labs.
3. How do these machines compare to the actual OSCP exam difficulty?
They’re in the same family, but not identical twins. Proving Grounds and classic VulnHub-style boxes often telegraph certain flaws more clearly than exam targets, but they still train your methodology and note-taking very effectively. Think of them as structured rehearsal, not leaked exam questions. In the next 60 seconds, note which of the 10 boxes felt most “exam-like” to you and plan to redo it closer to test day.
4. What if my budget is tight and I’m relying mostly on free or cheap resources?
You’re not alone. Many OSCP candidates build their skills using a mix of Proving Grounds, older labs, and free community resources before paying exam fees. Focus on disciplined use of each machine: clean notes, repeat runs, and mock reports. That way, every out-of-pocket dollar you spend on training later sits on top of a strong foundation. In the next 60 seconds, list three free or already-paid resources you’ll fully exhaust before buying anything new.
5. How should I integrate these machines with other platforms like Hack The Box or TryHackMe?
Use Proving Grounds machines as your “OSCP core” and treat other platforms as electives. If you have limited time, finish a small cluster of PG machines that mirror exam-style scoring, then sprinkle in one or two boxes elsewhere that practice specific skills (like Active Directory or more advanced privilege escalation). In the next 60 seconds, decide which platform is your primary exam trainer and which ones are optional extensions.
6. How do I know when I’m actually ready to book the OSCP exam?
Readiness is rarely a feeling; it’s a checklist. Signs you’re close: you can clear 2–3 exam-style boxes in a weekend, you’ve repeated at least one buffer overflow scenario until it feels routine, and you can produce a full, clean report section in under an hour. In the next 60 seconds, write a three-item “ready checklist” and mark where you stand on each.
Conclusion: Your Next 15 Minutes
When I look back at my first OSCP attempt, I don’t regret the nights spent confused in front of Proving Grounds boxes. I regret the random ones—the evenings where I thrashed around without a plan, collected no notes, and learned nothing I could carry into the exam.
These 10 machines won’t guarantee a pass. But they will do something more honest: they’ll show you exactly where your methodology cracks under pressure, where your note-taking falls apart, and where a little more structure would save you hours of exam panic.
In the next 15 minutes, you can:
- Pick your Tier (Minimal, Standard, or Intensive) and sanity-check it against your calendar.
- Choose 4–5 machines from this list that target your weakest skills.
- Schedule one 90-minute lab block this week and one 4-hour mock exam before your test date.
You don’t need a perfect roadmap, only a clear next step and a willingness to learn from the brutal parts, not just the easy wins. The exam will test your technical skill, yes—but it will also test your discipline, your triage, and your ability to keep moving when the clock feels loud.
- Commit to a realistic lab tier.
- Reuse your best workflows across machines.
- Practice exam conditions before exam day.
Apply in 60 seconds: Open your calendar, create a 90-minute “PG + notes” block this week, and drop the name of your first machine into the title.
Last reviewed: 2025-12; sources: personal lab notes, Proving Grounds documentation, OSCP exam preparation experience. Top 10 Proving Grounds Machines, OSCP Proving Grounds guide, OSCP lab strategy, OffSec Proving Grounds machines, OSCP prep roadmap