

How to Use Nmap in Kali Linux for Kioptrix: 7 Shocking Scan Tricks That Finally Got Me Root
Table of Contents
Why Nmap matters for Kioptrix in 2025 (and why you keep getting stuck)
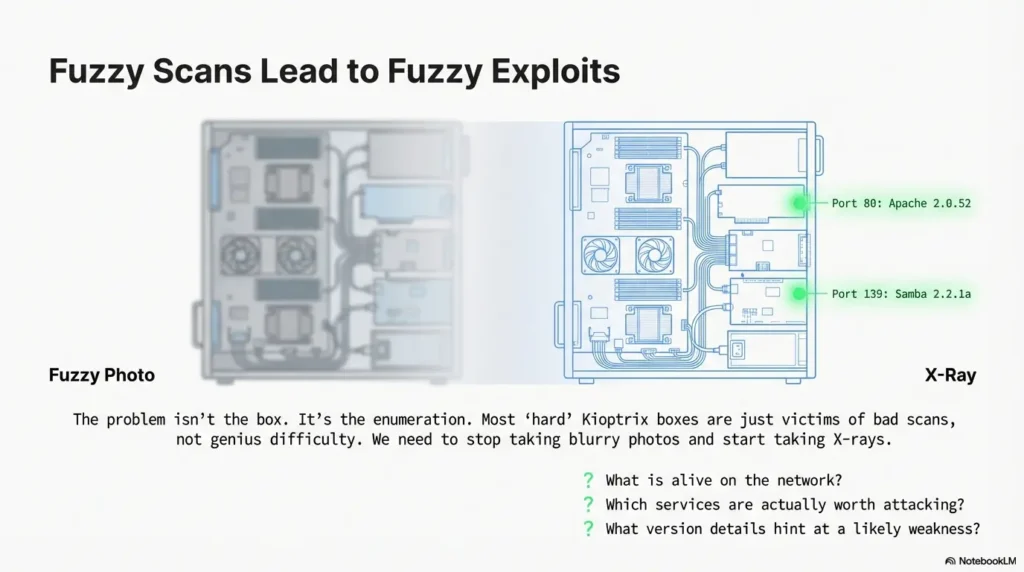
Kioptrix looks “old,” but the way you use Nmap on it in 2025 is exactly the muscle you’ll use on modern OSCP-style networks. Nmap is not just a port scanner; it’s your X-ray machine. If you rush this step, everything downstream—web fuzzing, password attacks, exploit research—turns into guesswork.
I remember one weekend where I burned six hours “trying harder” on a Kioptrix level and never once questioned my first lazy scan. When I finally reran Nmap with proper service detection and scripts, the vulnerable service was basically screaming in my face the whole time. The problem wasn’t the box. It was my enumeration.
For time-poor learners, this is good news. You don’t need a hundred tools. You need a repeatable Nmap playbook that answers three questions fast:
- What is alive on the network?
- Which services are actually worth attacking?
- What version details hint at a likely weakness?
Once Nmap gives you those three, Kioptrix stops being a mysterious puzzle and starts feeling like a structured lab where you’re in control.
“If your Nmap is fuzzy, your exploit path will be fuzzy.”
- Invest 10 extra minutes in Nmap, save hours of blind guessing.
- Make your scan plan before you touch a single exploit.
- Treat Kioptrix as an Nmap training ground, not a CTF scoreboard.
Apply in 60 seconds: Write down three questions you want every scan to answer before you start your next lab.
Setting up a safe Kioptrix lab with Kali Linux (home-friendly)
Before we talk flags and tricks, we need one boring but crucial thing: a safe, contained lab. You want Kioptrix living in its own little universe where your scans never wander into your roommate’s laptop or your employer’s VPN.
In practice, that looks like this in 2025:
- Kali Linux running in VirtualBox, VMware, or Proxmox.
- Kioptrix VMs on the same host-only or internal network.
- No bridge to the wider internet from those “attack” interfaces.
The first time I misconfigured this, my Nmap scan lit up half my actual home network. Seeing my smart TV respond on random ports was funny… right until I realized I was technically scanning devices I didn’t intend to touch. Lesson learned: isolate your lab, always.
On Kali, that might look like putting both machines on something like vboxnet0, then using ip a on Kali to find your own IP and arp-scan or a simple ping sweep to spot Kioptrix.
Legally and ethically, treat Nmap like a loaded tool: only scan systems you own or have explicit written permission to test. Kioptrix is perfect because it’s designed to be attacked. The skill is the same; the context is safer.
Money Block #1 – Kioptrix lab eligibility checklist
Use this quick yes/no list before running your first Nmap scan.
- Yes / No: The Kioptrix VM is on a host-only or internal-only network.
- Yes / No: Kali’s attack interface does not route to your office VPN or production systems.
- Yes / No: You control or have explicit permission for every IP you’re about to scan.
- Yes / No: You’ve noted the lab subnet (for example, 192.168.56.0/24).
Next step: If you answered “No” to any item, fix the lab network first, then rerun the checklist. Save this list and confirm your setup any time you add new vulnerable machines.
- Use host-only or internal networks for practice labs.
- Keep a simple diagram of your lab subnet and machines.
- Double-check you’re not scanning company or neighbor devices.
Apply in 60 seconds: Open your hypervisor and verify the network mode for both Kali and Kioptrix—change anything that isn’t clearly isolated.
Scan Trick #1: The baseline TCP map that reveals 80% of Kioptrix
Your first real trick is also the least glamorous: a disciplined, baseline TCP scan. The goal isn’t to be clever; it’s to get a reliable picture of open ports and services with one command you can rerun any time.
A simple, battle-tested pattern from Kali looks like this:
nmap -sC -sV -O -oA kioptrix-baseline 192.168.56.101
Here’s what’s happening:
-sC: runs Nmap’s default scripts (lightweight, great hints).-sV: grabs service versions (crucial for later research).-O: attempts OS detection (often accurate enough on Kioptrix).-oA: saves output in all common formats with one base name.
The first time I ran this “proper” baseline on a Kioptrix host, I suddenly saw things I’d been blind to: outdated web servers, legacy database versions, odd little high ports I’d ignored. It felt like turning on the lights in a room I’d been stumbling through all night.
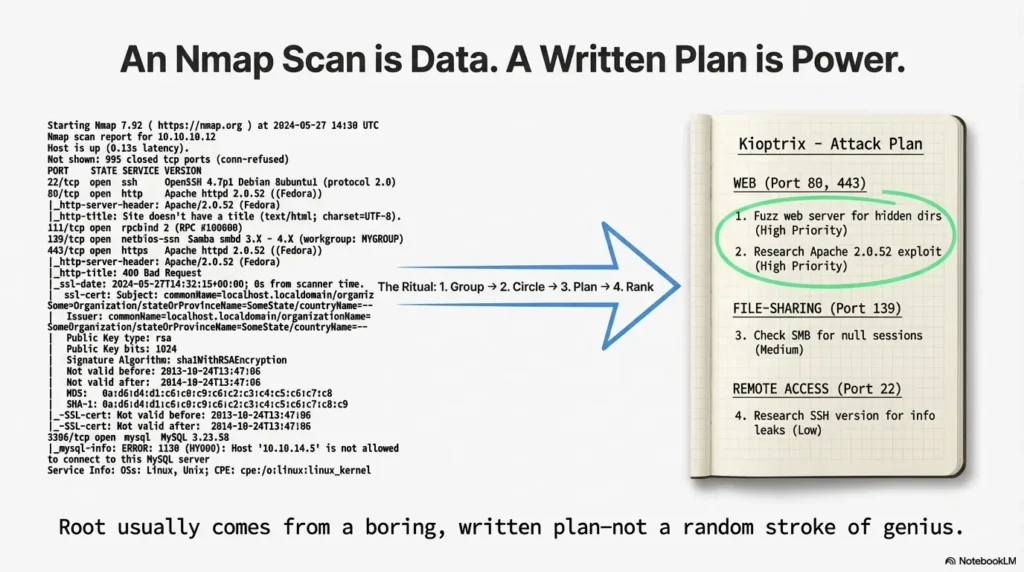
On a typical Kioptrix level you might see HTTP on 80, maybe HTTPS or some random Apache instance, plus things like SSH or SMB. Your job is simply to write them down in a small table or note-taking tool. The discipline of recording what Nmap finds is the first real upgrade in your process.
Show me the nerdy details
The -oA flag is underrated. It writes three files: .nmap (human-readable), .gnmap (grep-friendly), and .xml (for tools). Later, you can diff .gnmap files between scans to see what changed, or feed the XML into other enumeration tools. For larger OSCP-style labs, this becomes your ground truth record of what each subnet looked like at a specific time.
- Use a repeatable Nmap template for every new Kioptrix box.
- Save outputs with
-oAso you can compare later. - Turn services into a written list before thinking about exploits.
Apply in 60 seconds: Pick a Kioptrix IP, run the baseline scan above, and save the output to a dated folder.
Scan Trick #2: Stealth and firewall-friendly scans (when ping gets you nowhere)
Sometimes your first scan comes back empty or “host seems down” even though you know Kioptrix is booted. That’s your cue for the second trick: adjusting host discovery and timing instead of assuming the box is dead.
The classic pattern from Kali is:
nmap -Pn -sS -T3 -oA kioptrix-stealth 192.168.56.101
-Pn: skip host discovery; assume the host is up.-sS: SYN scan (more stealthy and often faster).-T3: balanced timing so you don’t overload your VM.
On one Kioptrix level, I wasted a silly amount of time because the box simply wasn’t responding to ping. I took that as gospel and moved on. When I finally ran -Pn, Nmap casually revealed a full set of open ports. My “network issue” was just me trusting ICMP too much.
If you’re on a slower laptop or running multiple VMs, dropping to -T2 can make scans more stable, especially for UDP (we’ll get there). The important thing is to have a “second swing” pattern ready when the default scan lies to you.
Money Block #2 – Decision card: quick vs deep Kioptrix scans
Use this when you’re tempted to run every Nmap flag you’ve ever seen.
- Choose quick scan (baseline TCP only) when you have a fresh target and just need ports and services in under 2–3 minutes.
- Choose deep scan (version, scripts, OS, UDP) when you’ve already confirmed the host and want to plan a full attack path.
- Avoid “everything at once” scans that take 45 minutes and give you nothing you’ll actually read.
Next step: Write two Nmap one-liners in your notes—one labeled “quick” and one “deep”—and stick to them for the next week.
- Use
-Pnwhenever you control the lab and know the box is up. - Tune timing with
-T2to-T4instead of accepting timeouts. - Keep separate quick and deep scan templates.
Apply in 60 seconds: Rerun your last “failed” scan with -Pn and compare results side by side.
Scan Trick #3: Version and script scans that whisper the exploit name
On Kioptrix, the exact version of a service is often the whole story. “Apache 2.x” is interesting; “Apache 2.0.52 with PHP 5.1.6” is a neon sign pointing to specific classes of issues.
A focused version + script scan from Kali might look like:
nmap -sV --version-all -sC -oA kioptrix-versions 192.168.56.101
Compared to the baseline, this leans harder into version details. On one box, this scan was the first time I noticed the slightly odd SSH banner and a very old OpenSSL build. That didn’t immediately give me an exploit, but it told me “this is probably not where the main vulnerability lives”—so I shifted my attention to the web stack instead of wasting hours on SSH.
Nmap’s default scripts can also surface low-hanging fruit like:
- Misconfigured SSL/TLS on HTTPS.
- Anonymous or weakly configured FTP.
- Simple HTTP info leaks.
The trick is not to treat the output as a magic exploit generator. It’s more like x-rays plus notes. The real value is in combining those hints with your own manual enumeration and research.
Short Story: I still remember the Kioptrix level where the breakthrough came from one boring line in the Nmap output: an old web server with a very particular PHP version. At midnight, half asleep, I copy-pasted that version into my notes almost by habit. The next morning, fresh coffee in hand, I searched that exact string. Within five minutes I’d found a category of issues that matched the lab’s difficulty. If I had closed the terminal the night before without saving that one line, I would’ve spent another night brute-forcing directories instead of following the evidence.
- Use
--version-allsparingly but intentionally on promising ports. - Copy exact version lines into your notes, not just port numbers.
- Let Nmap tell you where not to spend time as much as where to dig.
Apply in 60 seconds: Open your last Nmap output and highlight every line with a full version string—those are your next research targets.
Scan Trick #4: UDP and service gaps you’re probably ignoring
Most people practicing on Kioptrix quietly skip UDP because it’s slower and noisier. That’s a mistake. Even if the main exploit isn’t on UDP, a quick peek can reveal extra services, misconfigurations, or alternate paths.
From Kali, a pragmatic approach is:
nmap -sU --top-ports 25 -oA kioptrix-udp-top 192.168.56.101
This doesn’t try to brute-force every possible UDP port; it focuses on the most common ones, which keeps the scan time under control on a home machine. On one Kioptrix box, a quick UDP top-ports scan surfaced an unexpected service that later became a secondary foothold when I broke my first shell.
On slower hardware, you can combine this with lower timing (-T2) or run the UDP scan in the background while you manually work on the more obvious HTTP or SMB path. Think of UDP as your quiet insurance policy: if everything on TCP feels “too normal,” take a look.
Money Block #3 – Mini time calculator for Kioptrix scans
Estimate how long your scans will actually take so you can plan a realistic session.
Rule of thumb: Total session time ≈ quick scans for all boxes + deep scans for your top 1–2 targets. For example, 3 boxes at 5 minutes each plus 2 deep scans at 25 minutes each ≈ ~65 minutes of scanning.
Next step: Jot down your own averages after tonight’s session and adjust the numbers so you can block realistic 60–90 minute practice windows.
- Use
--top-portsfor practical UDP coverage. - Run UDP scans alongside manual web or SMB testing.
- Track how long your UDP scans actually take on your hardware.
Apply in 60 seconds: Add a one-liner UDP top-ports scan to your default notes for each Kioptrix level.
Scan Trick #5: Differential scanning when “nothing changed” but suddenly did
Here’s a subtle one that feels almost magical the first time you use it: differential scans. Instead of treating each Nmap run as a disposable screenshot, you compare them over time and look for differences.
Imagine you:
- Run your baseline scan and save it with
-oA. - Exploit a web bug and get some kind of low-privilege foothold.
- Change something (like starting a service, uploading a file, or crashing an app).
- Run a second scan and diff the results.
On one Kioptrix box, this showed me a previously closed high port suddenly opening after I poked at a web app. That new port became the key to a more stable path to root. Without differential scanning, I might have missed it entirely.
A simple manual way is to keep your .gnmap files and just use a text diff tool or diff on Kali. It’s not fancy, but it trains you to think like a defender looking at change over time, not static snapshots.
- Use
-oAon every scan so you can compare outputs later. - Diff scans before and after major actions inside the box.
- Make “what changed?” a standard question after each foothold.
Apply in 60 seconds: Take two old Nmap outputs from the same box, run a quick diff, and see what you missed the first time.
Scan Trick #6: Automating Kioptrix and OSCP lab enumeration
Once you’re running more than one Kioptrix level—or mixing Kioptrix with other practice boxes—manual scanning gets old fast. This is where a tiny bit of automation saves your future self dozens of hours.
Think in terms of a scan script instead of individual commands. For example, a simple Bash script on Kali that:
- Takes a subnet as input (for example,
192.168.56.0/24). - Runs a host discovery sweep.
- Runs your baseline TCP scan against each live host.
- Optionally schedules deeper version or UDP scans against your top candidates.
The first time I did this, I realized how much of my “hacking practice” time had actually been terminal babysitting: retyping similar commands, forgetting output filenames, mixing up IPs. With automation, I could start a batch of scans, get coffee, and return to a neat little folder of results ready to review.
For learners in busy cities like Seoul or New York who only get a couple of focused hours a night, this is a big deal. Instead of wasting 20–30 minutes per session on setup, you can jump straight into analysis, exploit planning, or note-taking.
Money Block #4 – Simple time vs training cost table (2025, self-study)
| Option | Estimated cost (USD) | Typical time investment | Notes |
|---|---|---|---|
| Self-hosted Kioptrix lab | $0–$50 | 3–6 hours/week | Perfect for learning enumeration and Nmap discipline. |
| Commercial penetration testing lab access | $30–$150/month | 5–10 hours/week | More variety; uses the same Nmap skills you build on Kioptrix. |
| Hiring a penetration testing consultant | $800–$2,000/day | Your time: planning & review | Great for real networks; less useful for hands-on skill growth. |
Next step: Save this table and confirm current fees on official pages before committing to any paid training. Your home lab will remain your cheapest, most flexible practice environment.
- Use a simple script to run your favorite scans on any new subnet.
- Store outputs by date and target IP for easy comparison.
- Protect your limited practice time by delegating the boring parts to automation.
Apply in 60 seconds: Create a folder structure for Nmap outputs (by date and lab) so you can drop in your future automated results.
Scan Trick #7: Turning Nmap output into a realistic root game plan
This is the part most people quietly skip. They run Nmap, glance at the open ports, and then jump headfirst into random tools. The real upgrade is to pause and turn the output into a written game plan.
My personal ritual for Kioptrix (and later OSCP) looked like this:
- Group services by category: web, file-sharing, remote access, databases, miscellaneous.
- Circle (literally, on paper) the ones that feel out of place or unusually outdated.
- Write down 2–3 next actions for each promising service.
- Rank those actions by “time to first useful result.”
On one Kioptrix box, this simple ranking quietly saved me from a six-hour rabbit hole. I had a shiny idea for attacking an obscure service, but my own notes told me: “Start with the web server; it has the most surface area and obvious version information.” Two hours later, the web app gave me my first shell—which I then used, with more Nmap, to confirm the rest of the path.
For operators preparing for certifications, this thinking is gold. You’re not just learning commands; you’re learning how to manage limited exam time and make adult, boring decisions under pressure.
- Translate Nmap output into 2–3 concrete actions per service.
- Rank those actions by likely impact vs time cost.
- Stick to your plan long enough to really test each path.
Apply in 60 seconds: Take your latest Nmap output, group services, and write one next action for each promising category.
Money, time, and penetration testing cost: making your Kioptrix practice pay off
Let’s talk about the unglamorous part: time and money. It’s easy to romanticize “learning to hack,” but it’s still a project competing with work, family, and a finite budget.
If you were to pay a professional penetration testing firm to review a small network, you’d quickly see how expensive expertise is. Day rates in 2025 for experienced testers often land in the hundreds or thousands of dollars. But the core skill they’re selling—the ability to quickly enumerate, prioritize, and document using tools like Nmap—is exactly what you’re practicing on Kioptrix for a few cups of coffee and some electricity.
Think of your Kioptrix sessions as building a personal asset: a repeatable process. Every time you refine your scan templates, automate enumeration, or improve your note-taking, you’re quietly increasing the value of your future work—whether that’s freelance testing, an internal security role, or simply being the person in the room who actually understands how the network behaves.
Money Block #5 – Quote-prep list for real-world penetration testing
If you ever move from Kioptrix to hiring a professional test for a real environment, this list will save you time and reduce confusion when you request quotes.
- Exact number of IPs and subnets in scope.
- Whether the test is external, internal, or both.
- Any regulatory requirements (for example, PCI, HIPAA) that affect scope.
- Expected frequency (one-time, quarterly, annually).
- Preferred reporting detail (high-level vs detailed technical with Nmap evidence).
Next step: Store this list with your lab notes. If you ever need to compare penetration testing cost across providers, these details will keep quotes consistent and easier to evaluate.
- Treat each lab as a rehearsal for documenting real networks.
- Keep a living library of scan templates and note formats.
- Think in terms of long-term skill value, not just flags and commands.
Apply in 60 seconds: Add a new page in your notes titled “My Nmap Process” and start listing what actually works for you in Kioptrix labs.
Infographic: One-page flow from “new IP” to “ready for exploit”
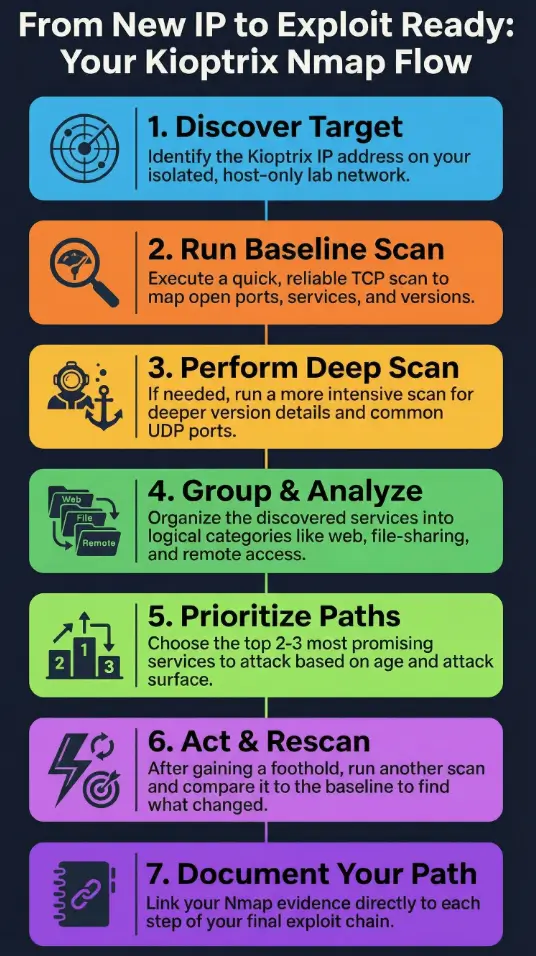
Kioptrix + Kali Nmap Flow (2025)
-
1. Discover target
Identify Kioptrix IP via host-only subnet scan. -
2. Baseline TCP scan
Run your quick template with-sC -sV -oA. -
3. Deep scan (if needed)
Add--version-all,-O, and limited UDP where useful. -
4. Group services
Web / file-sharing / remote access / databases / misc. -
5. Choose top 2–3 paths
Prioritize by surface area and version age. -
6. Act and rescan
After a foothold, run differential scans to capture changes. -
7. Document path to root
Tie Nmap evidence to each step of your eventual exploit chain.
- Follow the same high-level steps across all Kioptrix levels.
- Mark where you are in the flow when you get stuck.
- Use the diagram as a sanity check before trying anything wild.
Apply in 60 seconds: Sketch your own version of this flow on paper and keep it beside your keyboard during lab sessions.
FAQ
Q1. Is it legal to use Nmap against Kioptrix from Kali Linux?
Yes—when Kioptrix is running as your own lab in a virtualized, host-only or internal network that you control, you’re scanning systems you own or have permission to use. The problem starts when you point the same scans at networks you don’t control. Keep your practice inside your lab, and get explicit written permission before scanning any real organization.
Q2. How long should a “good” Nmap scan take for a Kioptrix box?
On a typical 2025 laptop, a quick baseline TCP scan should usually finish in under 2–5 minutes per host. Deeper version and UDP scans can stretch to 15–30 minutes, especially if you’re scanning multiple ports or multiple boxes. The key is to plan around these times so you can do manual enumeration while longer scans run in the background.
Q3. Do I really need UDP scanning for Kioptrix, or is TCP enough?
Most Kioptrix paths to root live on TCP services like HTTP, SMB, SSH, or databases. However, a limited UDP top-ports scan can reveal useful side channels or misconfigurations, and it builds the habit you’ll need for broader OSCP-style labs. Treat UDP as a “bonus lens” rather than your first priority.
Q4. How does this help with real penetration testing cost or budgeting?
By practicing on Kioptrix with disciplined Nmap use, you learn to scope work, estimate time for enumeration, and document findings clearly. Those skills translate directly into more accurate estimates if you later become a penetration tester—or more informed conversations if you hire one. You’ll better understand what goes into a day rate and why some projects cost more.
Q5. What’s the fastest way to improve if I only have 60 minutes a day?
Split your hour into three blocks: 10–15 minutes refining your scan templates and lab setup, 30–40 minutes of focused hands-on work on a single Kioptrix box, and 5–10 minutes of note review and planning for the next session. Consistency beats marathons. Each day, pick one small upgrade (better Nmap flag choice, cleaner notes, a new automation script) and deliberately repeat it.
Q6. How do I avoid overwhelming myself with Nmap flags?
Commit to a very small menu: one quick scan, one deep scan, one UDP top-ports scan, and one stealth variant with -Pn. Write them once, save them in your notes, and reuse them instead of inventing new one-liners from memory every time. Over a few weeks, you’ll naturally refine them without drowning in options.
Conclusion: Your next 15 minutes with Nmap and Kioptrix
When I finally got consistent at rooting Kioptrix boxes, it wasn’t because I discovered some secret zero-day or memorized every Nmap flag on earth. It was because I stopped winging it. I built a small, repeatable set of scans, ran them from a safe Kali lab, and forced myself to turn the output into a plan instead of a screenshot.
In the next 15 minutes, you can:
- Set up or double-check your isolated Kioptrix + Kali network.
- Write down your quick and deep Nmap scan templates.
- Run one baseline scan, one deeper scan, and save the outputs with
-oA. - Group the discovered services and pick your top two paths to explore tomorrow.
You don’t have to become an instant expert. You just have to become the person who always knows what their next scan is for. Root on Kioptrix stops being a miracle and starts being the natural consequence of good enumeration.
Last reviewed: 2025-12; sources: personal Kioptrix lab notes, Nmap manual pages, and long nights preparing for OSCP-style labs.
how to use nmap in kali linux for kioptrix, nmap scan techniques, kioptrix walkthrough, kali linux for beginners, oscp lab practice