

You don’t get stuck on Kioptrix Level 1 because you’re “missing a trick.”
You get stuck because the moment you land a shell, you start wandering—and 45 minutes later you have screenshots, not a plan.
This Kioptrix Level 1 Post-Foothold Checklist is a 12-minute privilege escalation triage: a tight, evidence-first way to classify your best lane— SUDO, SUID/SGID, or a kernel match—before you burn time (or destabilize your foothold). If you want the bigger “why this workflow works” context, pair this with a fast enumeration routine you can reuse on any VM.
Keep guessing and you lose the only thing that matters in a lab: momentum you can reproduce.
What you gain here is simple: a calm sequence that helps you decide faster, document cleaner, and move with intent—using signals like
sudo scope (think sudo -l), unusual SUID binaries, and kernel version/architecture constraints—without turning your session into tool-spam.
(If you’re building a “write-it-once, reuse forever” workflow, a clean note-taking system for pentesting makes this checklist feel twice as fast.)
Trust cue: the method is built around “proof beats possibility,” with outputs captured in order so your write-up reads like an operator’s log, not a thriller.
Table of Contents
Who this is for / not for
For: lab learners who already have a shell and want a repeatable escalation path
This is for you if you’ve got a foothold—maybe a wobbly one—and you want a clean path to root that you can explain later in a write-up without sounding like you “kind of clicked around until something worked.” If you’re mapping where this fits in the overall series, it pairs nicely with a quick Kioptrix levels overview.
Not for: production systems, real targets, or anything without explicit permission
The checklist mindset is useful everywhere, but the commands and techniques belong in authorized labs only. Treat this like a flight simulator: valuable training, not real-world clearance.
If you’re stuck pre-foothold: this is the wrong checklist (bookmark it for later)
If you’re still fighting for the first shell, stop scrolling. Save this page. Come back when you can run commands on the host. This post assumes your next problem is privilege escalation triage, not initial access. (If you’re still building your foundation, this beginner roadmap for Kioptrix labs will keep your practice structured.)
- Start with permissions reality (who/what you are).
- Choose one lane (sudo, SUID/SGID, kernel) based on signals.
- Keep outputs so your write-up is painless.
Apply in 60 seconds: Create a scratch note titled “Kioptrix L1 Triage” and paste every command/output pair as you go.
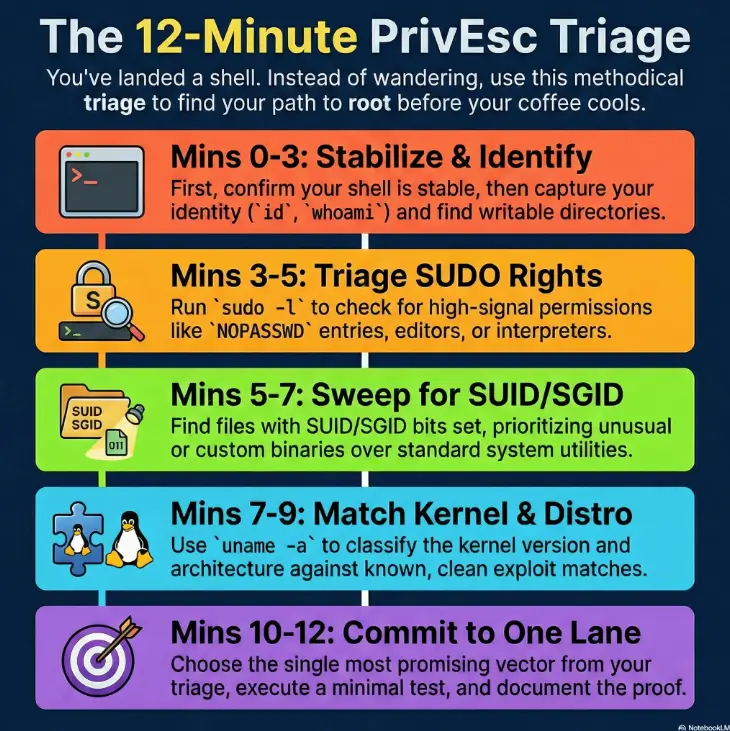
Minute 0–1: “Don’t lose the shell” stabilization checks
Confirm shell quality and command reliability (no fancy moves yet)
Before you chase root, you protect the foothold. If your shell is flaky, every “advanced” step becomes a coin flip. Your goal in minute one: confidence. Does your input arrive cleanly? Do you have a functional PATH? Can you run basic commands without weird delays?
- Identify your shell:
echo $0orps -p $$ - Confirm basic utilities exist:
id,uname -a,whoami - Check if output is stable: run a tiny loop or repeated command, not a heavy scanner
Capture essentials for notes: date/time, hostname, IP, and current user
Future-you will thank present-you for this. “Which box was this?” is how write-ups die. Get the basics now and you won’t have to reconstruct anything later. If you want to level this up into a habit, a simple Kali lab logging workflow keeps your sessions searchable and reproducible.
datehostnameoruname -nwhoamiandidip a(orifconfigon older distros)
Pattern interrupt: Let’s be honest… the fastest way to fail is to rush
The “rush” failure mode is predictable: you fire a noisy enumeration tool, it hangs, your terminal desyncs, and now you’re debugging your own chaos instead of escalating. One minute of stability is cheaper than fifteen minutes of regret.
Minute 1–3: Identity + permissions snapshot (the “who can do what” frame)
Who am I, what groups am I in, and what can I read/write?
PrivEsc is permission math with a little drama. First, learn exactly what the system already allows. Play it like a careful accountant: what do you control, what do you almost control, and what do you absolutely not control?
- Identity:
id,whoami - Groups:
groups - Home permissions:
ls -la ~ - Environment:
env(look for interesting variables, not “everything”)
Quick file system sanity: home, tmp, writable paths, weird ownership
You’re looking for friction reducers: writable directories that let you stage files safely, and “odd” ownership patterns that suggest misconfiguration. Especially on older lab boxes, you’ll sometimes see directories that are root-owned but group-writable—little cracks that become doors.
- Writable spots: check
/tmp,/var/tmp, and your home directory - Interesting perms: “world-writable” + “executable” combos
- Weird ownership: files you can write that “belong” to root or service accounts
The “permission smell test” that predicts easy wins
Here’s the smell test: if you find anything that runs as root (sudo/SUID/cron/service) and you can influence its behavior (write config, replace file, control PATH, control arguments), you likely have a clean route. If you have no influence, you don’t “try harder”—you switch lanes. This is the same core idea behind common Kioptrix privilege escalation patterns: influence beats effort.
- Yes/No: Can you run
id,uname -a, andlsreliably? - Yes/No: Do you have at least one writable directory for staging (home or /tmp)?
- Yes/No: Can you capture outputs (copy/paste) without losing lines?
- Yes/No: Do you know your current user + groups?
Next step: If you answered “No” to any, fix stability first (shell + note-taking) before escalation attempts.
Minute 3–5: SUDO triage (fastest win, fastest trap)
Check sudo rights safely (and why your first sudo command matters)
Sudo is the “fast lane” because it can be direct authorization. It’s also a trap because beginners see one allowed command and immediately assume “root is basically done.” Not always. Your first job is to find your exact sudo privileges without doing anything destructive.
- Read-only check:
sudo -l - Note constraints: command paths, arguments, and whether it requires a password
- Look for: editors, interpreters, file utilities, service managers, “NOPASSWD” entries
A practical truth: most people don’t fail sudo because it’s hard. They fail because they don’t read the scope. If you want a tight mental model for chaining foothold → shell → escalation, skim RCE → shell → privilege escalation as one workflow.
If sudo is allowed: map the exact command scope (not “sudo = root”)
Treat the output like a contract. What exactly are you allowed to run? Under what conditions? Some entries allow only one binary with no arguments; others allow a binary where arguments can quietly become “the whole system.” Your triage goal is to classify the entry into one of three buckets:
- Bucket 1: Full root shell or broad command execution (rare, but simple)
- Bucket 2: Limited command that still enables escalation through behavior (common)
- Bucket 3: Truly limited command with no meaningful escape (also common)
Show me the nerdy details
The key isn’t “sudo exists.” The key is whether the allowed program can: (1) execute other programs, (2) write to sensitive locations, (3) edit privileged files, (4) load plugins, or (5) respect environment variables like PATH in risky ways. This is why interpreters and editors are high-signal, and why a “safe-looking” wrapper can still be spicy.

Curiosity gap: One line in sudo output can change the whole path—find it
The line you’re hunting is the one that changes the rules of the game: NOPASSWD, a writable script path, an editor, or a command that touches system files. Once you see it, you stop “enumerating” and start executing a plan.
- Run
sudo -learly and save the output. - Classify entries into “escape possible” vs “likely dead end.”
- If you see a high-signal binary, stop scanning and deepen that lane.
Apply in 60 seconds: Copy your sudo -l output into notes and underline the exact allowed paths.
Minute 5–7: SUID/SGID sweep (tiny list, huge leverage)
Find SUID/SGID candidates worth attention (ignore the noise)
SUID/SGID is the quiet cousin of sudo: it doesn’t ask, it just runs with elevated privileges. The mistake is trying to remember every “famous” binary. You don’t need a museum of trivia—you need a shortlist. Your goal here is to discover what’s unusual on this machine. If you want a deeper method (with a cleaner candidate triage), use this SUID enumeration guide alongside the checklist.
- Core search idea: find files with SUID/SGID bits set and review the list
- Practical note: older boxes can be slow; limit scope if needed
- Output discipline: save the full list first, then annotate candidates
Prioritize by exploitability: shells, editors, network tools, weird custom bins
The “priority” question is simple: can this binary be made to run something else, read something sensitive, or write somewhere important? Classic high-signal categories include interpreters, editors, archive tools, and anything that reads config files from predictable paths.
- High-signal: interpreters/editors (behavior can become code execution)
- Medium-signal: file tools that can write or move files into privileged locations
- Low-signal: standard system utilities with no known abuse path (still keep the list)
Curiosity gap: Why one “boring” SUID binary is often the real door
Because “boring” often means “forgotten.” A forgotten custom binary with SUID set is the kind of thing no one audits twice. In lab environments, that’s sometimes exactly the point: the author leaves a breadcrumb that looks ordinary until you notice one detail—like unusual ownership or a surprising behavior flag.
If you want a fast heuristic: custom + SUID is louder than famous + SUID.
Minute 7–9: Kernel + distro match (don’t guess—classify)
Identify kernel version, architecture, and distro hints
Kernel escalation is where people burn hours because it feels dramatic. But it’s actually a classification problem: do you have a kernel + configuration combo that matches a known local privilege escalation path cleanly? If you can’t classify it, don’t gamble. If you’re training for exam-style thinking, this maps directly to privilege escalation patterns you’ll see in OSCP-like labs.
- Kernel version:
uname -a - Architecture:
uname -m - Distro hints: check typical release files (varies by distro age)
Build a “candidate exploit shortlist” (2–3 options, not 20)
The goal is not “find an exploit.” The goal is “find two plausible candidates and test them safely.” If you have 20 candidates, you’ve learned nothing except how to scroll.
- Only shortlist options that match your kernel version range and architecture.
- Prefer methods that minimize system risk (no reckless compilation runs).
- Define a rollback mental model: “If this fails, what did it change?”
Show me the nerdy details
A clean match usually requires alignment across: kernel version window, architecture, patch level behavior, and sometimes specific configuration flags. If you can’t explain why your candidate should work on this kernel, it’s not a candidate—it’s a hope. Hope is expensive in triage.
Curiosity gap: The kernel isn’t the answer—your constraints are
Here’s the twist: the kernel version is just one constraint. Your real constraints are: tools available on the box, compilation ability, write permissions, and how fragile your foothold is. A “perfect” exploit that requires a toolchain you don’t have is basically a fairy tale.
- Choose SUDO when
sudo -lshows a high-signal binary (editor/interpreter/service control) or NOPASSWD scope you can explain. - Choose SUID/SGID when you find unusual SUID binaries, custom tools, or anything with writable configs/paths you can influence.
- Choose Kernel only when version + arch match is clean and you can test without destabilizing your foothold.
Next step: Pick one lane and spend 10 focused minutes deepening it before you touch another.
Minute 9–10: Services + configs (Kioptrix Level 1’s breadcrumb zone)
Enumerate running services that expose local escalation angles
Services are where “local” and “misconfig” shake hands. You’re looking for processes running as root or service accounts, plus any configuration surface you can read or influence. In older lab setups (Kioptrix style), service choices can be deliberate breadcrumbs: web servers, databases, file sharing, and SSH tend to leave footprints in readable config files. If you’re unsure what “good” looks like, web exploitation essentials can help you recognize the breadcrumb patterns without over-scanning.
- Running processes: check process listings to see what’s privileged
- Listening ports: see what’s bound locally (even if it’s not exposed externally)
- Service accounts: note which services run as root vs unprivileged users
Check configs/logs for credential reuse and unsafe file permissions
The classic lab lesson: credentials often leak through convenience. A config file readable by your current user can contain passwords or paths that unlock lateral or vertical movement. Your triage approach is to search for a small set of patterns—without turning it into an all-day grep festival. When the service looks Samba-adjacent, it’s worth knowing quick fixes like why smbclient can’t show the Samba version (because misreads here waste time fast).
- Credential patterns: “pass”, “pwd”, “secret”, “key” (be disciplined)
- File perms: configs writable by non-root users are a loud signal
- Logs: sometimes reveal usernames, paths, or operational habits
Look for “root-owned but writable” patterns and scheduled tasks clues
If something is root-owned but writable by your user or group, that’s not a “fun fact.” That’s a priority escalation lead. Same goes for scheduled tasks: if a privileged job executes a script you can edit, your “exploit” is basically text editing.
Micro-checklist (keep it small):
- Any root-owned file you can write = stop and investigate.
- Any scheduled execution path you can influence = treat as a top-tier lead.
- Any service config you can edit = potential privilege path (carefully).
Minute 10–11: Proof-first escalation attempt (choose one lane)
Lane A: SUDO-based escalation (least friction)
If sudo gives you a high-signal opening, take it. This is the lane where you can often get root without touching the kernel, without compiling anything, and without turning the machine into a science experiment.
- Re-read sudo scope. Then read it again (seriously).
- Identify the escape mechanism (exec, edit, write, service control).
- Do one minimal test that proves control without making a mess.
Lane B: SUID-based escalation (controlled, repeatable)
In the SUID lane, the win comes from behavior: can the binary be coerced into doing privileged work on your behalf? This is where clean note-taking matters. You want a write-up that reads like a recipe, not a ghost story.
- Start with your shortlist. Don’t expand it unless you must.
- Test one candidate at a time with a minimal, reversible action.
- If a candidate fails cleanly, move on—don’t negotiate with it.
Lane C: Kernel LPE (only if the environment matches cleanly)
Kernel LPE is your “only if” lane. If you can’t describe the match conditions, you’re not ready to run it. In labs, kernel privesc can be educational—but only when it’s done with discipline.
- Confirm kernel + arch match and constraints (tools, permissions, stability).
- Prefer low-impact tests before any heavy execution.
- Keep a stop rule: if the box starts acting weird, you stop.
- Proof beats possibility.
- Minimal tests keep your foothold intact.
- Your write-up becomes effortless when outputs are captured in order.
Apply in 60 seconds: Write “Lane chosen: ____ because ____” as a sentence in your notes before you attempt escalation.
Minute 11–12: Post-root hygiene (don’t ruin your own write-up)
Verify root and capture minimal proof (id, hostname, flag locations)
Getting root is not the finish line. The finish line is: root verified, proof captured, and a clean story you can reproduce. Verify with simple commands. Avoid turning victory into a cleanup project.
- Confirm identity:
id(look for UID 0) - Confirm host:
hostname - Capture key artifacts: relevant flags or proof files for the lab
Record the exact path taken (commands + outputs) for reproducibility
A strong walkthrough is basically a chain of evidence. The reader should be able to follow your steps like sheet music. Keep command/output pairs together. Add one sentence of reasoning per major move. When you’re ready to turn notes into something publishable, a pentest report template for Kali workflows helps you keep the narrative tight.
Optional: confirm persistence is not needed in a lab walkthrough
Most Kioptrix write-ups don’t need persistence, and adding it can distract from the learning goal. If your tutorial is for beginners, clarity wins: show the escalation path, prove root, and stop. (If you’re writing in an exam-style format, a professional OSCP report template keeps your structure consistent across boxes.)
On a box like Kioptrix Level 1, the difference between a clean write-up and a painful one is often just two habits: paste outputs as you go, and write a single sentence that explains each decision. When you do that, your walkthrough reads like a calm operator’s log instead of a frantic thriller. And weirdly, you get root faster next time—because your brain trusts the process.
Common mistakes (read this before you “try stuff”)
Mistake #1: Treating privesc like loot—running everything you find
This is the classic “I found a thing, so I must run the thing” spiral. It feels productive. It’s not. In triage, every command is either a signal or a commitment. If it’s neither, it’s noise.
Mistake #2: Compiling random exploits without matching kernel/arch first
Kernel escalation without match discipline is like trying keys at random while the door is actively closing. You might get lucky, but you’ll usually just waste time and create instability.
Mistake #3: Breaking your shell with heavy tools before you stabilize
Tooling is not the villain. Timing is. If your foothold is fragile, heavy enumeration can turn your session into a timeout simulator. Stabilize first. Then enumerate with purpose.
Mistake #4: Ignoring sudo command scope and assuming it’s full root
Some sudo entries are basically a golden ticket. Others are narrow and safe by design. Your job is to distinguish them. Don’t assume.
Mistake #5: Losing your notes—no timestamps, no outputs, no proof trail
If you can’t reproduce it, you didn’t really solve it—you just experienced it. Notes are not busywork; they’re your second brain.
Don’t do this: the two commands that most often waste time
Don’t shotgun LinPEAS-style runs before you’ve done the 12-minute triage
Automated enumeration can be useful, but it’s not a substitute for judgment. If you run a giant script first, you often drown the exact signal you needed: sudo scope, a single SUID oddity, a single writable config. Do the triage first. Then run tools to deepen a lane. If you keep falling into “script first” habits, re-center on a fast enumeration routine that starts with human signals.
Don’t “download-and-pray” kernel exploits without a version/arch match
“Download-and-pray” is a time tax. It also creates risk: you’re executing code you don’t understand on a box where your foothold might be delicate. In a lab, the lesson is not “run more exploits.” The lesson is “match conditions and act with discipline.”
Pattern interrupt: Here’s what no one tells you… speed comes from restraint
The fastest operators look slow because they don’t chase everything. They follow signals, write down why, and stop when a step becomes speculative. That’s the whole trick. It’s not secret tooling. It’s restraint.
Next step: one concrete action (do this now)
Create a “12-minute triage” notes template and paste outputs into it as you go
Here’s a simple template you can copy into your notes app. The goal is a clean command/output chain that makes your walkthrough feel inevitable.
- Basics: date, hostname, IP, user, groups
- Sudo: paste
sudo -loutput + highlight high-signal lines - SUID/SGID: paste list + shortlist 3 candidates
- Kernel: paste
uname -a+ arch + constraints - Services/config: list 3 service clues + 3 config/log leads
- Lane chosen: “I chose ____ because ____”
- Proof: root verification outputs
Neutral action: Save this template once, then reuse it on every lab box for a month.
Run your triage in order once—then only deepen the lane that scored highest
This is where we close the loop from the hook: that “one line in sudo output” matters because it tells you whether you can escalate with a clean, low-risk path right now. If sudo is low-signal, you don’t sulk—you pivot. The checklist keeps you moving. For the “pre-foothold → foothold” side of the pipeline, how to use Nmap in Kali for Kioptrix pairs well with this post—because good initial enumeration makes post-foothold triage cleaner.
- Input 1: High-signal sudo entry? (Yes/No)
- Input 2: Unusual SUID/SGID candidate found? (Yes/No)
- Input 3: Clean kernel + arch match and stable shell? (Yes/No)
Output: If you have 2+ “Yes,” you likely have a short route (often 10–25 minutes). If you have 0–1 “Yes,” switch to deeper service/config review before you try anything risky.
Neutral action: Write your three answers as Y/N in your notes, then commit to one lane for 10 focused minutes.

FAQ
What should I check first after getting a shell on Kioptrix Level 1?
Stability and identity. Confirm your shell works reliably, then capture id, whoami, hostname, uname -a, and your IP info.
That gives you the baseline for every lane.
Is sudo always the easiest privilege escalation path in Kioptrix Level 1?
Sudo is often the fastest when it’s high-signal (NOPASSWD scope, editors/interpreters, service control). But a narrow sudo entry can be a dead end. Treat it like a contract, not a guarantee.
How do I prioritize SUID binaries without chasing false leads?
Build a shortlist. Prioritize unusual or custom binaries first, then anything that can execute other programs, edit privileged files, or write into sensitive locations. Don’t test 30 things; test 3 carefully.
When is kernel privilege escalation worth trying in a CTF lab?
When your kernel version and architecture match cleanly and you can explain why the candidate should work in this environment—plus your foothold is stable. If you’re guessing, it’s too early.
What kernel details actually matter for local privilege escalation?
Kernel version, architecture, and constraints (available tools, permissions, and stability). Sometimes configuration matters too, which is why you avoid “random exploit runs” without a clear match story.
How do I avoid crashing the box while testing privesc techniques?
Use minimal tests, one lane at a time. Avoid heavy scripts until after triage. Stop if the system becomes unstable or your shell starts dropping output. In labs, discipline is part of the lesson.
What’s the difference between SUID and sudo in practical escalation terms?
Sudo is explicit permission to run specific commands as another user (often root). SUID is a file permission bit that makes a program run with the file owner’s privileges. Both can lead to escalation, but the “escape mechanics” differ.
Do I need to run automated enumeration tools on Kioptrix Level 1?
Not first. The 12-minute triage is designed to surface the main signals quickly. Tools can help after you choose a lane, but they’re optional—not a rite of passage.
What outputs should I save to write a clean Kioptrix walkthrough?
Save: your identity (id), sudo scope (sudo -l), SUID known list, kernel/arch output, key service/config clues,
and root verification outputs. Keep command/output pairs together.
How do I know I’m root (and not just “looking like” root)?
Run id. If your UID is 0, you’re root. Also confirm by reading a root-only file or accessing a privileged path in a minimal, non-destructive way.
Conclusion
The promise of this checklist was simple: stop wandering, start escalating with evidence. Now you know why that one sudo line matters: it’s the fork in the road. If sudo is high-signal, you take it and you’re done fast. If it’s not, you don’t panic—you pivot to SUID/SGID, kernel classification, and the service/config breadcrumb zone with the same calm discipline.
If you want a final “operator” mindset to keep: triage is not enumeration. Triage is choosing what deserves your attention, and what doesn’t. That’s why you get faster with practice—not because you memorize more tricks, but because you waste less motion. If you’re ready to push beyond Level 1, the Kioptrix Level 2 walkthrough is a natural next box—especially if you want to compare how the “breadcrumb zone” changes across levels.
Your next step is intentionally small: open your notes template, run the 12-minute triage once, and commit to one lane for 10 focused minutes. You’ll either get root—or you’ll have a clean, actionable map of what’s missing. Either way, you’ve stopped guessing.
Last reviewed: 2026-01.