


Ten points. One target. Zero “I swear it worked last night.”
If you’ve ever “owned” a lab box and then couldn’t recreate the path the next day without improvising, your problem isn’t intelligence—it’s a workflow that doesn’t survive fatigue. In OSCP/OSCP+ practice, that gap quietly burns time, confidence, and (when it matters) scorable proof.
Keep guessing and you don’t just lose minutes—you lose the ability to defend your work under pressure.
This OSCP+ Initial Access checklist turns every target into the same calm sequence: scope → discovery → hypothesis → low-risk checks → proof artifacts → usable access → pivot-ready notes. You’ll move faster because you’ll stop re-learning your own decisions.
Initial access (in exam-style labs) means your first verified foothold you can prove and reproduce—access plus an evidence trail, not a vibe.
I’ve learned the hard way that “I’ll remember” is not a strategy—so this is built around receipts: a proof pack standard, a two-hypothesis cap, and a 15-minute re-run test.
The Shift:
- From tool dumping → to decision trails.
- From lucky wins → to repeatable points.
Let’s build the card you’ll trust when you’re tired.
Table of Contents
Who this is for / not for
Who this is for
- OSCP/OSCP+ candidates who finish boxes but can’t reproduce the path the next day
- People who want a per-target “Initial Access” rubric that stays calm under time pressure
- Anyone tired of “tool dumps” and ready for a decision trail that earns points
Who this is not for
- Anyone seeking real-world intrusion guidance, unauthorized access tactics, or out-of-scope behavior
- People who want a “best exploit list” for copying (this is a process blueprint, not a payload library)
Small honesty moment: I’ve watched smart, hardworking candidates lose points because their notes read like a travel blog—“I went here, then I went there”—instead of a proof-grade log. This checklist is built to stop that.
- Reproducibility beats brilliance under exam pressure
- Evidence beats memory when you’re tired
- A simple rubric beats a giant tool list
Apply in 60 seconds: Create a folder for one target and promise yourself: “No screenshot, no progress.” If you want a strict standard for what “counts,” borrow a proof-first mindset from a dedicated OSCP proof screenshot checklist and keep it consistent per target.
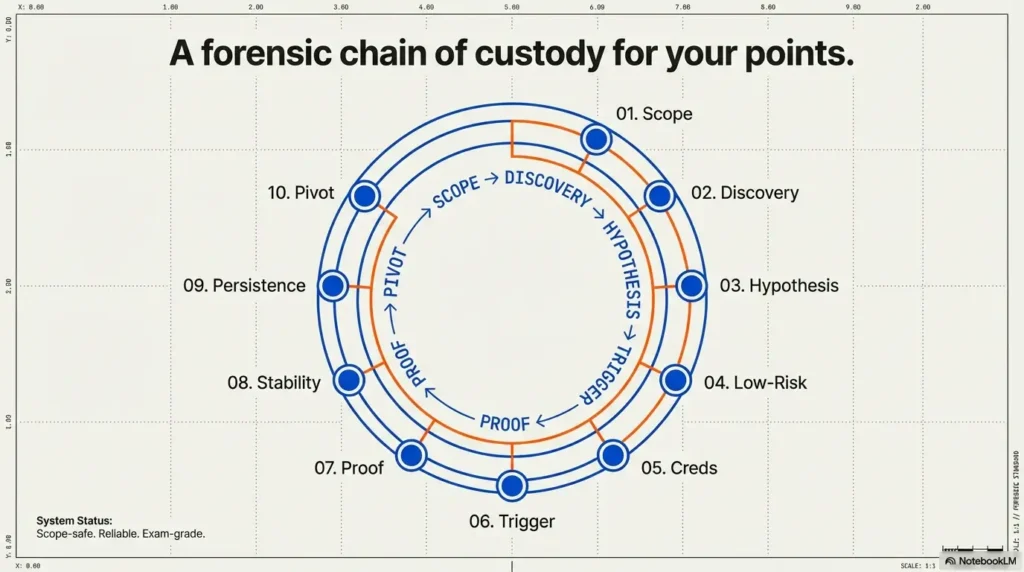
Define “Initial Access” in 10 points
“Initial Access” is not a vibe. It’s a chain you can audit: scope → discovery → decision → proof → repeat. The biggest shift is thinking like a tester who expects to be questioned: “How do you know?” “Show me.” “Can you reproduce it?”
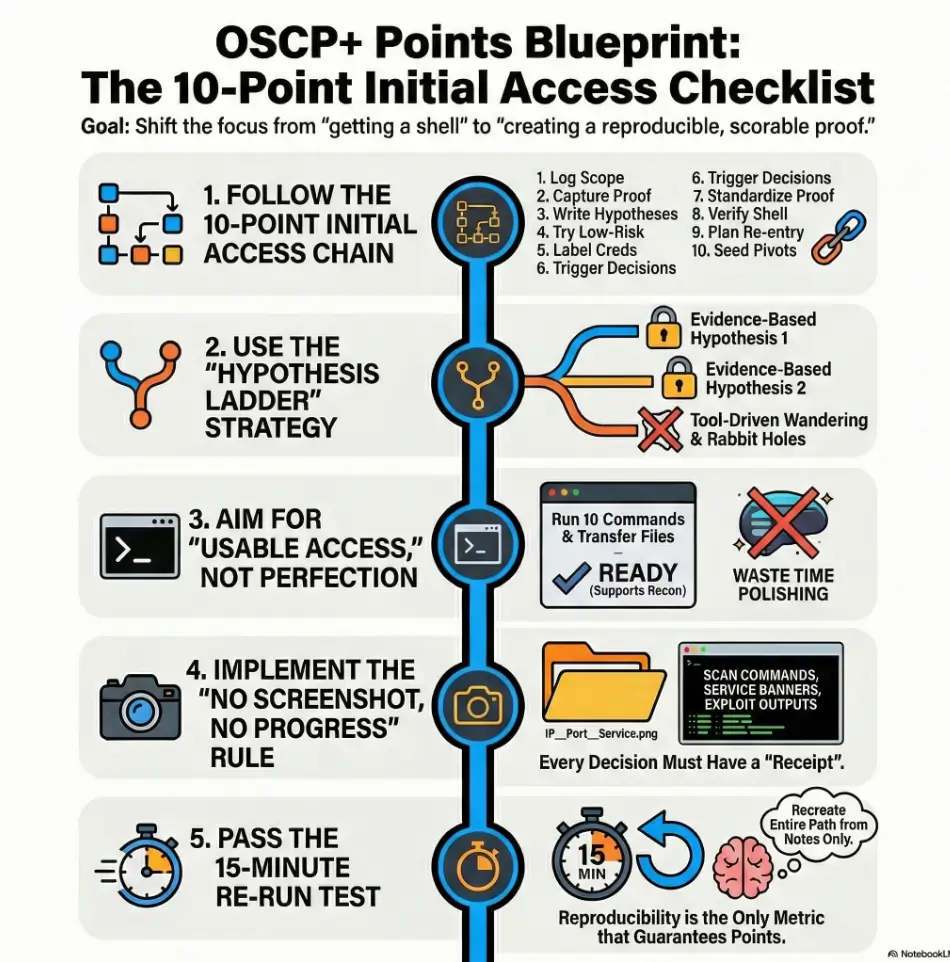
The 10-point checklist (use per target)
- Scope & constraints logged (target IPs/hostnames, allowed actions, timing assumptions)
- Discovery proof captured (scan command + key output + service list)
- Primary hypothesis written (top 1–2 likely entry paths, in plain English)
- Low-risk checks first (misconfigs, exposed panels, weak auth paths—authorized labs only)
- Credential handling plan (labeling, where to test, how to avoid mixing results)
- Decision trigger defined (what evidence justifies which attempt)
- Proof artifact standard (what you screenshot/save to make it undeniable)
- Shell stability baseline (“good enough” criteria for moving forward)
- Persistence not assumed (document volatility + re-entry plan)
- Pivot-ready notes (routes, creds, shares, tokens, local recon seed list)
Micro: Let’s be honest…
If you can’t re-run your own path in 15 minutes, you didn’t “solve” it—you visited it. And yes, I’m saying this as someone who has absolutely “visited” a box and then pretended it was a long-term relationship.
Infographic: the 10-point chain (printable mental model)
What’s allowed
What exists
What might work
Try cheap wins
Label & test
Evidence → attempt
Make it undeniable
Stable enough
Don’t assume
Seed next move
Operator tip: The chain is only as strong as the messiest box. Most people break at “proof” or “pivot.”
Money Block: “Exam-grade notes” eligibility checklist
Answer these yes/no fast. If you hit two “no” answers, you’re likely losing points to chaos (not difficulty).
- Yes/No: Could I explain the entry path in 4 sentences without guessing?
- Yes/No: Do I have at least 3 proof artifacts (scan, service evidence, access proof)?
- Yes/No: Are my attempts separated from my evidence (clean log vs experiments)?
- Yes/No: Could I re-run the path in 15 minutes using only my notes?
- Yes/No: Do I have one “pivot seed” (route/creds/share) documented?
Neutral action: Circle two “no” answers and fix only those before touching new tools.
Evidence-first scanning that actually earns points
Scanning is where most candidates quietly bleed points. Not because the scan is wrong—but because the record is missing. I learned this the hard way: I once had a perfectly valid foothold path… and a report that looked like a magician’s secret. No receipts. Just “trust me.”
What to capture (minimum viable evidence pack)
- Scan command + timestamp (even a rough time note helps)
- Key output snippet that proves the service exists
- Banner/version evidence (screenshot or saved output)
- Only the discovery that mattered (skip the noise; keep the decision facts)
How to label artifacts so they’re searchable
Use one naming pattern until it becomes muscle memory:
TARGET_IP__PORT__SERVICE__DATE__WHATYOULEARNED.txt/png
Example (human-readable, not fancy): “10.10.10.5__80__http__jan15__login-panel-found.png”. Your future self will thank you like you’re an actual friend.
Curiosity gap: the “one missing screenshot” problem
Here’s the uncomfortable question: which single artifact, if missing, would make your report unverifiable? Most people guess “the exploit output.” Often it’s earlier: the tiny proof that the service/version existed before you tried anything.
If you’ve ever been bitten by noisy versioning or misleading banners, it helps to keep a short sanity-check habit for Nmap -sV service detection false positives so your “evidence” stays evidence.
If you want a professional north star, NIST’s SP 800-115 talks about testing and assessment as a process with planning, execution, and documentation—same idea, different context. You’re building a miniature, personal testing methodology that survives stress. To make that repeatable, a simple Kali Linux lab logging habit can be the difference between “I did it” and “I can prove it.”
The “Hypothesis Ladder” that prevents random exploitation
Random exploitation feels productive. It’s also how you end up with 47 tabs, three half-finished notes, and a sinking feeling that you’re “behind.” A Hypothesis Ladder gives your brain a rail to hold onto.
Step 1: Convert findings into 2 hypotheses
Write exactly two hypotheses as sentences:
- “If service X is version Y, then vector Z is plausible because evidence.”
- “If config A is present, then misconfig B is plausible because artifact.”
Personal note: the first time I forced myself to cap it at two, I felt anxious—like I was “missing something.” Then I realized: I wasn’t missing anything. I was skipping the panic.
Step 2: Define disproof tests (fast, safe)
The trick isn’t proving yourself right. It’s disproving quickly. Ask: “What would prove this wrong in 2–5 minutes?”
- If the hypothesis depends on a path existing, can you confirm the path without brute forcing?
- If it depends on a role or permission, can you verify access boundaries with minimal touches?
- If it depends on an auth flow, can you confirm what endpoints exist before you attempt anything noisy?
Step 3: Choose the next action by expected value
You’re choosing between actions based on: time to attempt, probability, payoff, and risk. In labs, “risk” includes time risk—because a dead end costs points.
Show me the nerdy details
If you want a structured mental model, map each hypothesis to: (1) a single supporting artifact, (2) a disproof test, and (3) a success indicator. This mirrors how professional testers document rationale in scoped engagements: not “what I tried,” but “why this was the next rational step.”
Money Block: 30-second “Readiness” mini calculator
Three inputs, one output. No storage. Just a quick gut-check to stop you from running on vibes.
Score: 55/100 — Yellow: tighten evidence before you sprint.
Neutral action: If you’re Yellow or Red, capture one missing artifact before attempting anything new. If you need a hard stop that prevents spirals, keep a simple OSCP rabbit hole rule visible next to your timer.
The misconfig-first pass most people skip
I’m going to say something mildly annoying: the fastest footholds are often boring. Not always. But often. That’s why a misconfig-first pass exists—to catch cheap wins before you spend an hour being clever.
Low-friction checks that don’t require heroics
- Anonymous access possibilities (shares, endpoints, default views)
- Exposed admin panels and “forgotten” management interfaces
- Weak ACL patterns and obvious permissions mismatches
- Default paths that confirm what software is actually present
This is where professional frameworks help your thinking. OWASP’s testing guidance is basically a reminder that systematic checks beat vibes—especially on web surfaces. You’re not copying a playbook; you’re stealing the mindset. If your recon hits weird SMB reporting or you can’t confirm a version cleanly, a quick reference like why smbclient can’t show the Samba version helps you keep your evidence honest instead of hand-wavy.
Credential hygiene: one rule that saves hours
One credential = one label + one test log entry (where/when/result). This sounds small. It’s not.
- Label: origin (where it came from) + target (where it was tested) + result (worked/failed/unknown)
- Never reuse a credential without writing “tested here” first
Pattern interrupt: Here’s what no one tells you…
The fastest “Initial Access” isn’t the cleverest exploit—it’s the cleanest decision trail. When you’re tired, your brain won’t remember what you meant. It will only remember what you wrote.
Money Block: “Before you compare paths” prep list
Gather these first so your decision isn’t emotional.
- One clean scan summary (top ports/services only)
- Two hypotheses written as sentences
- One disproof test for each hypothesis
- A 20–30 minute timebox for the next attempt
- A folder ready for proof artifacts (screenshots/output)
Neutral action: Don’t start a new attempt until these five items exist.
Shell quality gate: “access” vs “usable access”
Getting “a shell” can feel like winning the lottery. Then you try to run two commands and it collapses like a folding chair. A quality gate keeps you from celebrating too early—or over-polishing when you should be enumerating.
The 3 checks that decide whether to proceed
- Command execution reliability: can you run basic commands without frequent drops?
- File transfer feasibility: can you move small files or output cleanly (even if crude)?
- Enumeration readiness: can you run your baseline recon steps without fighting the session?
I once spent 45 minutes “improving” a session that was already stable enough to enumerate. That wasn’t dedication. That was procrastination wearing a hoodie. Your goal is “usable,” not “perfect.” If your bottleneck is terminal weirdness or a fragile TTY, keep a practical TTY upgrade checklist close so you can cross the “usable” line fast and move on.
When to stop polishing and start enumerating
Define “stable enough” like a checklist:
- You can execute 10 consecutive commands without losing state
- You can capture output in a way you can later prove
- You have a quick re-entry plan documented if it drops
- Stop polishing when the session supports baseline recon
- Write re-entry notes while it’s fresh
- Keep proof artifacts flowing
Apply in 60 seconds: Write one line: “Stable enough when I can do X, Y, Z.”
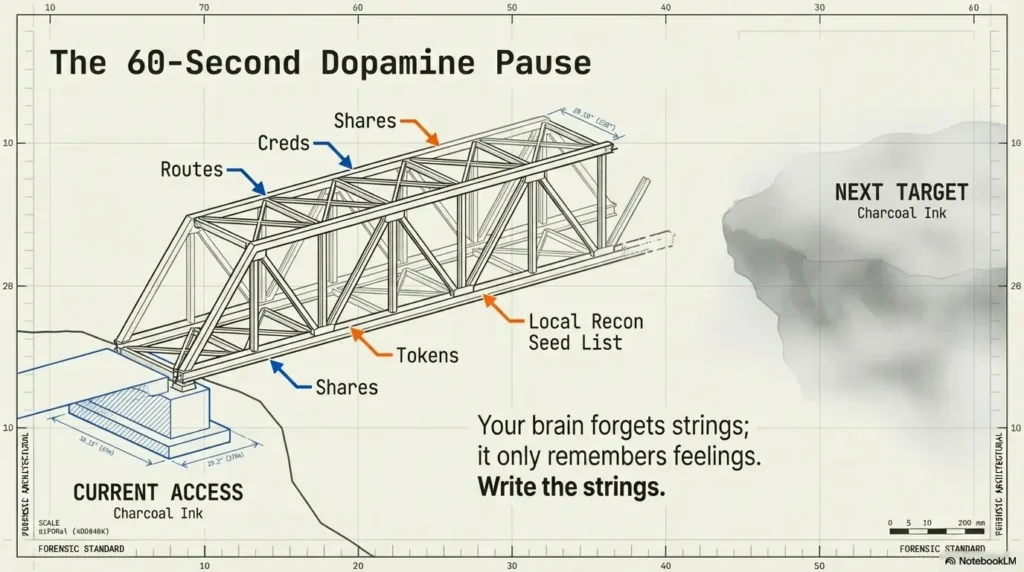
Pivot-ready notes: write them while your hands are warm
Pivoting is where lab time turns into points—but only if your notes are ready. The moment you get initial access, your brain wants a dopamine break. That’s exactly when you should write the pivot seed list.
The 60-second pivot prewrite
- Interfaces/routes and any reachable subnets (even partial)
- Trust relationships (domains, shares, known peer hosts)
- Useful local context (users/groups/services that matter)
- Any credentials, tokens, or access hints—labeled and scoped
What to save even if you think it’s “obvious”
- Working directories and temp files used
- The exact commands that produced proof
- Any fragile steps that will break if you forget one detail
Curiosity gap: what will future-you forget first?
The smallest detail that destroys reproduction is usually… not the exploit. It’s the “boring” thing: an exact endpoint, a path name, a service quirk, a timing assumption, a credential label you forgot to write.
Short confession: I used to tell myself, “I’ll remember.” I never remembered. I remembered feelings. I forgot strings. Computers do not negotiate with feelings. (Also: your “pivot seed list” gets dramatically easier when you’ve already settled on a sane OSCP pivoting tool choice for your workflow.)
Short Story: The day I learned to stop trusting my memory (120–180 words) …
Short Story: I once cracked an “easy” lab box late at night and went to sleep feeling smug. The next morning, I tried to recreate it and hit a wall. Same target, same tools, same confidence—zero results. I spent an hour spiraling, convinced the lab had changed. It hadn’t. My notes were the problem. I had written “found admin page” but not the path.
I had saved “scan output” but not the command. I had a screenshot of the shell but not the step that earned it. Eventually I stumbled back into the foothold through trial-and-error and felt… weirdly embarrassed. Not because I failed, but because I could see the pattern: I was collecting wins, not building proofs. That day I started writing “decision triggers” and naming artifacts like a boring accountant. My success rate didn’t just improve—it became repeatable.
Common mistakes that quietly burn points
If you want a quick confidence boost: most point loss isn’t from “not knowing enough.” It’s from doing the right work in a way that can’t be scored. Let’s fix the avoidable stuff.
Mistake #1: Treating scan output like trivia
Fix: extract “decision facts” (ports → services → evidence). Write one sentence per service: “This exists, here’s the proof, here’s why it matters.”
Mistake #2: Mixing experiments with evidence
Fix: separate your attempt log from your proof pack. Your proof pack should be clean enough that someone else could verify it without reading your entire emotional journey.
Mistake #3: Not timeboxing rabbit holes
Fix: set a 20–30 minute timer + a defined disproof test. If the disproof test fails, you pivot. No courtroom drama. If you want a single line that stops “just five more minutes,” keep the rabbit hole rule pinned where you can see it.
Mistake #4: “I’ll remember later” note-taking
Fix: write the pivot seed list before you celebrate. Celebration is allowed. It just comes after the 60 seconds of future-proofing.
Mistake #5: Screenshot chaos
Fix: one naming convention + one folder per target. When you’re stressed, you won’t search beautifully. You’ll search bluntly. Make blunt searching work. If you want a no-nonsense standard for what to capture, borrow the checklist logic from what to screenshot for OSCP proof and keep it identical across targets.
Money Block: Decision card — when to keep pushing vs pivot
| Situation | Do this | Why |
|---|---|---|
| You have 2+ supporting artifacts | Push for one more timebox | Your hypothesis is evidence-backed |
| You can’t define a disproof test | Pivot to a clearer hypothesis | You’re guessing, not testing |
| Your “attempt log” is longer than your “proof pack” | Pause and capture artifacts | Points want proof, not effort |
| You’re re-running commands out of habit | Reset with a 2-hypothesis cap | Stops tool-driven wandering |
Neutral action: Pick one row that matches your current state and follow it for 20 minutes.
Curiosity-gap section: the “Two doors” moment
Every target eventually gives you a choice. Two doors. Both “could” work. This is where experienced candidates quietly separate themselves—not by genius, but by choosing the door they can reopen tomorrow.
Door A: fast access, low confidence
- Gain: speed and momentum
- Risk: you can’t reproduce it cleanly, and your report gets shaky
Door B: slower access, audit-grade trail
- Gain: repeatability and proof clarity
- Risk: you feel “behind” while you document
The rule: choose the door you can re-open tomorrow
My personal rule: if Door A requires “I’ll remember,” it’s not Door A—it’s a trap door. Door B is where you spend 3 extra minutes labeling artifacts and save 30 minutes later. That’s not poetic. That’s math.
Build your reusable template (Obsidian/Notion/plain text)
Your template should feel like a calm checklist—not a shrine to copy-paste. Whether you use Obsidian, Notion, or a plain text file in Kali Linux, the structure is the real product.
The one-page “Initial Access” card layout
- Scope: target, allowed actions, assumptions
- Discovery: top services + evidence artifacts
- Hypotheses: two sentences
- Checks: low-risk pass + results
- Attempts: short log (what/why/result)
- Proof: list of artifacts + filenames
- Pivot seeds: routes/creds/shares/next test
Optional: the “decision trigger” mini-table
If you struggle with “what to do next,” add this mini-table:
- Evidence → Action → Expected result → Actual result
Make it mobile-safe and exam-fast
- Short fields, checkboxes, and defaults
- Minimal paste: keep only what supports a decision or proof
- One folder per target; one naming convention
A quick tool note (not a tool dump): it’s totally normal to use staples like Nmap for discovery or Burp Suite for web observation. Just remember: the point isn’t the tool. The point is the evidence trail. If you want a clean, reusable layout you can drop into your workflow, start from an Obsidian OSCP enumeration template and keep the same headings for every target. And if you’re running Burp in Kali and keep bouncing between browsers, a reliable Burp external browser setup in Kali keeps your “observation lane” stable instead of fiddly.
Next step: run the checklist on your last solved box
The fastest way to upgrade your workflow is to test it against a target you “already solved.” This removes the ego pressure and exposes the weak link in your chain.
One concrete action
- Pick one box you “completed.”
- Try to recreate it using only your notes.
- If you fail, rebuild your notes into a single 10-point card.
- Re-run until it’s reproducible in 15 minutes.
Tiny personal anecdote: the first time I did this, I felt personally attacked by my own notes. Then I improved them—once—and my next five boxes got easier. Not because the boxes changed. Because I did. If you want a clean target to “re-run test” on, a classic baseline like Kioptrix Level 1 without Metasploit is perfect for validating whether your notes are actually reproducible.
FAQ
1) What counts as “Initial Access” on OSCP-style exams?
Think “first verified foothold” in a scoped environment: you can demonstrate access, show how you got it, and reproduce it. The key is not just access, but proof + repeatability.
2) How do I turn lab practice into exam points instead of just “learning commands”?
Use a per-target rubric (like the 10-point checklist) and enforce a proof pack standard. Commands are a means. Points usually follow the decision trail and the artifacts you can show.
3) What should I screenshot to make my report defensible?
Capture: (1) discovery evidence (scan/service proof), (2) the key turning-point evidence (why you chose the next step), and (3) access proof. If your screenshot doesn’t support a decision or a claim, it’s optional.
4) How do I avoid rabbit holes during enumeration?
Cap hypotheses at two, define a disproof test for each, and timebox attempts to 20–30 minutes. If you can’t define a disproof test, you’re guessing—pivot to a clearer hypothesis.
5) Is a shaky shell “good enough,” or should I stabilize first?
“Good enough” means you can execute baseline recon steps, capture proof, and re-enter if it drops. Stabilize only to the point it enables progress—then move on.
6) What’s the best way to organize notes per target in Obsidian?
One note per target, one folder per target, and a consistent card layout (scope → discovery → hypotheses → proof → pivot seeds). The biggest win is the naming convention for artifacts—searchable beats pretty.
7) How do I decide between two possible entry paths quickly?
Choose the path with (a) stronger evidence, (b) faster disproof, and (c) cleaner proof artifacts. If both are equal, pick the one you can reproduce in 15 minutes.
8) What are the most common note-taking mistakes OSCP candidates make?
Mixing experiments with evidence, failing to label artifacts, and relying on memory for fragile details (paths, endpoints, versions, exact outputs). If your notes can’t survive sleep, they won’t survive exam pressure.
9) How much time should I spend on initial scans vs deeper enumeration?
Spend enough time to produce a clean service summary and two hypotheses—then move. Over-scanning is often procrastination; under-scanning is often guessing. The checklist keeps you honest.
10) How do I build a reusable checklist that doesn’t become copy-paste noise?
Keep the structure stable and the content minimal. Store only decision facts, proof artifacts, and pivot seeds. If a section doesn’t help you decide or prove, shrink it.
Conclusion
Let’s close the loop from the hook: the reason you can’t reproduce yesterday’s “win” isn’t that you forgot a command. It’s that your work didn’t leave behind a clean, scorable trail. The 10-point Initial Access checklist fixes that by forcing three habits: evidence capture, decision triggers, and pivot-ready notes. And those habits scale—from one lab box to an entire exam set—because they don’t rely on mood.
If you want to borrow credibility without copying tactics, steal from the boring grown-ups: NIST’s testing guidance emphasizes planning and documentation as part of a real assessment process, and OWASP’s testing resources remind you that systematic checks beat guessing. You’re building your own tiny, personal version of that discipline—fit for OSCP+ time pressure.
Your next step is small and measurable: pick your last “solved” box and run the 15-minute re-run test. If you fail, don’t punish yourself—tighten one link in the chain (usually proof artifacts or decision triggers) and try again. Do that once, and you’ll feel a quiet shift: you stop chasing wins and start building repeatable outcomes. If your “quiet shift” gets interrupted by lab instability (networking, host-only weirdness, disappearing IPs), fix that once with a practical VirtualBox host-only no IP troubleshooting guide so your workflow isn’t fighting the floor.
Last reviewed: 2026-01-15