

Kali Linux YubiKey SSH Flow
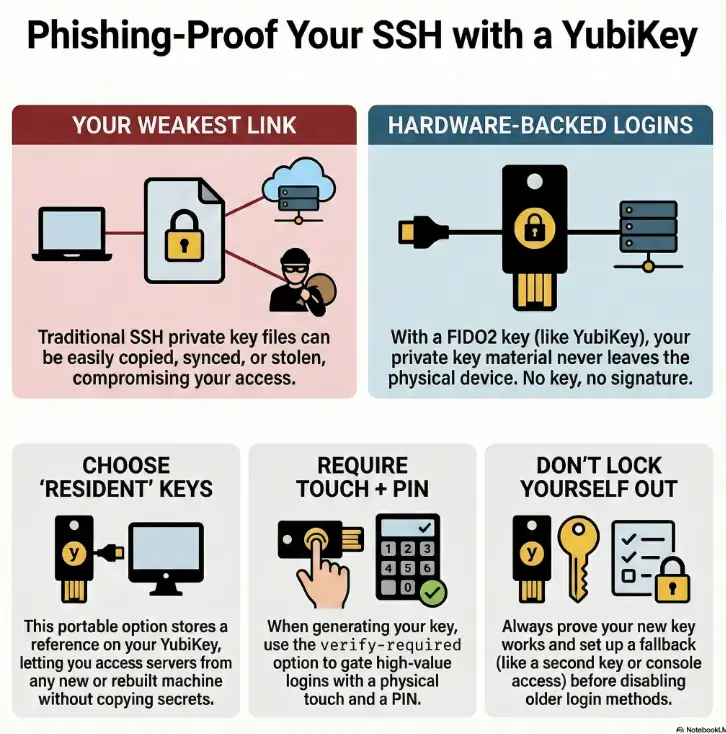
The weakest part of most SSH setups isn’t the math—it’s the private key file you didn’t realize you duplicated, synced, or left behind. A Kali Linux YubiKey SSH flow using FIDO2 keeps the secret on the hardware, so a “new laptop overnight” doesn’t turn into a key scavenger hunt.
ed25519-sk is OpenSSH’s security-key SSH key type: the private key never lives on disk, and each login requires a physical signing action on the device—usually touch, and optionally PIN-based user verification (the “verify-required” gate). With resident (discoverable) keys, you can later rehydrate the stubs on a fresh Kali install without copying private keys around.
Keep guessing and you eventually pay for it: one reimage, one agent conflict, one “wrong identity offered,” and suddenly access becomes a midnight troubleshooting ritual. This guide turns it into a boring, repeatable routine: preflight checks, a clean ssh-keygen command, tight authorized_keys, ssh-keygen -K portability, and per-host config that makes the right key the default.
Kali-first. Rebuild-friendly. Lockout-averse.
Then roll it out—one safe rung at a time.
Table of Contents
Resident keys: pick the “portable private key” path on purpose
Let’s start with the core idea in plain English: with FIDO2 SSH keys (the -sk kind), you’re not protecting a file on disk as much as you’re protecting the ability to ask the key to sign. That ability lives on the YubiKey. No YubiKey, no signature. And that’s the point.
Now the decision you can’t skip: resident (discoverable) vs non-resident (non-discoverable). It sounds like an implementation detail. It is not. It changes portability, recovery, and how “rebuild-friendly” your life becomes.
- Resident: key is discoverable on the YubiKey; you can rehydrate on a new machine.
- Non-resident: the client needs a local “handle” to find the key; portability is more manual.
- Either way, touch/PIN gates decide daily UX.
Apply in 60 seconds: Decide whether your threat is “stolen laptop” or “lost device,” then pick resident/non-resident accordingly.
Resident vs non-resident: the one toggle that changes everything
Resident (discoverable) means you can later “pull down” the public key + stub metadata from the YubiKey onto a fresh install and keep working without copying private keys. This is why resident keys feel like magic on a rebuilt Kali laptop.
Non-resident means the YubiKey holds the secret, but the client relies on local references to use it. Some tooling prefers this because it can fit into their sync model. In exchange, portability becomes a little less “plug-and-go.”
Open loop: why “discoverable” sounds safer—but sometimes isn’t
“Discoverable” can sound like “easier to steal.” The nuance: discoverable doesn’t reveal the private key. It reveals that a credential exists and can be used with your physical key and (optionally) your PIN. The real security hinges on: (1) the physical device, (2) touch policy, and (3) whether the credential requires user verification (PIN). We’ll close this loop in the final section with a break-glass plan that doesn’t ruin your security posture.
Where verify-required fits: touch, PIN, and what’s actually enforced
Touch is the “presence check.” PIN is the “user verification gate.” In practice, you want both for high-value access (bastions, prod, your GitHub org). If you only require touch, a stolen key can still be used by anyone who can touch it. If you require PIN + touch, you get a human-in-the-loop gate that’s hard to phish and hard to automate at scale.
- You reinstall/rebuild Kali often.
- You work across multiple laptops.
- You want “plug key → rehydrate → go.”
Trade-off: you must be serious about fallback access if you lose the device.
- Your tooling expects local key handles/stubs.
- You prefer explicit per-machine enrollment artifacts.
- You’re optimizing for a specific client workflow.
Trade-off: portability is more manual; you’ll manage local references carefully.
Neutral next action: Write down which problem hurts you more—rebuild pain or device-loss anxiety—then pick the side that solves it.
Who this is for / not for: don’t fight the wrong battle
This setup is ideal when your work has a lot of “keys everywhere” energy: multiple servers, multiple roles, frequent reimages, and a constant parade of jump boxes. It’s also ideal when you’re trying to reduce the chance that a single compromised laptop becomes “SSH everywhere.” If you’re also tuning the rest of your workflow (shell, prompts, and muscle-memory commands), pairing this with a clean Zsh setup for pentesters makes the day-to-day feel more consistent.
Best fit: Kali laptops, bastions, homelabs, and “I rebuild often” workflows
A common scene: you’re on a train, tethering your laptop, trying to hop into a box to grab one log file. The last thing you want is to remember which private key you used for that environment. A YubiKey-based flow can compress that mental overhead into one reliable ritual: plug in, touch, PIN, done.
Not ideal: shared jump accounts, brittle legacy OpenSSH, or mixed-policy enterprises
If your organization uses shared SSH accounts or requires older OpenSSH servers you can’t upgrade, you may need PIV or OpenPGP-based SSH instead. Also, if you can’t guarantee a fallback access path (console access, second key, break-glass account), “hardware-only” policies can become self-inflicted downtime.
Open loop: the surprising reason teams abandon this (and how to prevent it)
Teams rarely abandon security keys because they’re insecure. They abandon them because the day-to-day UX feels unpredictable: wrong key selected, agent conflicts, PIN prompts that appear on one machine but not another. We’ll prevent that by (1) naming keys like you mean it, (2) keeping per-host config explicit, and (3) building a safe rollout sequence that doesn’t bet production on your first attempt.
- Yes — You can keep at least one fallback access method during rollout (console, second key, or separate admin path).
- Yes — Your servers run an OpenSSH version that supports security keys (or you control upgrades).
- Yes — You’re willing to require touch (and ideally PIN) for high-value logins.
- No — You’re depending on a single device with no backup plan.
Neutral next action: If any “No” is true, plan the fallback first—then do the key work.
Kali preflight (2025): the 5 checks that prevent 80% of failures
Before we generate anything, we make the future you grateful: verify the pieces that commonly “fail silently.” In operator terms, this is where you save 20 minutes of confusion with 30 seconds of confirmation. If you’re in a VM-heavy lab setup, it’s also worth making sure your environment itself isn’t sabotaging you—especially if an encrypted Kali VM is slow on VirtualBox and you’re mistaking lag for auth weirdness.
1) Confirm your OpenSSH client can do FIDO2 security keys
You want a modern OpenSSH client (Kali is usually fine here). Confirm with:
ssh -VIf you’re on something unusually old, update first. Security-key SSH is not a feature you want to duct-tape onto an antique client.
2) Confirm the YubiKey is seen and usable (not just “plugged in”)
“Plugged in” is not a state; it’s a hope. The OS must see the device, and the FIDO2 applet must be available. If you use the Yubico tooling, it can help you verify that the FIDO2 application is enabled and that a PIN exists.
3) Confirm PIN state (because this is where first attempts go to die)
If you haven’t set a FIDO2 PIN, do that before you get emotionally attached to your key command. A missing PIN can lead to “why am I not being prompted?” confusion later, especially when you assume verification is required.
4) Confirm required libraries and support (Linux friction is real)
On Linux, missing dependencies can feel like the system ignoring you. If you generate a key and nothing prompts, this is often the reason. Don’t treat that as a mystery; treat it as a checklist item. And if your Kali environment is mid-upgrade, fix package friction first—especially if Kali packages have been kept back and you’re unknowingly running mismatched components.
5) Confirm you have a fallback path before you touch server settings
We’re not disabling password logins yet. We’re not changing SSHD hardening knobs yet. We’re first proving one key login works end-to-end. If you plan to harden right after validation, keep a roadmap handy—this pairs naturally with a dedicated Kali SSH hardening checklist once your FIDO2 path is proven.
Short Story: You’re in a hotel room with a slightly cursed Wi-Fi. Your Kali laptop updates, reboots, and suddenly your SSH agent behaves like it’s possessed. You try the usual: reloading keys, restarting services, re-trying the command in a different terminal. Ten minutes pass, then twenty. The real problem wasn’t the network. It was your setup relying on a local private key file you didn’t realize had been moved during the reinstall. A resident key would have made the fix boring: plug in the YubiKey, rehydrate the stub, touch, and move on. The bigger lesson is even simpler: build a path that still works when your laptop becomes “a new laptop” overnight.
Show me the nerdy details
Security-key SSH uses the FIDO2/U2F interface via OpenSSH’s “-sk” key types. On Linux, userland libraries and agent behavior can affect prompts and device discovery. Preflight is about confirming: client support, device availability, and verification gating (PIN) before you blame SSH itself.
Keygen on Kali: ed25519-sk resident + touch/PIN without regret
This is where we generate the key in a way that scales: multiple roles, multiple hosts, and future-you not cursing present-you. The UX goal is consistent prompts and predictable identity selection.
The canonical flags (-O resident, -O verify-required) and what each buys you
At a high level:
ed25519-sktells OpenSSH you want a security-key-backed ed25519 key.-O residentstores a discoverable credential on the YubiKey (portability).-O verify-requiredpushes for PIN-based verification (stronger gate than touch alone).
Example (adjust filenames to your naming strategy):
ssh-keygen -t ed25519-sk -O resident -O verify-required -C "kali-2025:bastion:ops" -f ~/.ssh/id_ed25519_sk_bastionNaming strategy: comments + purpose strings so keys don’t blur together
If you keep multiple keys on one device (and you will, if you do serious work), names are not aesthetics—they’re operational safety. Use a naming pattern that answers three questions:
- Where? (bastion, prod, homelab, client)
- Who? (role or account class: ops, deploy, break-glass)
- When? (year or rotation tag, so you can retire cleanly)
Let’s be honest… your first run fails if the PIN state is wrong (spot it fast)
If you don’t get a PIN prompt when you expect one, don’t keep re-running the command hoping it becomes more cooperative. Stop and verify the key’s FIDO2 PIN is set, and confirm the option you used (verify-required) matches what you’re trying to enforce. Many “it doesn’t work” stories are really “the device wasn’t in the state you assumed.”
- Label keys by role and destination, not by vibes.
- Require PIN for high-value logins; touch alone is weaker.
- Keep one test target before rolling to everything.
Apply in 60 seconds: Generate one “bastion test” key with a clear comment and file name.
Server enrollment: authorized_keys that stays tight (and testable)
This part is where good setups become great setups: you enroll the public key carefully, verify permissions, and you test without gambling your access.
Install the public key without weakening .ssh permissions
Copy the public key to the server and append it to the correct account’s ~/.ssh/authorized_keys. Then confirm the basics:
~/.sshis not world-writable.authorized_keysis owned by the correct user.- SELinux/AppArmor contexts (if present) aren’t blocking SSH reads.
Add guardrails: when verify-required belongs in authorized_keys
If you want the server to insist on user verification, you can enforce restrictions via authorized_keys options for security-key keys. The exact knobs depend on your OpenSSH version and policy. The practical rule: if you’re protecting something expensive (prod bastion, CI secrets, org admin), it’s reasonable to be strict. If you’re approaching this as a staged rollout, it can help to align the end-state with your overall SSH hardening strategy for Kali-managed hosts so you don’t harden “randomly” and then regret the order later.
Open loop: why it works locally but fails over SSH (the mismatch checklist)
When local signing works but remote auth fails, it’s almost always one of these:
- The server doesn’t support the security-key key type you enrolled.
- You enrolled the wrong public key (because names weren’t distinct).
- Your client offered a different identity first (agent/config order).
- The server is rejecting the key due to permissions or policy options.
- OpenSSH client version on Kali and OpenSSH server versions on targets.
- Inventory: which hosts are “must access” vs “nice to access.”
- Fallback method: console path, second key, or separate admin account.
- Key naming convention (comment + filename) you’ll keep for 12 months.
Neutral next action: Write these four items down before you change any SSHD policy.
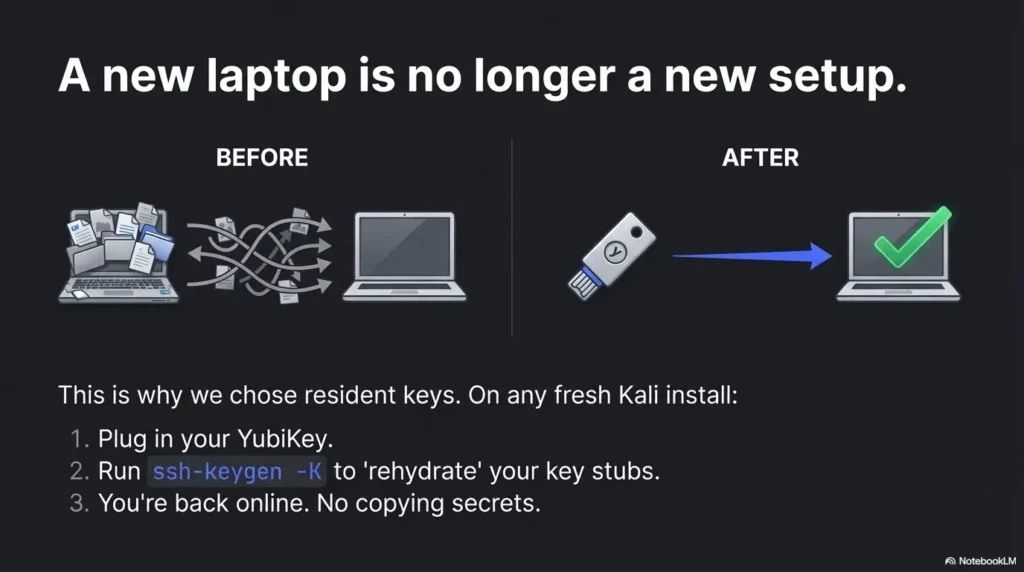
Portability: rehydrate resident keys on a fresh Kali install
This is the part that makes resident keys worth the effort: you can rebuild, reinstall, or migrate to a new machine without copying private keys around like contraband. The YubiKey stays the root of trust.
ssh-keygen -K: what it downloads (and what it doesn’t)
When you run the “download resident keys” flow, you are not extracting private key material. You’re pulling the public key and enough metadata to let the client reference the credential stored on the YubiKey. Think of it as restoring a pointer, not exporting a secret.
ssh-keygen -KAfterward, you’ll see key files that represent the resident credentials you’ve stored. The exact filenames can vary, which is why good comments and consistent naming matter.
Multiple resident keys: avoiding “which key did I just touch?”
If you store more than one resident key, confusion can creep in. Avoid it with these habits:
- One key per role per destination class (bastion vs Git vs homelab).
- Clear comments that include destination and purpose.
- Per-host SSH config that selects the identity explicitly.
Here’s what no one tells you… portability is 80% naming + 20% config
People blame FIDO2 when the real culprit is ambiguity. If your keys look the same, your brain treats them the same. Then the wrong key gets offered, the server rejects it, and suddenly “security keys are flaky.” They aren’t. Vague identity management is flaky.
- Install/confirm OpenSSH client is current.
- Plug in YubiKey → confirm PIN readiness.
- Run
ssh-keygen -Kto rehydrate resident key stubs. - Create per-host entries in
~/.ssh/configselecting the right identity. - Test against a non-critical server first.
SSH config ergonomics: make secure the default (no heroics)
If you want this to stick, it has to feel easy on Tuesday—not just impressive on day one. Your ~/.ssh/config is where you turn “strong security” into “automatic security.”
Per-host identities: bastion vs Git vs homelab (clean separation)
Make the identity explicit. Don’t rely on whichever key the agent feels like offering. A simple per-host pattern keeps everything predictable:
Host bastion-prod
  HostName bastion.example.com
  User ops
  IdentityFile ~/.ssh/id_ed25519_sk_bastion
  IdentitiesOnly yes
Do the same for Git remotes and homelab. It reduces misfires and reduces the “why did it pick that key?” spiral. If your lab spans multiple networks (NAT, Host-Only, Bridged) and you’re moving between test ranges, keeping your network layout predictable helps too—especially if you’re still deciding between VirtualBox NAT vs Host-Only vs Bridged for a pentesting lab.
Agent choices: when not using an agent is the smoother path
Agents can be great. They can also become a second operating system that you accidentally maintain. If your goal is “touch + PIN for every login,” you may prefer a minimal agent setup or even direct key use per host. If you do use an agent, be mindful of collisions with gpg-agent, desktop keyrings, and other ssh-agent instances.
Quick gut-check—are you optimizing for speed or certainty?
Speed says: cache everything, prompt less, automate. Certainty says: ask for touch, ask for PIN, make identity selection explicit. For bastions and anything with secrets behind it, certainty is usually the better bargain.
This is about expectations, not perfection. Estimate the friction so you don’t rage-disable it later.
Neutral next action: If you hate the number, reduce repetitive connections—keep the security gate.
Common mistakes: the lockout hall of fame (and how to dodge it)
If you’ve ever locked yourself out of a server, you know the emotional arc: confidence → one change too many → “why is this asking me for a password” → bargaining → console login. Let’s make that arc someone else’s story.
Mistake #1: disabling password login before you prove a working key path
Do not make “password off” your first milestone. Your first milestone is: one successful FIDO2 login end-to-end on a non-critical host. Only after that do you harden SSHD policy.
Mistake #2: wrong key selection (silent) → fallback key gets used instead
This is sneaky: your SSH client may offer a different key first, and you think your YubiKey setup is “working” when it’s actually using an older key. Then you rotate something, and it breaks. Use IdentitiesOnly yes and explicit IdentityFile per host to eliminate this.
Mistake #3: agent conflicts that look like “refused operation”
On Linux desktops, multiple agents can compete: system agents, desktop keyrings, gpg-agent, and purpose-built agents. The symptom is often cryptic. The fix is usually simple: run one agent that you understand, and set config explicitly.
Don’t do this: high-friction choices that quietly undo the whole point
- Disabling touch because “it’s annoying.” (You just removed your best phishing-resistant gate.)
- Reusing one identity everywhere. (You increase correlation and blast radius.)
- Keeping the only fallback key on the same disk you’re trying to protect. (That’s security theatre with extra steps.)
| Mistake | Symptom you’ll see | Fix that usually works |
|---|---|---|
| Disabled passwords too early | Lockout panic | Restore fallback access; test FIDO2 login first; then harden gradually |
| Wrong key being offered | It “works,” then suddenly doesn’t | Set IdentityFile + IdentitiesOnly yes per host |
| Agent conflict | “Refused operation,” missing prompts | Run one agent; disable competing agents; simplify until prompts are consistent |
| No naming convention | “Which key is this?” confusion | Adopt a role+destination naming pattern; rehydrate and re-test with clarity |
Neutral next action: If you only do one thing from this section, make key selection explicit per host.
Troubleshoot fast: translate scary errors into one of four causes
Troubleshooting gets easier when you stop treating each error as unique. Most FIDO2 SSH failures fall into four buckets: client support, key selection, server support/policy, and agent/device access. Your job is to identify the bucket, not memorize every error string.
Bucket 1: client-side support (or missing pieces)
If you see “security key not found” or you never get a prompt, suspect the client stack first: OpenSSH capability, device visibility, and required userland support. Confirm the basics, then retest.
Bucket 2: key selection (the silent saboteur)
If you have multiple keys, SSH may offer something else first. You’ll swear you’re using the YubiKey when you aren’t. Force the identity per host and temporarily disable extra identities to validate reality.
Bucket 3: server-side support and policy
Older servers, strict authorized_keys options, or file permission issues can reject a perfectly good key. Use server logs as a flashlight. They won’t write poetry, but they will tell you what failed.
Bucket 4: agent/device access conflicts
If another agent is intercepting requests—or if your desktop environment is doing “helpful” things—prompts can disappear or operations can be refused. Simplify: one agent, one key, one host, then add complexity back in. (And yes, if your wider toolchain is already battling dependency drift—say, the kind of “Ruby version mismatch” pain you’ve seen elsewhere—you’ll appreciate how much calmer life is when each layer is explicit.)
- No prompt at all? Confirm device visibility and client capability first.
- Prompt appears but auth fails? Check server logs and
authorized_keyspermissions. - Works on one machine but not another? Rehydrate resident stubs (
ssh-keygen -K) and confirm identical host config. - Error mentions agent/refused operation? Reduce to one agent instance; retest with explicit
IdentityFile.
Show me the nerdy details
Most SSH authentication failures are not cryptographic failures—they’re selection and policy failures. The client may offer multiple identities; the server may reject based on policy options, permissions, or unsupported key types; the agent layer can fail to reach the device. Debugging is faster when you isolate layers.
Alternatives map: when FIDO2 resident keys aren’t the best answer
FIDO2 security-key SSH is a strong default, but it’s not the only honest tool. Sometimes you need policy controls, sometimes you need compatibility, and sometimes you need a smoother “always prompt the same way” experience. The goal is the same: hardware-backed authentication with predictable operations.
Native FIDO2 (ed25519-sk) vs a dedicated agent: UX vs ecosystem tradeoffs
A dedicated agent can smooth prompts and enforce “always touch/PIN” behavior in a consistent way, especially across desktops where multiple agents exist. The tradeoff is adding another component you must understand and maintain. Native OpenSSH FIDO2 keeps the stack simpler, but you may do more config work to avoid conflicts.
PIV / OpenPGP: when policy and recovery needs dominate
PIV and OpenPGP-based SSH can be the better fit in organizations that already run smartcard policies, certificate workflows, or key rotation processes. If your environment demands centralized control or existing compliance patterns, those approaches can be more aligned—even if they feel heavier.
Open loop: the “one device” risk—and how pros mitigate it
The fear is reasonable: “If my key is the key, what happens when I lose it?” The mitigation is also reasonable: multiple devices, staged enrollments, and a break-glass method that’s isolated and monitored. We’ll lay out a practical break-glass plan in the final section without turning your setup into a fragile shrine.
| Option | Best for | Tradeoff | Ops burden |
|---|---|---|---|
FIDO2 native (ed25519-sk) |
Simple stack, phishing-resistant SSH | You must manage agent/config clarity | Low–Medium |
| Dedicated agent (YubiKey-focused) | Consistent prompts, smoother desktop behavior | Extra component; possible conflicts | Medium |
| PIV/OpenPGP | Smartcard policy, existing certificate workflows | Heavier setup; more moving parts | Medium–High |
| OTP/PAM add-ons | Legacy environments, incremental hardening | Not the same phishing-resistant story | Medium |

FAQ
Do I need a YubiKey 5 series, or will a Security Key by Yubico work?
For FIDO2-based SSH, you need a key that supports FIDO2. Many modern security keys do. If you’re also planning PIV or OpenPGP workflows, verify that your model supports those features before you standardize.
What’s the difference between ed25519 and ed25519-sk in OpenSSH?
ed25519 is a traditional file-backed private key. ed25519-sk is a security-key-backed key type: the signing operation happens on the hardware device, typically gated by touch and optionally a PIN.
What does “resident (discoverable)” mean for SSH—where is the private key stored?
Resident means the credential is stored on the YubiKey in a discoverable form, so you can later rehydrate the client-side stub on a new machine. The private key material remains on the device; you’re restoring the ability to reference it, not exporting it.
Can I use the same resident key on multiple computers, including a fresh Kali reinstall?
That’s the main advantage of resident keys. With the device present, you can rehydrate the required stubs and continue using the same credential without copying private keys around like contraband.
Why do I sometimes get a touch prompt, sometimes a PIN prompt, sometimes both?
Touch is presence. PIN is user verification. Depending on how the credential was created and how verification is required, you may see touch-only or touch+PIN. For high-value systems, it’s reasonable to require both.
What happens if I lose the YubiKey—am I permanently locked out?
You can be if you design it that way. Don’t. Use a break-glass plan: enroll a second hardware key ahead of time, keep console access, or maintain a separate tightly controlled admin path. The goal is “hard to steal,” not “easy to lock yourself out.”
Will this work with older Ubuntu/Debian servers?
Compatibility depends on the server’s OpenSSH version and policy configuration. If you control upgrades, plan to standardize versions across critical hosts. If you don’t, consider PIV/OpenPGP options that better fit legacy constraints.
Can I still use GitHub/Git over SSH with -sk keys?
Often yes, but details vary across clients and environments. The operator move is to create a dedicated key identity for Git workflows and test it independently from your bastion access.
Do I need an SSH agent at all for FIDO2 keys?
Not always. Agents can help manage identities and reduce repeated prompts, but they can also introduce conflicts. If you’re aiming for predictable touch/PIN behavior, keep the agent layer simple and explicit.
Next step: one concrete action (safe rollout) + closing the loop
Here’s the promise you came for: no more “where’s my private key?” Not because you became more disciplined, but because the system stopped asking you to be. With resident FIDO2 keys, your private key material doesn’t bounce between laptops, dotfiles, and cloud sync. It stays on the YubiKey. Your job becomes operational: clear naming, explicit host config, and a rollout sequence that respects downtime.
The 15-minute pilot that prevents the 2 a.m. lockout
- Create one test user on a non-critical server (or a disposable VM).
- Enroll your
ed25519-skresident key public key intoauthorized_keys. - Confirm you see the expected prompts (touch, and PIN if required).
- Confirm logs show a successful public-key auth event.
- Only then consider hardening steps like disabling password auth on real hosts.
ssh-keygen -K on a second machine or fresh profile.- Tier 1: FIDO2 key works on one test host (touch required).
- Tier 2: PIN required for high-value hosts (verification enforced).
- Tier 3: Per-host identities + explicit config (no silent key selection).
- Tier 4: Second device enrolled + break-glass path documented.
- Tier 5: Gradual SSHD hardening + monitoring/log review for key-based access.
Neutral next action: Pick your current tier and move up one rung this week—no heroics required.
Closing the loop: “discoverable” vs “safe” (the real answer)
Remember the open loop about resident keys sounding scary? Here’s the sober version: “discoverable” doesn’t mean “extractable.” It means the credential can be found on the device. Safety comes from touch + PIN, from per-host identity clarity, and from a break-glass plan that doesn’t live on the same laptop you’re trying to protect. If your next move is “tighten everything,” do it deliberately—this is where having a clear