


Kali SSH Hardening: No Heroics, Just Clean Control.
I once “secured” a Kali box so well that I spent 38 minutes crawling back in through a VM console. Not because SSH is hard—because the order of operations is unforgiving. If you’re doing Kali SSH hardening and you’re moving fast (lab, VM, jump box), the real pain isn’t “security settings.” It’s the moment you restart sshd and realize you just removed your own ladder.
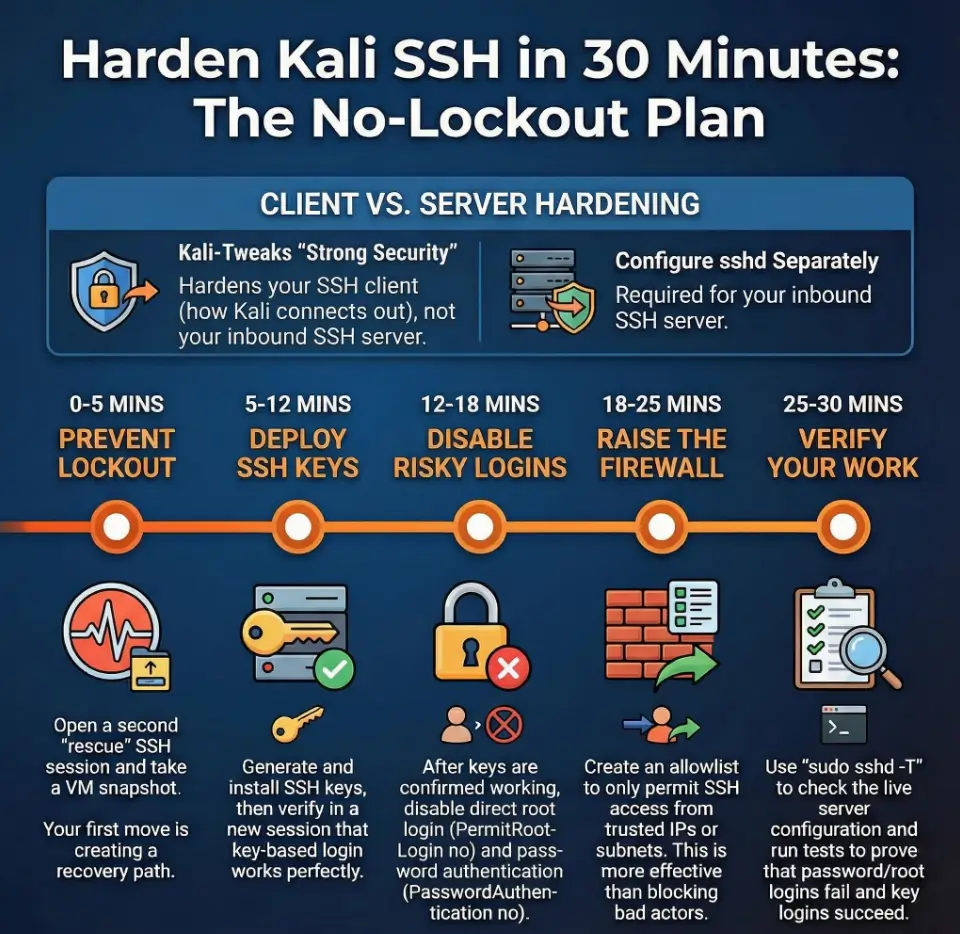
Here’s the contrarian truth this guide is built on: kali-tweaks Strong Security mostly hardens the SSH client defaults on Kali—it makes your Kali machine stricter about ciphers/KEX when connecting out. Your server posture still lives in sshd_config, network exposure, and controls like key-only auth, firewall allowlists, and fail2ban.
Keep guessing and you lose time, access, or both. This walkthrough gets you to a calm, testable baseline—without copy-paste crypto regret—then proves it with sshd -T and a quick login test suite.
It’s written like an operator: one change, one proof, repeat.
Next: a 60-second “don’t strand yourself” setup… and the exact switches that actually change reality.
Table of Contents
First 60 seconds: the lockout-proof setup
If you do one thing before touching SSH settings, do this: make it impossible to lock yourself out. Security that strands you is just an expensive lesson.
Keep-one-session-open rule (rescue SSH session)
- Open two SSH sessions to the box (or one SSH + one local console).
- Session A = your “work” session. Session B = your “rescue” session. Leave Session B alone.
- If you’re on a VM: keep the hypervisor console window open (and make sure your VirtualBox NAT vs host-only vs bridged networking choice matches your access plan).
Snapshot/console fallback (VM, cloud console, or local TTY)
- VM? Take a snapshot. It’s the closest thing to a time machine you’ll ever deserve.
- Cloud? Confirm you have serial/console access, or at least a recovery method.
- Physical box? Make sure you can reach a keyboard/monitor if needed.
Let’s be honest… “secure” isn’t secure if you can’t get back in
I’ve watched people “optimize” into downtime with the confidence of a surgeon and the planning of a cat. Don’t be the cat. Give yourself an exit.
- Keep a rescue session open
- Have console access ready
- Change one thing at a time
Apply in 60 seconds: Open a second SSH session and promise yourself you won’t close it until verification passes.
Short Story: I once hardened SSH on a Kali VM at 1:12 a.m. because “it’ll take five minutes.” I disabled password auth first (because I’m brave), then realized my public key never actually landed in the right user’s authorized_keys. Session A dropped. Session B dropped. T
he VM stared back like a silent judge. I spent 38 minutes in the hypervisor console, re-enabling passwords, undoing my own confidence, and learning the one lesson I now teach on autopilot: you don’t earn extra points for suffering. You earn points for a repeatable process that keeps you connected while you tighten the screws. End of story: no hero music—just a calmer checklist.
kali-tweaks Strong Security: what it really changes
This is the part that quietly ruins a lot of “Kali SSH hardening” guides: they treat kali-tweaks like it hardens your SSH server. It mostly doesn’t. It tunes the SSH client behavior—how your Kali box talks to other servers.
Strong Security vs Wide Compatibility (why Kali offers both)
Kali ships with an opinionated stance: out of the box, its SSH client defaults to Strong Security. That means it prefers modern algorithms and avoids older, weaker ones. But Kali also needs to talk to dusty legacy boxes during testing, so it offers Wide Compatibility that can enable older key exchange algorithms and ciphers.
Operator translation: Strong Security makes your Kali box stricter; Wide Compatibility makes it more forgiving when you’re dealing with old or vulnerable SSH servers.
Where the toggle lives (the config file it creates/removes)
When you change modes through kali-tweaks (Hardening → Strong Security / Wide Compatibility), the switch is achieved by creating or deleting a file named:
/etc/ssh/ssh_config.d/kali-wide-compat.confThat’s client-side configuration. It affects tools on Kali that use the SSH client stack.
The punchline: why your SSH server didn’t change after kali-tweaks
Your SSH server is controlled by sshd and /etc/ssh/sshd_config (plus included files). If you toggle kali-tweaks and then wonder why inbound SSH is still wide open… that’s why. You tuned the caller, not the door.
Money Block: 30-minute eligibility checklist
- Yes — You have console access or a snapshot you can roll back.
- Yes — You can keep a second SSH session open while testing changes.
- Yes — This Kali box is for a lab/VM/authorized work (not a public production server).
- No — You’re unsure who needs SSH access and from where.
Next step: If you got 3 “Yes” answers, proceed. If not, spend 10 minutes on access planning first.
SSH server baseline: make SSH “intentional” on Kali
Before we harden, we make SSH boring. Predictable. Testable. I’m allergic to “it usually works.” If you’re still shaping your environment, treat this as part of Kali Linux lab infrastructure mastery, not a one-off tweak you’ll forget in a week.
Install/start/enable OpenSSH server (the minimal path)
On many Kali installs, the OpenSSH server isn’t enabled by default—especially on fresh images. The exact state varies by how you installed Kali, so treat this as a quick baseline check.
sudo apt update
sudo apt install -y openssh-server

sudo systemctl enable --now ssh
sudo systemctl status ssh --no-pager
If you prefer to verify listeners (highly recommended), use:
ss -tulpn | grep -E '(:22|sshd)'Host keys: what they are and why Kali regenerates them
Kali has a helpful safety behavior for images: since Kali 2022.1, SSH host keys are automatically generated if missing via a systemd service named regenerate-ssh-host-keys. This matters because host keys should be unique per machine—prebuilt VM images can’t safely embed them.
Operator note: If you clone a VM, confirm you didn’t accidentally duplicate host keys across clones. That’s not “instant compromise,” but it’s unnecessary risk and confusion.
Ports + listening interfaces: confirm what’s exposed (before hardening)
Hardening is easiest when you know what’s reachable. Answer these two questions now:
- Is SSH listening on all interfaces or only a specific NIC?
- Is the box reachable from LAN only, VPN, or the public internet?
It’s not paranoia. It’s scope control. (And if your instinct is “I’ll just scan it,” do it with intent: the mental model from how to use Nmap in Kali Linux for Kioptrix-style enumeration will keep your checks consistent when you’re tired.)
Keys first: key-only auth without the spiral
Key-based authentication is the single biggest upgrade you can make without turning your life into a log-review hobby. It’s also a move that pairs beautifully with a clean terminal workflow—if you haven’t already, building a calmer shell from Zsh setup for pentesters makes repetitive admin work feel less like friction and more like rhythm.
Generate keys (ed25519 vs RSA: practical guidance)
If you’re starting fresh, ed25519 is a solid modern default for most people. If you have compatibility constraints, RSA can still be appropriate—just don’t use weak sizes.
# On your client machine (your admin laptop, or your trusted jump box)
ssh-keygen -t ed25519 -a 100 -C "kali-admin-key"
You’ll be asked for a passphrase. Yes, it’s a tiny inconvenience. Also yes, it’s the difference between “stolen laptop” and “instant remote access.”
Place keys + permissions (the silent failure zone)
The easiest, least-error method is:
ssh-copy-id -i ~/.ssh/id_ed25519.pub youruser@kali-hostIf you do it manually, do it like you’re handling evidence:
# On the Kali box, for the target user:
mkdir -p ~/.ssh
chmod 700 ~/.ssh
touch ~/.ssh/authorized_keys
chmod 600 ~/.ssh/authorized_keys

# Paste the public key into authorized_keys (one key per line)
Here’s what no one tells you… the one permission setting that makes SSH “randomly fail”
SSH is picky on purpose. If ~/.ssh is too open (or owned by the wrong user), key auth can fail and it looks like black magic. Nine times out of ten, the fix is boring: ownership and permissions.
# On Kali (replace "youruser"):
sudo chown -R youruser:youruser /home/youruser/.ssh
chmod 700 /home/youruser/.ssh
chmod 600 /home/youruser/.ssh/authorized_keys~/.sshshould usually be700authorized_keysshould usually be600- Ownership must match the login user
Apply in 60 seconds: Run the chown/chmod commands above and re-test key login before changing anything else.
Root & passwords off: safer privilege without breaking workflows
This section is where people get dramatic. It doesn’t need drama. You can keep your workflow fast and still shut down the most abused paths.
Disable root SSH login (and why it matters)
Disabling direct root login reduces the blast radius of a stolen credential and forces an attacker to pass through a named account first—something you can audit and restrict.
In /etc/ssh/sshd_config (or an included file), set:
PermitRootLogin noIf you truly need root-like actions, use sudo from a normal user. It’s not moral superiority. It’s containment.
Disable password auth after key login passes (order matters)
The safe order is:
- Add key auth.
- Test key auth in a new session.
- Only then disable password auth.
Config lines commonly used:
PasswordAuthentication no
KbdInteractiveAuthentication no
Mistake trap: turning off passwords before confirming keys
This is the #1 self-own. I’ve done it. You’ll do it once if you don’t treat the order as sacred.
Practical guardrail: Don’t restart SSH until you have a successful key-auth login in a separate session you opened after the key was installed.
Money Block: 30-second “lockout risk” mini calculator
Answer three yes/no questions:
- Do you have console access or a snapshot? (Yes/No)
- Have you successfully logged in with your SSH key in a new session? (Yes/No)
- Is SSH reachable from outside your LAN/VPN? (Yes/No)
Interpretation: If you have any “No” on the first two, pause before disabling passwords. If the third is “Yes,” prioritize allowlists and bans before you sleep.
Next step: Spend 5 minutes improving the lowest-confidence answer before proceeding.
Exposure choice: VPN-only, LAN-only, or public IP?
Same SSH daemon. Totally different threat reality. The hardening moves that matter most depend on exposure.
LAN-only: allowlist by subnet (quiet, clean, effective)
If SSH is only needed inside your home lab network, your best “security feature” is often boring network restriction: only allow SSH from your admin subnet.
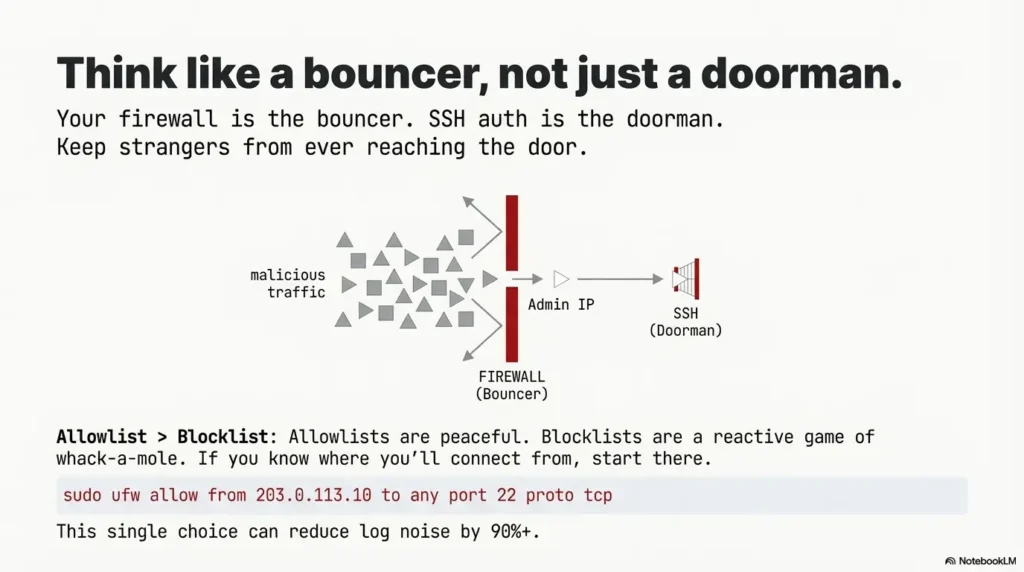
I’ve watched this single choice reduce log noise by 90%+ in real home labs—not because attackers got nicer, but because they never reached the service.
VPN-only: “reduce blast radius” defaults (and what you can skip)
If SSH is only reachable over a VPN, you can often simplify:
- Still use key-only auth (non-negotiable if you value your time).
- Still disable root login.
- You may not need aggressive bans if there’s no public exposure—though lightweight rate limiting is still sane.
Public IP: minimum viable “internet posture” (what must be non-negotiable)
If SSH is reachable from the public internet, assume it’s being scanned. Not “maybe.” It is. Your baseline becomes:
- Key-only authentication
- Allowlist if possible (even if it’s “my office IP” + “my VPN exit IP”)
- Brute-force brakes (bans/rate limits)
- Verification + log review routine
Money Block: Decision card — VPN-only vs Public IP
| Choose this | When it fits | Trade-off |
|---|---|---|
| VPN-only SSH | You control remote access with a VPN gate | You must maintain VPN availability |
| Public SSH | You truly need direct inbound access from many networks | You must handle constant scanning and attack noise |
Next step: If you can use VPN-only, choose it and simplify the rest of your hardening stack.
Firewall first: restrict who can even reach SSH
Think of the firewall as the bouncer. SSH auth is the doorman. If you can keep strangers from getting to the door, you win twice: fewer attacks, fewer logs, less stress.
Allowlist beats blocklist (and why it’s calmer)
Blocklists are reactive. Allowlists are peaceful. If you know where you’ll admin from, start there.
Port changes: when it helps vs when it’s just noise
Changing the port from 22 can reduce background noise, but it’s not a primary defense. Treat it like moving your doorbell—not installing a lock.
- Helpful: you’re drowning in noise and want fewer log entries.
- Not helpful: you think it stops a targeted attacker.
Mistake trap: changing the port and forgetting the firewall rule
This is the “I hardened it and it stopped working” classic. If you change ports, update the firewall, then test from an allowed host before restarting your session.
Example (UFW-style logic, adapt to your environment):
# Allow SSH only from your admin IP (example)
sudo ufw allow from 203.0.113.10 to any port 22 proto tcp

# Then enable (if you're ready)

sudo ufw enable

sudo ufw status verbose
Example (nftables-style thinking): allow TCP to the SSH port from your admin subnet, drop everything else. If you’re not comfortable with nftables syntax, use UFW—clarity beats ego.
Brute-force brakes: fail2ban + sane limits
This isn’t about paranoia. It’s about math. If someone can try a password a thousand times, eventually they’ll get lucky—or you’ll get tired. We prefer neither.
Fail2ban setup (minimal jail + log source sanity check)
Fail2ban watches logs and bans abusive IPs. It’s not magic; it’s a practical bouncer with a clipboard.
sudo apt install -y fail2ban
sudo systemctl enable --now fail2ban
sudo systemctl status fail2ban --no-pager
Then create a local override (so updates don’t overwrite your changes):
sudo nano /etc/fail2ban/jail.localA minimal SSH jail conceptually looks like: “watch SSH auth failures, ban for a while.” The exact filter/backend varies by distro logging, so after enabling, verify bans actually trigger and that you’re not banning yourself due to a misread log source.
Rate limits: MaxAuthTries / LoginGraceTime (practical numbers)
Inside sshd_config you can reduce brute-force efficiency with sane limits. For many lab setups:
MaxAuthTries 3
LoginGraceTime 20
If you admin over high-latency VPNs, don’t get aggressive. Over-tight values don’t make you “secure.” They make you locked out on hotel Wi-Fi.
Quick gut-check: are you hardening… or just adding fragility?
My personal rule: every control must be testable in under 2 minutes. If it isn’t, it’s not a control yet—it’s a mystery.
- Start with allowlists if you can
- Add fail2ban for repeated abuse
- Keep rate limits realistic for your network
Apply in 60 seconds: Enable fail2ban and confirm the service is active before you tune anything fancy.
Crypto knobs: modern without copy-paste regret
This is where the internet tries to tempt you with “ultimate” cipher lists. Don’t take candy from strangers—especially strangers who haven’t tested your environment.
What competitors recommend (and why it can break stuff)
Many guides jump straight to custom cipher/KEX/MAC lists. The intention is good: avoid weak algorithms. The problem is operational: a bad list breaks older clients, automation, or tooling mid-engagement—usually at the worst time.
When Wide Compatibility is the right choice (on the client)
If you’re using Kali to test older SSH servers, Wide Compatibility mode exists for a reason. Kali’s own documentation explains that the client can be made more compatible specifically to communicate with older, obsolete servers that still use legacy methods. That’s a testing need—not a best practice for your inbound SSH server.
Don’t do this: the “random blog cipher list” that silently locks out automation
If you rely on scripts, CI jobs, or jump boxes, a strict crypto list can quietly break automation and you’ll diagnose it as “network flakiness” for days. Ask me how I know.
Show me the nerdy details
If you want to tighten crypto safely, do it like a change-managed operator: (1) inventory your clients, (2) test in a staging VM or a second sshd port, (3) measure what breaks, (4) only then enforce. Kali’s client-side modes are a hint that compatibility is a real operational constraint. In other words: secure is a system property, not a single list of settings.
Verification pass: prove what sshd is actually running
This is the section that separates “I edited a file” from “I changed reality.” The verification pass is how you keep your confidence honest.
Runtime config check (sshd -T) and what to grep for
sshd -T prints the effective runtime configuration as sshd understands it. That’s gold when you have include files, overrides, or surprises.
# Print effective config (may require root depending on environment)
sudo sshd -T | head

# Useful targeted checks

sudo sshd -T | grep -E 'permitrootlogin|passwordauthentication|kbdinteractiveauthentication|maxauthtries|logingracetime|port'
Test suite: key login succeeds, password fails, root fails, correct port, correct source IP
Run these tests from a separate machine (or at least a separate terminal session):
# 1) Confirm key login works (should succeed)
ssh -i ~/.ssh/id_ed25519 youruser@kali-host

# 2) Confirm password auth fails (should fail if disabled)

ssh -o PreferredAuthentications=password -o PubkeyAuthentication=no youruser@kali-host

# 3) Confirm root login fails (should fail)

ssh root@kali-host

# 4) If you changed ports

ssh -p 2222 youruser@kali-host

# 5) If you allowlisted by IP/subnet, test from a non-allowed host (should fail)
Log review: journalctl/auth logs + what “normal noise” looks like
On systemd-based systems, the journal is often your fastest truth source:
sudo journalctl -u ssh --since "30 min ago" --no-pagerNormal: occasional failed logins (especially on public IP). Not normal: high-rate repeated attempts from the same IP, or sudden changes in successful login patterns. If you want to go deeper than logs—especially when troubleshooting “is this noise or signal?”—the mindset from traffic analysis with Wireshark in Kioptrix-style labs translates surprisingly well to real SSH incidents.
sshd -T + test suite + logs
Common mistakes: the fastest ways to weaken SSH
Most SSH “mistakes” are not ignorance—they’re speed. You’re tired. You’re rushing. You’re in a lab. I get it. Here’s how it goes wrong.
Mistake #1: hardening the client and assuming the server is hardened
If you toggled kali-tweaks and felt done: that’s a client-side comfort setting. Your inbound sshd may be unchanged. Treat them as separate systems.
Mistake #2: “port change = security” thinking (without allowlists)
Changing ports can reduce noise, but without an allowlist, it’s mostly housekeeping. A real attacker scans ports. A bored bot also scans ports. Port changes are not locks.
Mistake #3: permissions on ~/.ssh / authorized_keys (silent failure)
When key auth fails, people panic-edit sshd_config. Often the fix is simply permissions and ownership.
Mistake #4: no verification step—so you ship unknown configs
If you don’t run a verification pass, you don’t know what you did. You know what you meant. Those are different.
- Separate client vs server
- Prefer allowlists over “cute” tweaks
- Always prove effective config
Apply in 60 seconds: Run sudo sshd -T and grep for the settings you think you changed.
Who this is for / not for
Let’s keep this honest. Kali is a fantastic toolset. It’s not automatically the best long-term internet-facing server OS for everyone. If you’re building a practice environment, do it in a way that stays on the right side of reality—start with safe hacking lab at home principles and keep your scope clean.
For: labs, VMs, jump boxes, VPN-only access (authorized use)
- Home lab Kali VM you reach occasionally
- Jump box used during authorized work
- CTF/classroom environment where you still want predictable hygiene
Not for: internet-facing production servers (use server-first distros + infra controls)
- Public production apps with real customer impact
- Long-lived infrastructure where you need minimal attack surface by default
If you’re building something production-like, consider a server-focused distro, infrastructure controls, and a dedicated bastion strategy. Kali can still be your client-side workstation—where Strong Security/Wide Compatibility modes actually shine—and where having a consistent set of essential Kali tools (plus a curated pentesting tools list) keeps you fast without getting sloppy.
FAQ
Does kali-tweaks Strong Security secure my SSH server or just the client?
It primarily affects the SSH client on Kali—how your Kali box connects out to other SSH servers. Your inbound SSH server hardening is handled by sshd configuration, firewall exposure, and controls like allowlists and bans.
What’s the safest order to disable password authentication?
Keys first, verify keys work in a new session, then disable passwords. If you flip passwords off before confirming keys, you’re gambling with lockout.
Should I change the SSH port on a Kali box?
You can, but treat it as noise reduction—not a primary defense. If you can allowlist by IP/VPN, that’s far more meaningful. If you do change the port, update firewall rules and test before you close your rescue session.
Do I need fail2ban if SSH is behind a VPN?
Maybe not strictly, depending on how controlled your VPN access is. Many VPN-only setups can rely on key-only auth + root disabled + allowlists. Fail2ban is still useful if you see repeated abuse or shared networks.
Why does SSH say “Permission denied (publickey)” after I add my key?
Most commonly: the key is in the wrong user’s authorized_keys, ownership is wrong, or permissions are too open. Fix ~/.ssh to 700 and authorized_keys to 600, then test again.
How do I confirm which sshd settings are active right now?
Use sudo sshd -T to print the effective runtime configuration, then grep for the values you care about (root login, password auth, ports, limits).
Can I disable root login and still admin comfortably?
Yes. Use a normal user and elevate with sudo. That gives you better auditability and reduces the risk of “one credential = total control.”
What logs should I check for brute-force attempts?
Start with journalctl -u ssh on systemd-based setups. Look for repeated failures from the same IP or unusual successful logins. Pair that with fail2ban status if you’re using it.
Next step: one concrete action
If you want a single move that pays off immediately, do this:
- Run your full verification pass once, then save the outputs as your “known-good baseline.”
Here’s a simple baseline bundle you can copy into a notes file (or a private repo):
# Effective sshd config (filtered)
sudo sshd -T | grep -E 'permitrootlogin|passwordauthentication|kbdinteractiveauthentication|maxauthtries|logingracetime|port' > ssh-baseline.txt

# Listener check

ss -tulpn | grep -E '(:22|sshd)' >> ssh-baseline.txt

# Recent SSH logs

sudo journalctl -u ssh --since "30 min ago" --no-pager >> ssh-baseline.txt

# Fail2ban status (if installed)

sudo fail2ban-client status 2>/dev/null >> ssh-baseline.txt || true
Neutral action: Save the file somewhere you can find in 30 seconds next time. If you want the “operator loop” around this—enumerate, record, verify, repeat—the structure from a fast enumeration routine for any VM (plus a reliable note-taking system for pentesting) makes your hardening work easier to trust later.
Conclusion
Remember the hook—the part most people miss? We closed it: kali-tweaks Strong Security is a client-side posture. It’s valuable, especially if you’re bouncing between modern servers and legacy targets. But your inbound SSH hardening still lives in sshd config, network exposure, and verification. And when your exposure checks start drifting into “I should scan more,” the combination of easy-to-miss Nmap flags and a clear Nmap workflow for Kioptrix-style enumeration keeps you precise instead of noisy.
If you have 15 minutes, do the highest-leverage version: keys verified, root off, passwords off, allowlist what you can, and run sshd -T. That’s not perfection. That’s a repeatable baseline you can trust when you’re tired, busy, or in the middle of something that actually matters.
Last reviewed: 2025-12.