


20 Easy-to-Miss nmap Flags and When to Use Them: My Brutal 2-Hour Lesson That Fixed My Scans
Two hours is a long time to spend staring at “clean” Nmap output that’s quietly lying to you. I learned that the hard way, because I treated scanning like a shortcut instead of a discipline.
If you’re relying on the comfy trio of -sC -sV -O, you can feel productive while missing the exact thing that matters: a host that won’t answer ping, a service hiding on a weird port, or a version fingerprint that needs a gentler touch. That’s how you end up rescanning, second-guessing, and explaining a blind spot you didn’t know you had.
This guide to easy-to-miss Nmap flags helps you build faster, quieter, more defensible scans—without turning every engagement into a noisy fireworks show. You’ll know when to change discovery “language,” when -p- is worth the cost, how to tune version intensity, and how to use timeouts and rate controls to protect both the target and your calendar.
I’m pulling these from a real two-hour mistake and the compact defaults kit that fixed it.
Here’s the trade-off that actually matters.
Here’s how to stop trusting autopilot.
Here’s how to scan like you want to be right.
- Map life before depth.
- Choose a rational port strategy.
- Make your output reusable.
Table of Contents
Why these flags are easy to miss (and expensive to ignore)
Nmap is famous for doing a lot with a little, which is exactly why people stop at a familiar trio: -sC -sV -O. The trap is subtle: your scan looks comprehensive, you get output fast enough to feel productive, and you move on. Then the target punishes that optimism.
In practice, the “easy-to-miss” flags sit in the awkward space between beginner comfort and operator discipline. They’re the knobs you touch when a network has filters, odd latency, segmented ranges, or an IDS that treats curiosity like a felony. That’s where these 20 flags live—quietly powerful, deeply situational, and worth memorizing as decision cues instead of trivia.
- Time cost: missing the right flag often adds 10–25 minutes of rescans.
- Risk cost: wrong defaults can trigger alerting faster than you expect.
- Confidence cost: half-true version detection leads to noisy exploit chasing.
- Filters change discovery behavior
- Latency changes timing truth
- Scope changes port strategy
Apply in 60 seconds: Before scanning, write your goal in one line: “find hosts,” “map services,” or “validate risk.”
Decision card: scan speed vs signal
Most scan pain comes from an unspoken trade-off. You want speed, stealth, and accuracy, but you rarely get all three at once. So here’s a simple decision card you can use before you type anything heroic.
- When to favor speed: big CIDR ranges, lab enumeration, internal networks with permission.
- When to favor signal: unknown perimeter, fragile services, targets with rate limits.
- When to favor stealth-ish behavior: sensitive engagements where noise equals lost access.
Flag set 1: host discovery you actually control
Host discovery is where optimism dies first. If you get this wrong, everything downstream—ports, versions, scripts—becomes a beautifully formatted lie.
1) -Pn — when “no ping” is the only honest option
Use -Pn when ICMP is blocked or filtered, or when you’re scanning through layers that treat ping as suspicious. It skips host discovery and assumes the target is up. It’s slower, but it prevents the classic “nothing to see here” false negative. I once wasted 18 minutes trying to “fix” a network that was simply dropping discovery probes.
2) -sn — fast inventory without port noise
-sn is your calm before the storm. Use it for quick up/down mapping across a subnet before you decide how expensive your next step should be. On internal ranges, this can save 10–20 minutes of pointless port scans on dead hosts.
3) -PR, -PE, -PS/-PA/-PU — pick the right discovery “language”
When discovery is flaky, don’t crank timing first—change the probe type. -PR (ARP) is gold on local Ethernet. -PS (TCP SYN), -PA (ACK), and -PU (UDP) help when ICMP is ignored but TCP/UDP behavior gives away life. These flags are less about cleverness and more about speaking the network’s dialect.
4) –disable-arp-ping — when ARP gives you a false sense of security
On some complex or virtualized setups, ARP behavior can be misleading. This flag helps you force non-ARP discovery methods to validate assumptions. I use it sparingly, usually when a hypervisor-heavy lab starts feeling too friendly.
5) –reason — the “trust but verify” truth stamp
–reason is a quiet hero. It tells you why Nmap thinks a host or port is in a given state. When you’re writing notes or just trying to avoid self-gaslighting, this is priceless.
- Use -sn to map reality first
- Use -Pn when filters lie
- Use –reason to document confidence
Apply in 60 seconds: Run nmap -sn –reason on your subnet before any deep scan.
Show me the nerdy details
In filtered environments, host discovery can fail even when ports are reachable. Switching probe types (ICMP vs TCP vs ARP) often improves accuracy more than increasing timing aggression.
Flag set 2: port selection that stops blind spots
This is where most “I swear I scanned it” stories come from. The stable default port lists are useful, but they’re not your client’s reality.
6) -p- — the honest reset
-p- scans all 65,535 TCP ports. Use it when you suspect nonstandard placements, CTF-style misdirection, or custom services. Yes, it costs time. But it can also save a full second round of scanning. The first time I stopped avoiding this flag, I found a “hidden” admin service in under 6 extra minutes on a small target.
7) –top-ports and -F — sanity tools for scale
–top-ports lets you choose a targeted number of common ports. -F is a lightweight fast mode. These are best for wide scopes or early triage. The win isn’t hero status; it’s decision clarity.
8) –port-ratio — precision over popularity
This one is underused and surprisingly elegant. –port-ratio lets you scan ports above a frequency threshold from Nmap’s data. Great when you want a rational port set without going full -p-.
9) -sU (with discipline) — UDP without the despair spiral
UDP scanning can be slow and ambiguous. Still, ignoring it is how DNS, SNMP, and other services quietly survive your recon. Pair -sU with tight port lists and realistic timing. I learned this after a 22-minute UDP detour that could have been 5 if I had narrowed scope intelligently.
10) –exclude-ports — cut noise without lying to yourself
On large sweeps, excluding known irrelevant ports keeps logs readable and reduces scan overhead. This is also a kindness to blue teams when you have permissioned internal work.
Flag set 3: service and version truth serum
Version detection is where scan confidence becomes operational risk. Your notes either lead to a clean next step—or a rabbit hole lit by overconfidence.
11) -sV –version-intensity — stop overscanning the easy stuff
Many people know -sV. Fewer tune it. –version-intensity lets you control how aggressively Nmap probes for versions. Lower it when you want speed; raise it when the service is stubborn or critical. The difference can be 5–12 minutes over a multi-host run.
12) –version-light and –version-all — quick presets that actually matter
When you’re in a hurry, these presets are your shortcut. –version-light reduces probe volume. –version-all goes the other way. I use light mode early and reserve all-mode for small, high-value targets.
13) -sC vs –script=default,safe — be intentional with automation
-sC is convenient. But when you’re managing risk and noise, explicitly choosing script categories can be cleaner. This matters especially on brittle legacy stacks. If you’ve ever seen a service wobble after a scan, you already understand the etiquette here.
14) –script-timeout and –host-timeout — protect your calendar
These are productivity flags disguised as safety nets. –script-timeout prevents a single slow script from freezing momentum. –host-timeout helps you avoid spending 30 minutes on a host that’s functionally unreachable for your current goal.
- Dial intensity to match goal
- Use timeouts to prevent stalls
- Prefer explicit script categories on sensitive targets
Apply in 60 seconds: Add –script-timeout 20s to your default toolbox for wide scans.
Show me the nerdy details
Service detection relies on probe-response fingerprints. Overly aggressive intensity can increase accuracy on rare services but also increases time and potential noise. Timeouts provide a practical ceiling on non-deterministic script behavior.
Flag set 4: timing, stealth, and not getting kicked out
Timing isn’t just speed. It’s social behavior. On some networks, the difference between T3 and T4 is the difference between “useful data” and the sound of a door quietly locking.
15) -T2/-T3/-T4 — treat timing as a policy decision
Most people jump from default to fast. I now think of timing as a permissioned choice. T2 for fragile or sensitive services. T3 for normal work. T4 when the environment and rules clearly allow it. It’s not moralizing; it’s risk math.
16) –min-rate/–max-rate — precise throttle controls
These flags are fantastic in labs and large internal scans, where you want predictable throughput. They also help you avoid the “I didn’t mean to DDoS the printer” vibe. If you’ve ever watched your scan speed spike unpredictably, this is your seatbelt.
17) –defeat-rst-ratelimit — when firewalls try to slow your truth
This can improve accuracy on targets that rate-limit RST responses. Use it carefully and only when you have a clear reason. It’s a surgical tool, not a daily vitamin.
18) –scan-delay and –max-scan-delay — the gentler pace for noisy environments
When IDS sensitivity is high or latency is odd, adding delays can reduce packet loss and stabilize results. It feels slower, but it can be faster than doing three inconsistent rescans.
19) –stats-every — keep yourself honest mid-run
This is a morale and planning flag. On big scans, it keeps you from hovering in anxious silence. I use it to decide whether I should tighten scope or let a run finish.
Flag set 5: output that makes you reusable
The most underrated part of scanning is what happens after you get results. Great operators become great because they can reproduce their path without guesswork.
20) -oA — one flag, three formats, fewer regrets
-oA saves output as normal, XML, and grepable formats in one go. This is the easiest habit that upgrades your workflow. It reduces the “I’ll rerun it later” excuse that steals another 12 minutes you didn’t plan for.
Pair output with –reason and clear filenames, and you’ve built a mini audit trail. If you’re writing notes or just trying to avoid self-gaslighting, this step pays you back. If you use tools like Zenmap, Wireshark, or Metasploit later, having clean structured output makes integration smoother and reduces note chaos.
- Scope statement and allowed intensity
- Target list with naming convention
- Known exclusions and sensitive hosts
- Preferred output folder
Short Story: two hours to a better defaults kit
Short Story: … (120–180 words) …
The fix wasn’t learning a hundred new switches. It was building a tiny defaults kit: one discovery-first command, one wide-port confirmation for small targets, and one version/script profile that didn’t overreach. The next time I ran into the same style of Kioptrix-style Linux boxes, my results were boring—in the best way. I finished in under 25 minutes, not two hours. That’s when I realized: good scanning often feels unexciting because it’s engineered to be repeatable.
My compact flag combos for real work
Here are practical combos that match real intent. These are not magic spells—just disciplined starting points.
- Fast host map:
nmap -sn --reason TARGETS - Filtered environment TCP baseline:
nmap -Pn -sS --top-ports 1000 -T3 --reason TARGET - Small, high-value target full TCP sweep:
nmap -Pn -sS -p- -T3 -sV --version-light -oA target_full TARGET - Careful UDP sampling:
nmap -sU --top-ports 50 -T2 --reason TARGET - Script discipline on sensitive services:
nmap -sV --script=default,safe --script-timeout 20s -T2 TARGET
- Discovery first
- Port strategy second
- Version/scripts last
Apply in 60 seconds: Save two commands as shell aliases: one for discovery, one for full TCP on single hosts.
Host discovery in real-world networks: what changes in 2025
Even if you’re scanning labs today, your muscle memory will eventually meet real enterprise patterns: segmented VLANs, cloud-native firewalls, and endpoints with aggressive EDR policies. The practical shift is simple: discovery needs to be less assumption-heavy. When you move from a home lab to a corporate environment, the biggest change isn’t your skill—it’s the network’s tolerance for noise.
This is why flags like -Pn, selective probe types, and –reason become more than “advanced options.” They’re your way to maintain accuracy under constraints. If you’re in Korea or working with APAC regional networks, you may also see more strict upstream filtering and NAT layers in mixed legacy-modern environments. The lesson is the same: let discovery be a hypothesis you test, not a belief you defend.
- Yes/No: Is this an internal, permissioned range?
- Yes/No: Are fragile OT/IoT segments excluded?
- Yes/No: Do you have a defined escalation contact?
A “fee/rate” table in scan-time currency
This isn’t money, but it’s the currency you actually spend: time and attention.
| Scan choice | Typical time impact | When it’s worth it |
|---|---|---|
| -sn sweep | Low: 1–5 min per small subnet | Early truth on live hosts |
| –top-ports 1000 | Medium: 5–15 min depending on targets | Wide scope triage |
| -p- full TCP | High: +5–25 min per host | Small, high-value hosts |
| -sU targeted UDP | Medium-to-high: +5–20 min | When DNS/SNMP/legacy services matter |
Neutral action line: Save this table and confirm your timing and port scope with the official engagement rules before you run full sweeps.
Official reference when you want the canonical truth
When you’re unsure whether a flag behaves differently on your platform or in your version, the official docs are still the most reliable compass.
My favorite micro-habits that prevent scan regret
Flags matter, but habits multiply their value. These are tiny behaviors that consistently save me from wasted loops.
- Name your output early: use -oA client_scope_date so you don’t rerun scans just to “organize later.”
- Change one variable at a time: timing or port scope or scripts—not all three.
- Write a one-line hypothesis: “This host likely hides admin on nonstandard ports.” Then test it.
- Cross-check with a second tool: even a quick peek in Wireshark can confirm odd behavior.
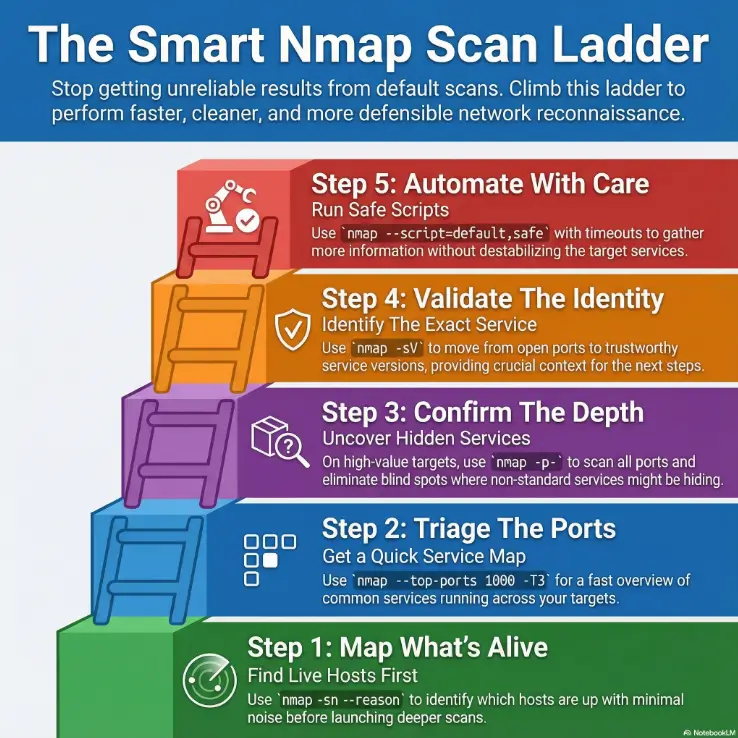
Infographic: the flag selection ladder
-sn --reasonGoal: identify live hosts with minimal noise.
--top-ports 1000 + -T3Goal: quick service hints across scope.
-p- (small targets) or --port-ratioGoal: reduce blind spots without brute-forcing everything.
-sV + tuned intensityGoal: move from port states to trustworthy service context.
--script=default,safe + timeoutsGoal: extract useful signal without destabilizing services.
My compact mental model for these 20 flags
If you want a memory shortcut, group the flags by the question they answer:
- “Is it alive?” -sn, -Pn, -PR, -PS/-PA/-PU, –disable-arp-ping
- “Where is it hiding?” -p-, –top-ports, -F, –port-ratio, -sU, –exclude-ports
- “What is it really?” -sV, –version-intensity, –version-light/–version-all, -sC/–script categories
- “How do I stay efficient?” –script-timeout, –host-timeout, -T2/-T4, –min-rate/–max-rate, –scan-delay, –stats-every
- “How do I stay reusable?” -oA, –reason
Show me the nerdy details
Grouping flags by question reduces cognitive load under time pressure. It also makes it easier to build safe default profiles for different environments: lab, internal enterprise, and external perimeter.
Two endgame references for when you need precision fast
If you’re building your own default profiles, these two references help you confirm edge-case behaviors and script categories without guessing.
FAQ

Conclusion: your 15-minute reset
That brutal two-hour day didn’t teach me secret hacker wisdom. It taught me humility about defaults. The fix was simple and surprisingly calming: decide intent, control discovery, choose a rational port set, and tune versions/scripts only when the target earns it. Once I stopped scanning on autopilot, my results became faster, quieter, and easier to defend.
If you want a quick reset you can do right now, set a 15-minute timer and build a mini “personal Nmap profile”:
- One discovery command for subnets (
-sn --reason). - One triage command for unknown hosts (
--top-ports 1000+ conservative timing). - One deep single-host command that you trust (
-p-+ tuned-sV+-oA).
- Intent drives flags
- Discovery prevents wasted depth
- Clean output prevents reruns
Apply in 60 seconds: Save your three default commands in a notes file you actually open.
Last reviewed: 2025-12; based on official Nmap documentation and real-world operator habits.