

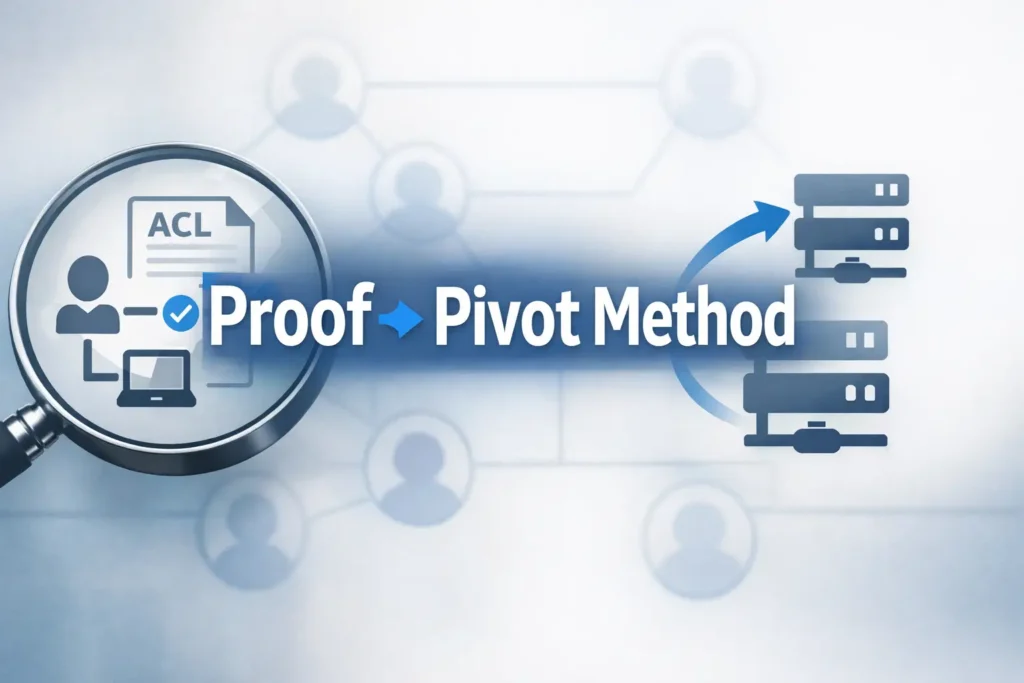
Manual Active Directory Enumeration: The ACLScanner → Proof → Pivot Method
When BloodHound is off-limits, AD doesn’t get “harder”—it gets noisier. The graph vanishes, and suddenly you’re staring at Windows output like it’s weather.
If you’re doing OSCP AD enumeration without BloodHound, the real problem isn’t missing a tool. It’s losing a rhythm: what to scan, what to trust, and what’s worth acting on when time is tight. Keep guessing and you’ll pay the usual tax: an hour of “enumeration” that can’t produce one defensible edge—or one reportable step forward.
Definition: ACLScanner → Proof → Pivot is a manual mini-graph method for Active Directory. Quickly surface a few write-like permission candidates, validate one edge with reproducible evidence (principal/right/target/impact), then make the smallest measurable move that changes your position and unlocks the next scan.
This post gives you a calm practice loop that turns permission noise into progress: built around PowerView, high-signal ACL targets, and a proof standard you can re-run under pressure. (If you want the companion “big picture” framing first, start with AD profiling without BloodHound and come back here.)
If you can’t use BloodHound, you can still win AD with a tight loop: scan for likely ACL-based edges, prove one edge with evidence, then pivot into the next permission or credential opportunity. Use PowerView to identify “who can control what,” verify with one targeted check (membership, ACL diff, effective rights), and only then attempt the smallest safe action (add member, reset password, modify SPN). Repeat until your path is undeniable—and reportable. (For the evidence habit, see OSCP proof screenshot standards.)
Table of Contents
1) Scope-first rules (so you don’t train bad habits)
Who this is for / not for
For you if: you’re practicing in authorized environments (OSCP labs, PNPT-style ranges, CTFs you’re allowed to touch) and want a BloodHound-free routine that still produces clean, “grader-friendly” evidence.
Not for you if: you’re looking for real-world intrusion guidance. This article stays intentionally practice-scoped and focuses on decision flow, validation, and documentation—so your habits remain safe, legal, and transferable.
“No BloodHound” doesn’t mean “no graph”
BloodHound is a graph builder. You can still build a tiny graph manually—one edge at a time—using a sentence you can paste into your notes:
- Principal → Right → Target → Action → New Position
That sentence is your compass. If your notes don’t contain it, you’re not navigating—you’re sightseeing.
Evidence standard: what counts as “proof”
In practice labs (and especially in reporting), “I think I can” is not a finding. Proof is an artifact that answers five questions without drama:
- Who (principal)
- What (target object)
- Which right (permission / attribute)
- Where (domain context + object location)
- How do I reproduce (the exact check you ran)
Personal note: the first time I tried “ACL-only” enumeration, I took a dozen screenshots, felt productive… and later realized I couldn’t re-run a single check. It wasn’t evidence. It was confetti.
- Scan fast, but prove precisely.
- Prefer checks that you can re-run in one line.
- Document edges, not vibes.
Apply in 60 seconds: Add a “Principal → Right → Target → Action → New Position” line template to your notes before you scan anything.

2) Loop overview: ACLScanner → Proof → Pivot (the rhythm)
Step 1: ACLScanner (find candidates fast)
The goal is not “enumerate all ACLs.” The goal is find 3 plausible edges quickly. Think of it like triage: groups, service accounts, OUs/GPOs, computers—objects that tend to create outsized leverage in lab AD.
Step 2: Proof (validate one edge)
Pick one candidate and lock it with a minimal verification. If the environment doesn’t support your assumed action, proof will expose it early—before you spend 45 minutes “trying harder” at the wrong door.
Step 3: Pivot (convert permission into position)
Pivot means: use the smallest reversible action (or the smallest confirmable change) that creates a new surface. Then you re-run the scanner as the new principal/context. (When you’re choosing between approaches, keep a simple rule of thumb from OSCP pivoting tool choice: pick the method that keeps variables isolated and proofable.)
Micro moment: Let’s be honest…
The loop fails when you scan forever. Your brain starts bargaining: “Just one more query… just one more object…” And suddenly it’s 2 a.m. and your only achievement is a larger pile of output.
- Healthy loop: 20 minutes scanning → 25 minutes proof → 15 minutes pivot & rescan
- Unhealthy loop: 60 minutes scanning → 0 minutes proof → 0 minutes progress
- Use a fixed scan/proof/pivot split.
- Stop scanning when you have 3 candidates.
- One locked edge beats ten maybes.
Apply in 60 seconds: Mini calculator: If you have 90 minutes, run 30/40/20 (scan/proof/pivot). If you have 60 minutes, run 20/25/15. Write the split at the top of your notes. If you struggle with “productive-looking” detours, keep the OSCP rabbit hole rule visible while you work.
3) Setup that prevents “PowerView lies” (context + identity)
Confirm where you are (domain context checks)
Most “PowerView lies” are actually context lies. Wrong domain. Wrong user token. Wrong time. Wrong idea of what your identity is right now. Before you trust any output, anchor yourself:
- What domain/forest am I in?
- Who am I (and which groups are in my effective token)?
- Is time skew breaking authentication workflows?
Personal note: I once chased an “interesting” permission for half an hour before realizing I was still in a stale shell from a previous user. My notes looked impressive. My results were fiction.
PowerView loading + clean session discipline
PowerView is useful in labs because it helps you reason about principals and permissions. But modules can be messy if you import, re-import, and mix versions. Adopt a boring ritual:
- One “clean” working directory per session
- One module version per session
- Restart the shell when context changes materially (new creds, new groups, new host)
Normalize outputs for repeatability
If your files are chaos, your brain becomes the database—and your brain is not a reliable database when you’re tired. Use consistent filenames that answer: who, what, when. (If you want a ready-to-use structure, adapt your note system from the Obsidian OSCP enumeration template and keep it boring.)
- principal_context.txt
- target_acl.txt
- edge_proof.txt
Show me the nerdy details
“PowerView lies” often means you’re querying different domain controllers, using a token that hasn’t refreshed, or interpreting inherited/default ACEs as meaningful. A clean session + a consistent proof checklist reduces false confidence and makes your work reproducible under exam pressure. For clean capture habits, pair this with Kali Linux lab logging so your artifacts stay searchable later.
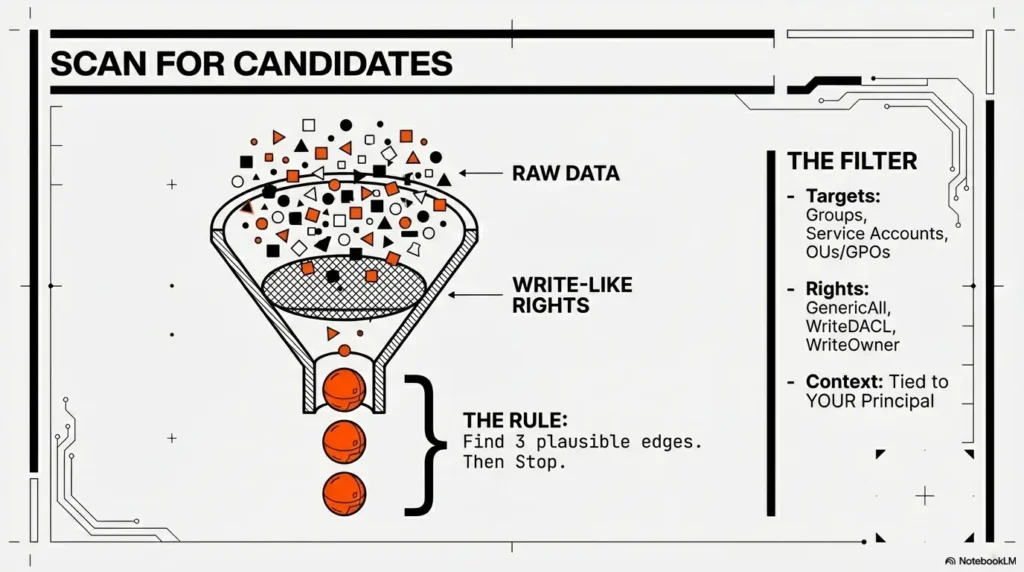
4) ACLScanner targets: what to scan first (and why)
High-signal objects list (ordered for OSCP speed)
When time is limited, scan where labs tend to hide leverage:
- Groups with admin-like power (helpdesk, server operators, local admin delegations)
- Service accounts (accounts tied to apps often sit near privileged pathways)
- OUs/GPOs (policy control can outrank local admin in practice)
- Computers (lab paths often involve delegated rights over machine objects)
Candidate rights that actually pivot
You’re not hunting every permission. You’re hunting write-like permissions that can change state. Common lab-relevant categories include:
- GenericAll / GenericWrite (broad control; validate scope carefully)
- WriteDACL / WriteOwner (permission to change permissions—high impact)
- AddMember (group membership control)
- ResetPassword (user control; still needs environment validation)
- WriteProperty (specific attribute control; can be decisive or useless)
Curiosity gap: “Why this ‘minor’ ACE keeps showing up”
Labs love delegated permissions because they look harmless. A “minor” delegated right often appears across multiple objects (reused templates, copied OUs, “temporary” helpdesk workflows). Your job is to spot repetition: repeated delegation is how “one small edge” becomes a hub.
- Prioritize write-like rights tied to your principal or its groups.
- Prefer rights on objects that “fan out” (groups, OUs, GPOs).
- Validate power of the target (what it controls) before you celebrate.
Apply in 60 seconds: Eligibility checklist (Yes/No): (1) Is the ACE non-default or non-routine for this object? (2) Is the right write-like? (3) Does the target object control access somewhere meaningful? If you can’t say “yes” to at least two, downgrade it.
5) ACLScanner execution: a “small list” that finds big edges
Baseline scan: your current principal → what can I touch?
Start from yourself (and your effective groups). The goal is to identify objects where your principal appears in a way that suggests control, not merely read access. Think: “Where do I show up as someone who can change this?”
Expand to “your groups → their rights”
Group nesting is where labs hide shortcuts. If a low-looking account is nested into a group that holds delegated rights, your effective reach may be bigger than your username suggests. Treat nested membership as first-class: it’s part of your identity, not an “extra detail.”
Reduce noise with filters (the OSCP version)
Noise kills momentum. Use heuristics that keep you honest:
- Highlight non-inherited ACEs first
- Highlight write-like rights over read-like rights
- Highlight ACEs tied to you or your groups
Personal note: my most painful dead ends weren’t “hard targets.” They were “interesting outputs” I couldn’t explain. If you can’t explain a finding in one sentence, you can’t pivot on it.
Curiosity gap: “The one OU you should always inspect”
If you’re going to inspect only one OU early, pick the one that feels operational: where workstations, servers, or “managed users” live. Those OUs often carry delegations intended for IT workflows. In labs, those delegations are frequently your intended path.
Show me the nerdy details
Most AD environments have a lot of routine ACEs that are inherited or default. High-signal lab edges often appear as unusual write-like permissions on a small subset of objects. Your scanner doesn’t need to be “complete.” It needs to be directional. If your scan cadence needs tightening, borrow the timebox structure from a fast enumeration routine for any VM and apply the same discipline here.
6) Proof stage: how to “lock” an edge (without overacting)
Proof checklist (must capture all 5)
Before you do anything that changes state, lock the edge with proof. Your proof pack should include:
- Principal (who you are, including relevant group membership)
- Target (the object you control)
- Right (the specific permission / attribute)
- Evidence output (the line you can quote)
- Repro check (the minimal command/check you can run again)
Proof patterns by right type
You don’t need a thousand proof patterns. You need a few that cover common edges:
- Group control: prove you can affect membership, then prove the group’s power (what access it grants)
- User control: prove the specific right, then prove what “control” would mean here (login viability, scope, constraints)
- OU/GPO control: prove you can change the object and identify its linked scope (what it would influence)
- Computer control: prove the right and where it matters (which machine, which policy surface, which admin boundary)
Micro moment: Here’s what no one tells you…
“Proof” isn’t just ACL text. Proof is: this right maps to an action in this environment. If the lab’s configuration makes the action irrelevant, your proof should say that too. Dead ends are acceptable. Unexplained dead ends are expensive.
- Stop at “locked edge” before any big action.
- Prefer reversible moves or non-destructive validation first.
- Write the edge as a sentence you can defend.
Apply in 60 seconds: Decision card: If you can prove the right and prove the target’s power, proceed to a minimal pivot. If you can prove the right but can’t explain the power, pause and enumerate the target’s impact first.
7) Pivot stage: permission-to-position conversions (minimal, repeatable)
Pivot menu (choose the smallest move)
Pivoting is where people get reckless because it feels like “finally, action.” The operator move is the opposite: smaller, calmer, more measurable. In authorized labs, common pivot categories include:
- Identity shift: change to a new principal (new creds / new token context) and rescan as that identity
- Membership shift: if you legitimately gain membership, validate that the effective token changed before you assume new reach
- Scope shift: move from a user object edge to an OU/GPO edge (or vice versa) and re-enumerate what that changes
- Host shift: if your new position changes host-level access, use that to expand recon surfaces (again: authorized practice only)
I once “pivoted” by making a change, saw no immediate difference, and assumed failure. It wasn’t failure—it was a token refresh issue. That was the day I learned: a pivot isn’t complete until you can show the before/after in text.
After-action checks (don’t skip)
- Start a fresh session (or refresh context) when the principal changes
- Re-run the scanner as the new principal
- Capture “before vs after” output in one place
Curiosity gap: “When a pivot ‘works’ but nothing changes”
Common reasons in labs:
- Token reality mismatch: your session didn’t pick up new group membership
- Wrong scope assumption: the right applies to an object, but not to the attribute/action you assumed
- Cached context: you’re seeing old state in one tool/shell while the directory reflects new state elsewhere
Show me the nerdy details
In Windows environments, group membership and privilege changes often require a new logon session/token to be reflected in effective access checks. That’s why “rescan as the new principal” is part of the loop, not an optional habit. If time skew is part of your “nothing changes” story, fix it early with KRB_AP_ERR_SKEW troubleshooting.
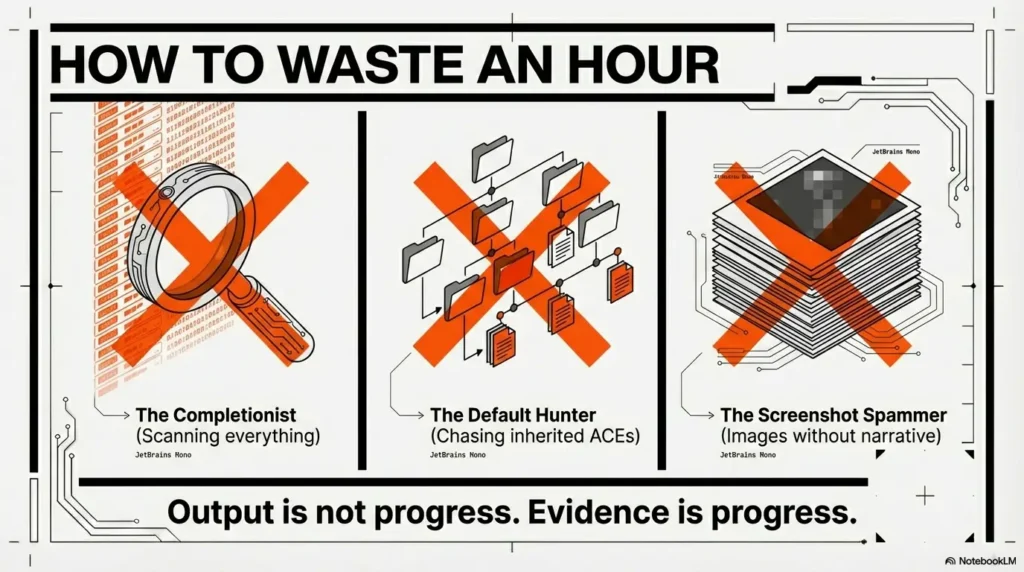
8) Common mistakes (the ones that waste an hour)
Mistake 1: scanning every object before proving one edge
This feels productive because output is growing. But output isn’t progress. Fix it with a rule you can say out loud:
- 20-minute timebox: find 3 candidates → prove 1
Personal note: when I started doing this, my “stuck time” dropped sharply. Not because I became smarter—because I stopped letting my brain buy more time with more scanning.
Mistake 2: treating inherited/default ACEs like findings
Default permissions are usually there because AD needs them. Lab authors rarely build the intended path on boring default ACL lines. Fix: prioritize non-inherited write-like permissions tied to your principal or its groups.
Mistake 3: proof without context (no target power validation)
“I can edit Group X” means nothing until you can answer: What does Group X control? Does it map to local admin on a host? Does it grant rights over an OU? Does it unlock a workflow? Always pair the ACL finding with the impact statement.
- Write the impact statement next to the ACL line.
- Capture before/after when a pivot changes context.
- Keep checks reproducible and minimal.
Apply in 60 seconds: Proof-pack prep list: (1) principal + groups, (2) target DN/path, (3) permission name, (4) one quoted evidence line, (5) one reproducible verification check. If any item is missing, you’re not done proving.
9) Don’t do this (two failure modes that look “productive”)
Don’t do this: “ACL spam screenshots”
Screenshots aren’t evil. But screenshots without a narrative are. They become un-runnable, un-searchable, and impossible to audit. If you do capture images, pair each one with a one-sentence edge statement and a reproducible check. (This is exactly why I keep a proof screenshot checklist nearby.)
Don’t do this: “big swing pivots”
Big swings feel heroic. They also create breakage and confusion. In practice labs, you want the opposite: boring moves that isolate variables. If a pivot fails, you should know why within 5 minutes—not within 5 hours.
Upgrade your habit: one edge, one proof, one pivot
If your routine becomes “boringly consistent,” you’ll start compounding skill. You’ll recognize patterns faster, and your notes will become a reference library instead of a graveyard.
Operator mantra: “If I can’t explain the edge in one sentence, I don’t own it yet.”
10) The practice loop: 60-minute drills you can repeat weekly
Drill A: 15-minute ACL candidate sprint
Goal: produce 3 candidates and one sentence for each explaining the expected pivot.
- Candidate 1: why it might pivot
- Candidate 2: why it might pivot
- Candidate 3: why it might pivot
Drill B: 25-minute proof pack build
Goal: produce 1 locked edge with a reproducible verification check and an impact statement. If the edge is a dead end, document the dead-end mechanism (that’s still learning).
Drill C: 20-minute pivot + re-scan
Goal: pivot once (authorized lab context), validate the new context, and generate a fresh “3 candidates” list from the new position.
Scorecard (track improvement)
- Candidates found: ___
- Proofs locked: ___
- Pivots achieved: ___
- Dead ends explained: ___
11) Differentiation map (why this loop feels boring—and that’s good)
What most guides do (and why it backfires)
- Dump huge command lists with no prioritization
- Treat ACL enumeration as a “one trick” moment instead of a repeatable cycle
- Show output without a proof standard (so nothing is defensible later)
- Skip the “after pivot” rescan, so learning doesn’t compound
What this loop does differently
- Builds a manual mini-graph one edge at a time
- Forces a proof gate before pivoting
- Uses timeboxes so you don’t get trapped in scanning
- Creates notes that are compatible with OSCP-style reporting expectations
The “commercial entity reality check” (so your practice matches your goals)
If your north star is an exam-style environment (think Offensive Security OSCP labs or a TCM Security PNPT-style range), your advantage isn’t secret tooling—it’s a workflow that survives stress. Microsoft’s AD permission model is the underlying physics here, whether you’re using a fancy graph tool or a plain notebook. PowerView is just a flashlight; your loop is the map. (If your end-to-end practice flow starts earlier than AD, keep your front door tight with an OSCP initial access checklist so you arrive at AD with cleaner context.)
Show me the nerdy details
Graph tools accelerate discovery, but they don’t replace reasoning. When you practice the loop, you’re effectively building a graph in slow motion—with higher comprehension. That comprehension is what transfers when the environment changes.
- Tier 1: “Interesting output” (weak; easy to misread)
- Tier 3: ACL line + verified impact statement (solid)
- Tier 5: Before/after + reproducible checks + rescan results (undeniable)
Apply in 60 seconds: Label your current finding Tier 1–5. If it’s below Tier 3, your next action is proof-building, not pivoting.
12) Next step (one concrete action)
Start your first “Proof → Pivot” run today
Here’s a 15-minute start that doesn’t require heroics:
- Pick one principal (your current user).
- Run one ACL-oriented scan pass (enough to produce 3 candidates).
- Choose one candidate and build a 5-point proof pack.
- Decide on one minimal pivot (authorized lab context), then rescan as the new context.
Short personal note: when I started treating “rescan” as mandatory, my labs stopped feeling like random forests. The path didn’t get easier—my certainty got stronger. And certainty is what keeps you moving when you’re tired.
Quick win: Even if your first edge is a dead end, write the mechanism of failure. “Dead end, explained” is a usable asset for your next attempt.
FAQ
How do I do AD enumeration in OSCP without BloodHound?
Use a repeatable loop: ACLScanner → Proof → Pivot. Scan for a small set of write-like edges tied to your principal, prove one edge with reproducible evidence plus an impact statement, pivot with the smallest measurable change (authorized lab context), then rescan as the new context.
What is PowerView used for in Active Directory enumeration?
In labs, PowerView helps you reason about AD objects and relationships—especially around who can control what. The key is not dumping output; it’s using PowerView-like visibility to identify a candidate edge and then proving that edge maps to a real, environment-specific action.
Which ACL permissions matter most for privilege escalation in AD labs?
Prioritize write-like permissions that can change state (broad write permissions, rights related to changing permissions, group membership control, password control, and specific attribute write control). Always validate scope and impact before acting.
How can I tell if an ACL finding is actually exploitable in a lab?
Force a proof gate: capture (1) principal, (2) target, (3) right, (4) one quotable evidence line, and (5) a reproducible verification check. Then add an impact statement (“This target controls X”), and confirm the impact is real in that environment.
What’s the fastest way to find “who can control what” without a graph tool?
Start with high-signal objects (groups, service accounts, OUs/GPOs, computers) and limit yourself to three candidates per scan pass. If you can’t explain why a candidate might pivot, it’s probably noise—park it and move on.
Why does my group membership change not show up right away?
Because your effective token may not refresh in an existing session. Treat “membership changes” as incomplete until you validate the new context in a fresh session and can show before/after evidence (and then rescan as the new principal).
How do I keep enumeration notes that are report-ready for OSCP-style practice?
Write edges as sentences: Principal → Right → Target → Action → New Position. For each edge you pursue, keep a 5-point proof pack plus a short “what changed” after pivot. That structure makes your work searchable, defensible, and easy to summarize.
What should I scan first: users, groups, OUs, or computers?
For OSCP-style speed, begin with groups and OUs/GPOs, then service accounts, then computers. Groups and policy surfaces tend to “fan out,” meaning a single edge can unlock multiple downstream opportunities in labs.
How do I reduce noise in ACL results so I only see high-signal edges?
Focus on non-inherited and unusual entries, filter for write-like rights, and only elevate findings tied to your principal or its groups. If you can’t link the finding to an impact statement, downgrade it until proven.
Conclusion
The curiosity loop from the top was simple: “If the graph is gone, do I just wander?” The answer is no. You replace the missing tool with a stronger habit: the loop. Scan just enough to find candidates. Prove one edge so your notes can survive daylight. Pivot with a small, measurable move. Then rescan—because rescan is where learning compounds.
If you do one thing in the next 15 minutes, do this: open your notes, write the edge sentence template, and run a single 20/25/15 session. Even if it ends in a dead end, make it an explained dead end. That’s how your future self stops guessing—and starts navigating.
Last reviewed: 2026-01.
Short Story: The first time I practiced AD enumeration without a graph tool, I did the classic rookie thing: I tried to “make up for it” with volume. I collected output like it was currency—pages of it. Halfway through, I realized I wasn’t calmer. I was noisier. Then I forced myself into the loop. I picked three candidates and stopped. I proved one edge like a skeptic, not a fan.
The proof wasn’t glamorous—just enough to say, “This right exists, and it matters here.” I made one small pivot, restarted my session, and rescanned. The moment the new scan produced different results, the room changed. Not because the lab changed—because my understanding did. That was the day I learned: the loop isn’t a limitation. It’s an engine.