

Proxychains DNS Leak Test Still Shows My ISP
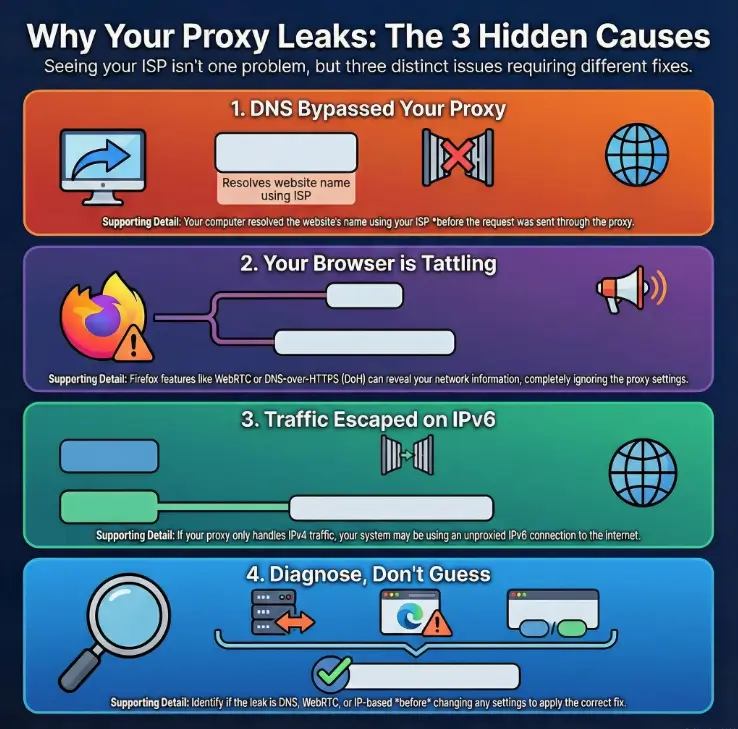
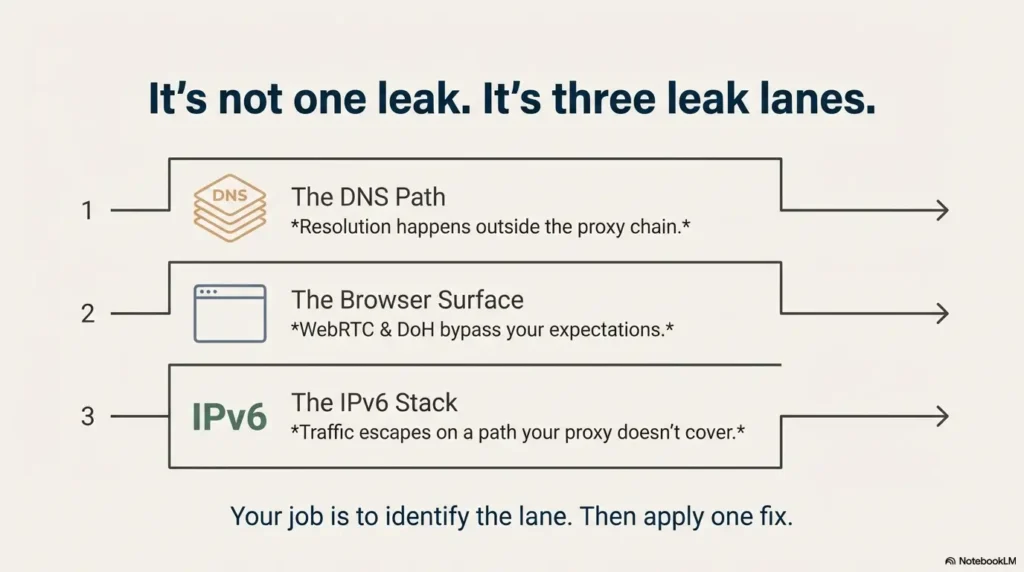
You run Firefox through proxychains, hit a DNS leak test, and the page still slaps your ISP’s name on the results—like nothing you did mattered. That moment is usually not one failure. It’s three different systems taking three different shortcuts: the DNS path, Firefox’s leak surfaces (WebRTC/DoH), and the IPv6 stack.
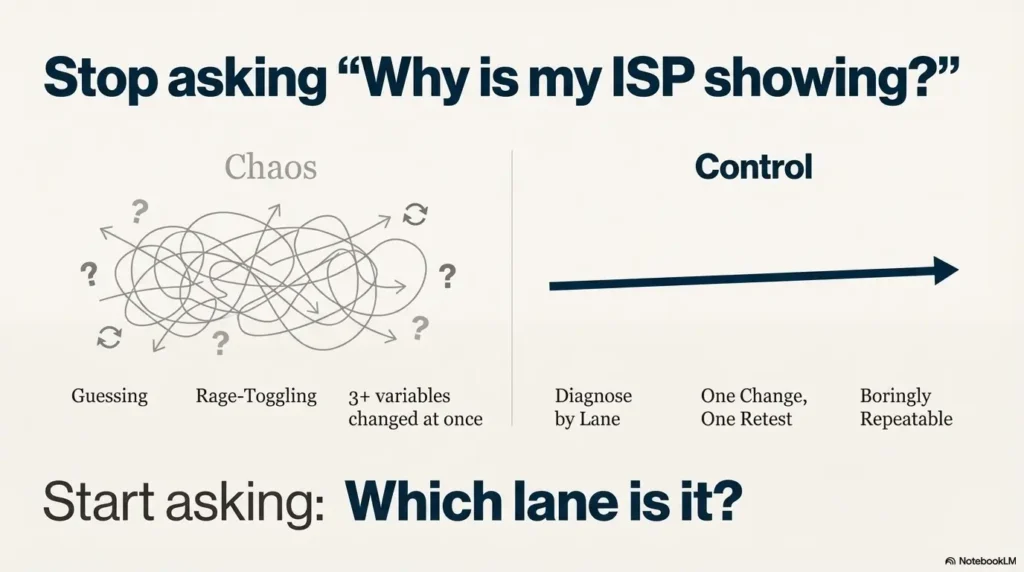
Stop guessing and burning hours flipping toggles. This guide gets you to a boring, repeatable result: isolate the leak lane, apply one change, retest once, and lock in a CleanTest setup you can reuse on Kali.
Table of Contents
- DNS path leak: resolution happens outside the proxy chain
- Browser leak surface: WebRTC/DoH bypass your expectations
- IPv6 escape: traffic leaves on a stack your proxy doesn’t cover
Apply in 60 seconds: Decide what exactly was shown (exit IP vs DNS provider vs WebRTC/IPv6) before changing anything.
Proxychains leak first: confirm what “ISP showing” actually means
Let’s start with a calm diagnostic truth: seeing your ISP name is only a “leak” if the site is telling you that your DNS resolver or real network identity is being used. Sometimes it’s simply identifying the exit network you’re currently using, or it’s labeling a DNS server you didn’t intend to hit.
ISP shown where: exit IP, DNS provider, or WebRTC section?
Most leak pages expose multiple signals. Look for these three buckets:
- Exit IP / location: the IP the website sees for HTTP/HTTPS.
- DNS servers: who resolved hostnames for you (this is the classic DNS leak target).
- WebRTC / local IP hints: your LAN IP range, interfaces, or STUN results (often labeled separately).
Standard vs Extended test: why “more servers” can appear (not always a leak)
Some tests run a “standard” set of lookups, then an “extended” run that queries many domains and record types. That can surface additional resolvers involved in your path—especially if your system/browser mixes caching, parallel resolution, or encrypted DNS. More results don’t automatically mean a leak; it means more evidence.
Pause—what is the site measuring?
Micro-rule: if you can’t state the measured thing in one sentence (“this page is showing my DNS resolver”), don’t change settings yet. Otherwise you’ll “fix” the wrong layer and still see your ISP later—because the real culprit never moved.
- ISP shown under “Your IP” only? That’s an exit-layer problem (proxy chain isn’t being used or is being bypassed).
- ISP shown as “DNS provider”? That’s a DNS-path problem (resolver bypass or split DNS).
- ISP/local network shown under WebRTC? That’s a browser leak surface (STUN/WebRTC config).
Anecdote: The first time I saw “my ISP” in a leak test, I rage-toggled settings for 20 minutes… then realized the site was flagging WebRTC separately. My HTTP exit was fine. My pride was not.
Proxychains DNS path: verify proxy_dns and the resolver route
Proxychains can proxy connections, but DNS is its own creature. If name resolution happens locally (system resolver) before the proxy ever sees anything, a leak test can still list your ISP’s resolver even when your TCP traffic is proxied.
The two lines that decide your DNS fate: proxy_dns + chain mode
In most proxychains configs, DNS behavior hinges on whether you’ve enabled DNS through the proxy chain (proxy_dns) and whether your chain mode is reliable under failure (strict_chain vs dynamic_chain). The point isn’t ideology—it’s predictability. You want the same behavior on the 1st run and the 100th run.
Why DNS leaks happen with ProxyChains (system resolver bypass)
Here’s the classic leak story: your app asks “where is example.com?” and the OS resolves it using your configured DNS servers (often ISP or router). Only after it receives the IP does it create a TCP connection—at which point proxychains can intercept. A DNS leak test isn’t impressed by your proxied TCP if the hostname resolution already happened “in the clear.”
Open loop: the one config drift that returns after reboot (and how to pin it)
If your setup “works” today and fails tomorrow, the repeat offender is often DNS configuration being rewritten (NetworkManager, systemd-resolved, DHCP). Your proxychains file may be stable, but the resolver behind it may change under your feet—especially in VM labs where NAT vs Host-Only vs Bridged networking can change what DHCP hands you. The fix isn’t paranoia—it’s making your test setup deliberately boring.
Show me the nerdy details
DNS resolution can happen through multiple libraries and services (glibc resolver, systemd-resolved stub, NetworkManager-managed resolv.conf). Even if proxychains intercepts outbound TCP, your DNS queries may still go to a local stub (like 127.0.0.53) which then forwards to upstream resolvers you didn’t pick. The observable result: DNS leak pages show ISP-branded resolvers even though your browser’s “what is my IP” looks proxied.
- Proxying TCP doesn’t guarantee proxying DNS
- Resolver drift after reboot is common in lab setups
- Stability beats cleverness for repeatable results
Apply in 60 seconds: Write down your current resolver path (system stub vs direct DNS) before you change anything.
Anecdote: I once “fixed” a DNS leak by swapping DNS servers… only to have DHCP overwrite it on the next network change. The leak didn’t come back. My confusion did.
Firefox DNS over SOCKS: the hidden checkbox that fools DNS leak tests
This is the gap most competitor pages don’t treat with the respect it deserves: even if you launch Firefox through proxychains, Firefox has its own proxy behavior. If Firefox isn’t configured to send DNS lookups over SOCKS, it may still resolve locally and create the perfect “ISP DNS provider” breadcrumb.
Why Firefox can bypass SOCKS for DNS by default
Browsers are built to be fast and “helpful,” which means they may resolve names using system DNS unless told otherwise. Proxychains can wrap the process, but browsers can still do DNS in ways that don’t match your mental model. This is why your terminal can look perfectly proxied while Firefox leak pages still show ISP-branded DNS.
Step-by-step: configure Firefox proxy settings so DNS follows the SOCKS proxy
- Open Firefox settings and find the proxy configuration (Connection Settings).
- If you’re using a SOCKS proxy (common with Tor), set SOCKS host/port to your proxy endpoint.
- Enable DNS over SOCKS (wording varies by version, but you’re looking for the option that forces hostname resolution through the SOCKS proxy).
- Restart Firefox (yes, actually restart) and rerun a DNS leak test.
Let’s be honest—proxychains isn’t controlling your browser settings
Proxychains can’t read your mind. If Firefox is configured one way and proxychains expects another, you get Frankenstein networking: half proxied, half local. The goal is not “maximum settings.” The goal is one coherent story from browser to OS to proxy—and if you’re trying to keep your tooling consistent, it helps to standardize the rest of your setup too (for example, a minimal set of essential Kali tools you always have in the same place).
- Yes/No: Are you using SOCKS5 (Tor, SOCKS proxy) rather than HTTP proxy?
- Yes/No: Is Firefox configured to send DNS through SOCKS (not just “use proxy”)?
- Yes/No: Do your leak tests show DNS servers you expect (not your router/ISP)?
Next step: If you answered “No” to any, fix that one item and retest once.
Anecdote: I’ve watched smart people lose an hour here because they assumed “proxychains firefox” overrides everything. It doesn’t. Firefox is its own little country with its own laws.
Firefox WebRTC leak: stop STUN from tattling (without breaking everything)
WebRTC is a frequent “gotcha” because it uses real-time networking techniques that can expose local IP information or network paths in ways that feel like a proxy bypass. Even when your main traffic is proxied, WebRTC can reveal details that a leak page happily labels as “your real network.”
WebRTC leak shapes: local IP vs public IP vs interface hints
- Local IP leak: exposes your LAN IP (like 192.168.x.x) or interface identifiers.
- Public IP via STUN: can reveal a public-facing IP in certain NAT scenarios.
- Interface hints: shows network adapters and routes used for real-time connections.
Step-by-step hardening: settings that stick across restarts
Your goal is modest: prevent WebRTC from exposing identities you didn’t intend to share. Options vary by Firefox version, but the practical approach is:
- Decide whether you need WebRTC in your lab browser profile. (Most people don’t.)
- Disable or constrain WebRTC features in a dedicated “Clean Test” profile.
- Retest using a page that explicitly reports WebRTC results (don’t infer from DNS-only pages).
Here’s what no one tells you—WebRTC leaks aren’t one leak
You can “fix WebRTC” and still see your ISP under DNS. Or you can “fix DNS” and still see a local IP under WebRTC. That’s not failure. That’s simply two different surfaces. Treat them as separate lanes, and you’ll stop spiraling.
Show me the nerdy details
WebRTC commonly uses STUN/TURN to establish peer connections. In some configurations, the browser can reveal candidate addresses (local, reflexive, relay) that hint at your network topology. Even if your HTTP requests go through a proxy, STUN checks may still reveal information a leak page can display. The fix is to disable or constrain WebRTC in a lab profile and verify the result with a dedicated WebRTC test page, not just DNS output.
Anecdote: The funniest “leak” I ever saw was my local IP proudly displayed as if it were a scandal. It wasn’t. It was just WebRTC doing WebRTC things—and when I wanted to understand exactly what was leaving the interface, I ended up leaning on a simple Wireshark traffic analysis workflow to make the invisible obvious.
Firefox DoH: when encrypted DNS breaks your proxy assumptions
DNS over HTTPS (DoH) is a privacy feature, but it can also be a lab breaker. If your browser decides to use DoH, it may send DNS queries to a DoH provider you didn’t plan for—bypassing the exact DNS path you’re trying to control and confusing your test results.
When DoH helps privacy vs when it sabotages proxy-lab testing
DoH can reduce local network snooping. But if your goal is “all name resolution follows my SOCKS proxy chain,” DoH can create a split path: web traffic goes one way, DNS goes another. The result is mismatched evidence and the dreaded “why does this site still show my ISP?” loop.
Step-by-step: force predictable DoH behavior (choose a mode, don’t drift)
- In your dedicated test profile, decide: DoH off, DoH default, or DoH strict.
- Stick to that decision for your test run. Don’t toggle mid-test.
- Retest with the same site and the same mode (Standard vs Extended) to control variables.
Curiosity gap: why two DNS leak sites can contradict each other (and both be “right”)
Different tests query different hostnames, record types, and pathways. One test may reveal your browser’s DoH resolver; another may reveal system DNS under certain failures or fallbacks. Your job isn’t to “find the one true site.” Your job is to stabilize your path, then confirm the same story appears across multiple checks—using the same fundamentals you’d use to explain DNS and routing to a beginner in Networking 101 for hackers.
Best for lab clarity when you want one DNS authority and fewer surprises.
Trade-off: DNS privacy depends on your OS resolver path.
Best when you explicitly want browser DNS to use a chosen provider consistently.
Trade-off: Can conflict with “DNS via SOCKS” goals.
Next step: Pick one mode for the entire test session, document it, and retest once.
Anecdote: I once “fixed” a DNS leak by enabling DoH… then spent 15 minutes wondering why my DNS provider changed again. Plot twist: I had created a different kind of split path.
IPv6 escape hatch: prove or eliminate dual-stack leakage
IPv6 is not your enemy. But it can absolutely be your uninvited guest. If your proxy chain (or your assumptions) only cover IPv4, dual-stack systems can route certain lookups or connections over IPv6—and your leak test will happily show ISP-linked IPv6 resolvers or routes.
Run separate tests: IPv4-only vs dual-stack (don’t guess)
The cleanest approach is an A/B test:
- A: Test with IPv6 temporarily disabled (lab mode).
- B: Test with IPv6 enabled (normal mode).
If “ISP shows up” only in B, you’ve learned something real. Now you can decide whether to route IPv6 properly or keep lab mode IPv4-only for demos—exactly the kind of decision you make when you’re building a safe hacking lab at home that behaves predictably.
Lab mode: temporary IPv6 disable vs real mode: route IPv6 correctly
Lab mode is about repeatability. Real mode is about correctness. If your use case is a training lab, IPv4-only can be a perfectly reasonable choice. If your use case is “I want everything proxied in daily browsing,” you’ll need an IPv6-aware strategy—proxy support, system routing, and consistent DNS authority.
Open loop: the one sign you’re leaking on IPv6 even when DNS looks perfect
If your DNS servers look “clean” but your observed IP location flips unexpectedly—or your tests occasionally show a different ISP/resolver set—dual-stack fallback is a usual suspect. This is especially true on networks that prefer IPv6 by default.
Show me the nerdy details
On dual-stack networks, applications may prefer IPv6 records (AAAA) when available. If your proxy chain or DNS strategy is IPv4-centric, IPv6 requests can bypass or follow a different route than expected. Some leak tests will trigger lookups that surface IPv6 behavior even when your standard browsing appears stable. That’s why separate IPv4-only vs dual-stack tests are so revealing.
Anecdote: I once blamed my proxy for “random leaks” until I realized my laptop had quietly switched to a network that strongly preferred IPv6. The proxy wasn’t random—my environment was.
dnsleaktest workflow: run Standard + Extended like a controlled experiment
If you want repeatable results, treat leak tests like a tiny experiment. Same browser profile. Same proxy chain. Same test mode. One change at a time. This is the difference between “I think it’s fixed” and “I can prove it’s fixed.”
What Standard vs Extended is actually doing
Standard tests often perform a smaller number of lookups. Extended tests typically do many more. The point is to surface resolvers that might only appear under different query patterns, caching states, or fallback behavior. Your job is to keep your environment stable while the test increases the pressure.
What “good” looks like: expected DNS server patterns vs red flags
- Expected: DNS servers tied to your chosen resolver path (proxy exit, chosen encrypted resolver, or controlled lab DNS).
- Red flag: DNS servers clearly tied to your local ISP/router when you intended proxy-based DNS.
- Also a red flag: wildly changing DNS servers across repeated runs with no configuration changes.
Keep one variable stable (browser profile / proxy chain / network)
Don’t change your proxy chain and your browser and your DNS and your network, then “see what happens.” That’s not troubleshooting—it’s gambling with extra steps. The practical fix looks a lot like a fast, repeatable enumeration routine: one input, one output, one controlled variable.
Common leak: OS resolver hits ISP DNS
Fix: proxy_dns + single DNS authority
Common leak: WebRTC/STUN hints
Fix: lab profile hardening
Common leak: dual-stack bypass
Fix: A/B test IPv4 vs dual-stack
Use it: When a test says “ISP,” identify the lane first. Then change only a single lane’s settings.
Anecdote: The first time I ran Standard then Extended back-to-back, my results “changed.” I thought it was a leak. It was actually my own mid-test toggling. I was the chaos agent.
Common mistakes: the two fastest ways to leak (and feel confident anyway)
If you only read one section, read this one. Not because mistakes are fun, but because they’re expensive—time-wise and confidence-wise. Most “I still see my ISP” cases are one of these patterns.
Mistake #1: assuming proxychains covers browser DNS without Firefox config
If your browser resolves locally, your DNS provider will be local. Period. This is the single most common mismatch between “proxychains is on” and “DNS leak test still shows ISP.” Fix browser DNS over SOCKS first.
Mistake #2: mixing Tor + VPN + proxies without defining the exit layer
Stacking privacy tools without a written “exit story” creates confusion. Are you trying to exit via Tor? A VPN? A paid proxy? You need one declared exit layer for the session, or your tests will look inconsistent even when nothing is “leaking.”
Mistake #3: running tests with stale caches / parallel resolvers
Browsers cache. Systems cache. Some resolvers cache. If you change settings and rerun immediately, you may be measuring yesterday’s truth with today’s anxiety. Restart the browser and rerun once. Don’t do ten frantic refreshes and call it science.
Don’t do this—it creates false confidence
Don’t declare victory based on one “clean” run. Do two runs, same conditions, and confirm the story holds. Stability is the win.
Enter three simple inputs mentally:
- Number of layers you changed at once: 1 / 2 / 3+
- Did you restart Firefox? yes / no
- Did you run Standard + Extended twice? yes / no
Output: If you changed 2+ layers, didn’t restart, and didn’t repeat tests, expect 30–60 minutes of confusion. If you changed one layer, restarted, and repeated tests, expect 10–15 minutes to a stable answer.
Next step: Reduce your variables to one change and rerun once.
Anecdote: I’ve done the “change three things at once” move so many times I should have a loyalty card. It never pays out.
Short Story: I once watched a friend run a leak test like it was a slot machine. Refresh. Toggle DNS. Refresh. Disable IPv6. Refresh. Enable DoH. Refresh. At minute twelve, the page finally looked “clean” and he exhaled like he’d just defused a bomb. Then his laptop switched Wi-Fi networks—same coffee shop, different access point—and the ISP label popped back up.
He looked betrayed. The fix wasn’t more toggles. The fix was writing down a single exit plan and testing one lane at a time. We created a “Clean Test” Firefox profile, documented the proxy endpoint, and ran Standard and Extended twice. Ten minutes later, it was boringly consistent. The real win wasn’t invisibility. It was trust: he could explain why the results looked the way they did.
Troubleshoot like an operator: a 10-minute “one change, one retest” script
This is your repeatable flow. It’s designed for time-poor people who want the answer—not a hobby. If you follow it, you’ll know what changed, why it changed, and whether it’s stable.
Step 1: confirm proxy path (one command, one expected output)
- Check your exit IP with a simple “what is my IP” site in the browser.
- Then check the same in terminal using a proxied command (for comparison).
- If these disagree, fix the exit path first before touching DNS.
If you want this step to be truly boring (in the best way), it helps to keep one baseline tool flow you always use—many people simply pair it with a beginner-friendly Nmap workflow in Kali so the “am I routed the way I think I’m routed?” question becomes muscle memory.
Step 2: confirm DNS path (one query, one expected resolver)
Run a DNS leak test twice, Standard then Extended, without changing anything. Your goal is not perfection on the first run; it’s consistency across two runs.
Step 3: confirm browser leak surfaces (WebRTC + DoH)
- Verify WebRTC results (local IP exposure) separately from DNS output.
- Verify DoH mode is what you intended for this session.
Step 4: confirm IPv6 behavior (toggle test)
Do an A/B run: lab mode (IPv6 off) then normal mode (IPv6 on). If the “ISP” label changes only in one mode, you’ve found the lane.
Save state: export your “known-good” Firefox profile + proxychains.conf snapshot
This is the part that makes future you happy. Save a copy of your proxychains config and create a dedicated Firefox profile named something like “CleanTest.” That way, your everyday browser remains normal, and your lab browser remains boringly consistent—especially if you already have a note-taking system for pentesting where you can drop the two screenshots and the one-line “expected resolver” statement.
- Fix exit path before DNS path
- Separate DNS vs WebRTC vs IPv6
- Document one stable test profile
Apply in 60 seconds: Run Standard + Extended twice with no changes and compare the DNS server lists.
Anecdote: The day I started saving a known-good profile was the day this stopped being an emotional experience. (And yes—keeping a clean operator environment helps too; even something as simple as a Zsh setup built for pentesters makes “repeat the exact same steps” less painful.)
FAQ
Why does a DNS leak test show my ISP even with proxychains?
Because DNS resolution can happen outside the proxied connection. If your system resolver or your browser resolves hostnames locally (or via DoH outside your proxy plan), the leak test can show ISP-linked DNS even when your exit IP is proxied.
Does proxychains proxy DNS by default, or only with proxy_dns?
Proxychains can be configured to proxy DNS, but you typically need the correct option enabled and a consistent chain setup. If DNS is being resolved before the proxy intercepts the connection, you’ll see ISP DNS regardless of your proxy settings.
What’s the difference between a DNS leak and a WebRTC leak?
A DNS leak reveals who resolves your domain names (often your ISP). A WebRTC leak reveals network/interface information through real-time browser mechanisms like STUN. They’re different surfaces; you can fix one and still have the other.
Should I disable Firefox DoH when using proxychains?
For lab testing, disabling DoH can make your DNS path easier to reason about—because you’re not adding a second DNS authority. For daily privacy, DoH may be useful, but it needs to match your proxy strategy (no split paths).
Why do Standard vs Extended DNS leak tests show different servers?
Extended tests often run many more lookups and can surface resolvers involved in caching, fallback, or mixed pathways. Different query patterns can reveal different parts of your setup. The fix is to run both modes twice under the same conditions.
How do I know if IPv6 is bypassing my proxy chain?
Do an A/B test: temporarily disable IPv6 (lab mode), rerun your tests, then re-enable IPv6 and rerun. If results change only when IPv6 is enabled, you’ve found the lane that needs routing or constraint.
Is SOCKS5 better than HTTP proxy for preventing leaks?
SOCKS5 is often more flexible (and common with Tor), but “better” depends on correct configuration—especially DNS handling and browser settings. A misconfigured SOCKS setup can leak just as effectively as a misconfigured HTTP proxy.
Why does terminal traffic look proxied but Firefox still shows my ISP?
Because terminal tools and browsers may resolve DNS differently. Your terminal command may use the proxied path cleanly, while Firefox may resolve locally or use DoH. Align the browser’s DNS behavior with your SOCKS/proxy plan.
Can proxychains handle UDP-based leaks like STUN?
Proxychains is primarily about intercepting connection behavior for typical app traffic. UDP and WebRTC/STUN are a separate category. If your concern is WebRTC, handle it at the browser level with a dedicated test profile and WebRTC constraints.
Next step: lock in a “Clean Test” profile you can reuse
This is the step that turns “I fixed it once” into “I can fix it anytime.” Make your lab setup boring, documented, and reversible—whether you’re running everything in VirtualBox today or comparing VirtualBox vs VMware vs Proxmox for your pentest lab tomorrow.
Do this now: create a dedicated Firefox profile + saved test log
- Create a Firefox profile named CleanTest (only used for leak testing).
- Set your proxy settings inside that profile (and ensure DNS over SOCKS is consistent).
- Choose a DoH stance for the profile (on or off) and keep it stable.
- Run Standard + Extended twice, save screenshots, and write a one-line note: “Expected DNS provider is ___.”
- Proxy endpoint type: SOCKS5 / HTTP
- Proxy host/port (lab value)
- Firefox profile name and DoH mode
- IPv6 mode: lab-off / normal-on
- Two screenshots: Standard and Extended (same session)
Next step: Save this as a tiny “lab card” so you can reproduce it in under 15 minutes.
Anecdote: The second time you fix this should feel slightly boring. If it feels dramatic, your variables are still too wild—so tighten your baseline the same way you would when doing Kali SSH hardening for a predictable remote workflow (one change, one verification, one documented state).
Conclusion
So—why did your DNS leak test still show your ISP? In most real cases, it’s one of three things: DNS resolved outside your proxy path, Firefox revealed a separate surface (WebRTC/DoH), or IPv6 escaped your assumptions. The fix isn’t more toggles. The fix is lane discipline.
If you have 15 minutes, do the simplest high-leverage move: create a CleanTest Firefox profile, lock proxy + DoH behavior, run Standard + Extended twice, and keep your screenshots. That single habit turns future breakage into a quick checklist—rather than an evening you didn’t plan to donate to networking. And if you ever need an alternate “boringly consistent” environment for these checks, a WSL2 + Kali + VMware hybrid setup can be a helpful fallback when your primary VM/network is the variable.
Last reviewed: 2025-12