

Raspberry Pi 5 Wi-Fi Pentesting: The Adapter Reality Check
The Raspberry Pi 5 is fast. Its built-in Wi-Fi is… polite. And that mismatch is why so many “monitor mode fixes” turn into an all-weekend kernel spiral that ends the moment a known-good USB adapter hits the port.
If you’re running Kali on a Raspberry Pi 5 for Wi-Fi pentesting in an authorized lab, the frustration is usually modern and specific: the interface claims monitor mode, then quietly flips back to managed, channel hopping “works” but sticks, and your capture files look confident—yet empty.
This post helps you choose an adapter by chipset, verify monitor mode / packet injection with simple pass/fail gates, and stabilize the boring stuff (power, USB placement, heat, NetworkManager, and power saving) so your interface doesn’t disappear mid-capture.
Trust signal: the workflow here is intentionally unglamorous—repeatable checks you can run twice, log once, and reuse.
- Pick a buyer-safe adapter shortlist (US-friendly)
- Validate monitor mode with three gates
- Fix drops caused by power/USB noise before blaming drivers
- Keep your lab interface from fighting the desktop stack
Table of Contents
Built-in Wi-Fi reality check (why it disappoints)
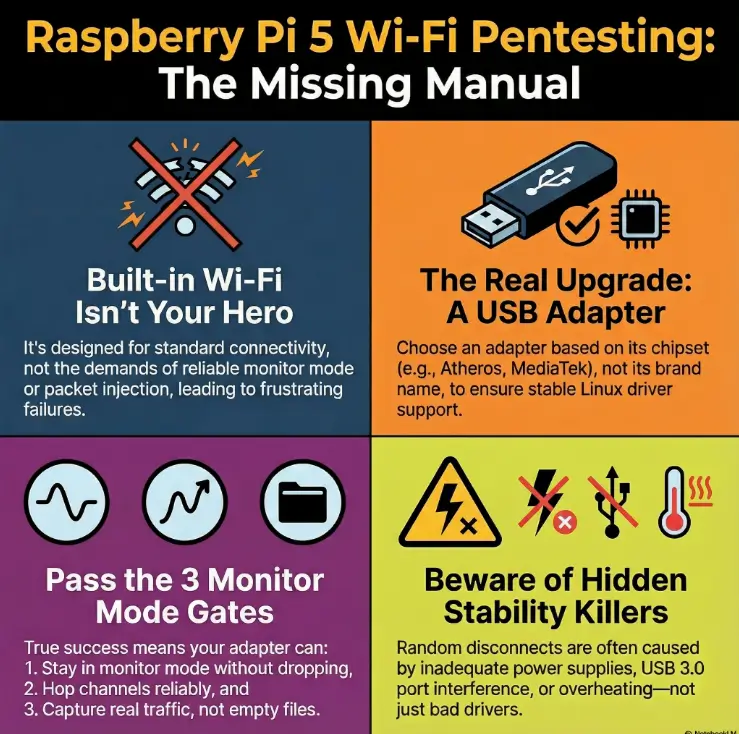
The Raspberry Pi 5 is quick. It’s the kind of quick that makes you think, “Surely it can handle Wi-Fi auditing.” And it can—as a computer. The friction comes from the radio: the built-in Wi-Fi isn’t designed as a specialist pentesting interface. It’s designed to be… Wi-Fi. Normal Wi-Fi. Polite Wi-Fi.
Micro-story: I once watched someone spend an entire Saturday “fixing” monitor mode. They changed kernels, reimaged Kali, swapped tools, and blamed the moon’s gravitational pull. The only thing they didn’t change? The hardware radio. When they finally plugged in a known-good USB adapter, everything “mysteriously” worked in under five minutes. That’s not magic. That’s physics.
What “monitor mode” really demands (not just a toggle)
Monitor mode is not simply “Wi-Fi, but cooler.” It asks your adapter to listen to raw 802.11 frames, stay on chosen channels, and behave consistently under load. Many built-in radios (especially those optimized for consumer connectivity) don’t prioritize that feature set, and driver support can be uneven across Linux distributions—especially on ARM setups, where “works on x86” doesn’t always translate cleanly (if you’re hitting odd ARM friction elsewhere, this kind of pattern shows up in unexpected places, like Burp “browser not available” issues on Kali ARM64).
- “Monitor enabled” text is not proof of stable monitoring.
- Real success looks like consistent captures, stable channel control, and no random drops.
- The Pi 5’s speed doesn’t change what the radio can do.
Apply in 60 seconds: Write down whether you’re using built-in Wi-Fi or USB. That single line will save you hours of confusion later.
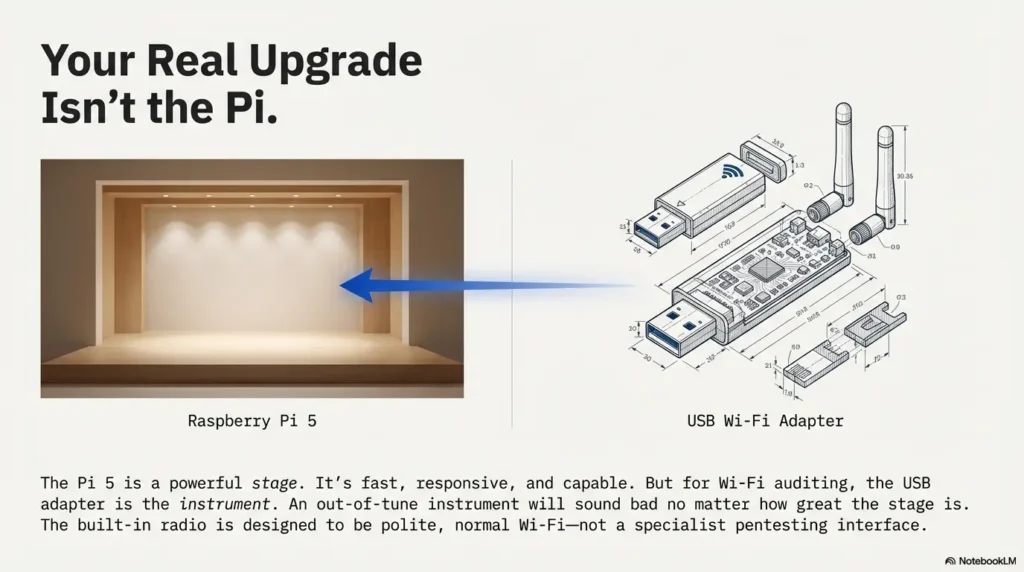
The Pi 5 got faster—your Wi-Fi didn’t
Upgrading CPU/RAM is like swapping concert-hall seats to the front row: the sound is clearer, your reaction time is faster, and everything feels more responsive. But if the instrument is out of tune, you still hear the wobble. Wi-Fi pentesting hinges on radio + driver behavior. That’s why the USB adapter choice becomes the “real upgrade.”
Curiosity gap: the one symptom that proves it’s the chipset, not your commands
If you can enter monitor mode, start a capture, and then see one of these patterns repeatedly, it’s often not “you”:
- Mode flip-flopping: interface claims monitor mode, then silently returns to managed mode.
- Channel glue: you “switch channels,” but the adapter behaves like it’s stuck.
- Empty confidence: capture files exist, but contain little to no meaningful traffic even in a busy RF environment.
When those happen consistently across clean installs and different tools, the simplest explanation is usually the correct one: the radio/driver combo isn’t built for this job.
Show me the nerdy details
Monitor mode support is a blend of hardware capability (chipset/firmware) and driver features (Linux mac80211/cfg80211 integration, stable channel control, and reliable frame reporting). Some radios can “enter” monitor mode but fail under sustained load or channel operations. That’s why a pass/fail checklist beats vibes.
USB adapter picks that actually work (US buyer-friendly)
Let’s get practical: most US readers land here because they want to buy one thing that prevents three future headaches. You don’t need the “best” adapter on Earth. You need the adapter that reliably supports your legal lab workflow on Kali with minimal driver drama—and a stable base toolchain helps too, so it’s worth keeping your fundamentals tight (if you want a clean baseline, start with essential Kali tools you’ll actually use before you add more moving parts).
The short list: chipsets to prefer (and why)
Instead of chasing brand names, chase chipsets. Product listings change. Chipsets tend to be the stable truth underneath. When you’re shopping, look for listings that explicitly name the chipset or model family.
- Atheros (ath9k family) – often praised for stability and mature Linux support.
- MediaTek (selected mt76 families) – strong Linux support for many models; varies by exact chipset.
- Realtek (some models) – widely available, but compatibility depends heavily on chipset and driver maturity.
Note: “Supports monitor mode” in a listing is not a promise. It’s a marketing sentence. Chipset + driver history is the promise.
The “avoid list”: adapters that look perfect—then fail at the worst time
- Unspecified chipset listings (“Dual-band Wi-Fi 6 adapter!!”) with no Linux details.
- Frequent silent revisions where a product name stays the same but the chipset changes.
- Driver-by-GitHub-only adapters that require fragile out-of-tree modules that break on updates.
Let’s be honest—your adapter matters more than your Pi
If the Pi 5 is your stage, the adapter is your instrument. You can’t “practice harder” to make a violin play like a trumpet. I say this gently because I’ve learned it the annoying way: if you buy an adapter that’s 20% incompatible, you’ll spend 80% of your time debugging the last 20%.
- Prioritize stable Linux driver support over peak advertised throughput.
- Avoid adapters with unclear chipsets or constantly changing hardware revisions.
- Expect fewer surprises with mature driver families.
Apply in 60 seconds: Before buying, search the exact adapter model + “chipset” + “Kali” and see if users report stability after updates.
Buying checklist: what to verify before you click “Buy” (listing clues that save you)
- Yes/No: Does the listing name a chipset (or a Linux driver family) clearly?
- Yes/No: Are there recent reviews (last 6–12 months) mentioning Linux/Kali use?
- Yes/No: Does the adapter specify band support you actually need (2.4 GHz vs 5 GHz)?
- Yes/No: Is it from a seller with consistent inventory (to reduce silent chipset swaps)?
Next step: If any answer is “No,” choose a different model or confirm chipset via community reports before purchasing.
Show me the nerdy details
Many “same-name” adapters ship with different chipsets across production runs. Linux support is tied to the chipset + driver, not the brand name. That’s why experienced users treat “chipset disclosure” like a required feature.
Setup flow: from box to monitor mode in under 20 minutes
Here’s the approach that keeps you sane: you’re not “installing Wi-Fi pentesting.” You’re building a stable network interface that can be audited only when you have authorization. The goal is repeatability, not heroics—and if you want the “boring, reliable” lab foundation underneath, it pairs well with Kali Linux lab infrastructure mastery so your setup doesn’t collapse the moment you scale beyond a single test.
Micro-story: My favorite setups are the boring ones. The ones where I plug in the adapter, the interface name is predictable, and nothing “mysteriously disappears” after reboot. Boring is a love language in Linux.
Update + firmware + headers (the boring step that prevents 80% of pain)
Keep Kali updated and ensure you have the basics for driver support. If your adapter relies on kernel modules, headers can matter. If you’re running Kali on ARM for Pi 5, stay mindful of kernel updates and how they affect external drivers.
- Update system packages regularly.
- Prefer adapters supported by in-kernel drivers when possible.
- Document your kernel version when things work well (future-you will thank you)—even a simple habit like a note-taking system built for pentesting can save you from “what changed?” loops later.
Driver sanity check: confirm the chipset the OS actually sees
Don’t trust the box. Trust what Linux detects. Your goal is to confirm: (1) the USB device is recognized, (2) the driver is loaded, (3) the wireless interface exists and is stable. If that chain breaks, fix it before you try anything “pentesty.”
Clean interface naming: stop chasing wlan0/wlan1 confusion
Pi builds can be especially chaotic if you have built-in Wi-Fi plus a USB adapter. The easiest way to stay calm is to pick one interface as your pentesting interface (usually USB) and keep the other for normal connectivity, or disable one when you’re in “lab mode.”
If you’re managing the Pi remotely (which is the easiest way to keep your workflow calm), it’s worth tightening the basics like Kali SSH hardening so your “portable rig” doesn’t become a soft target inside your own lab.
Show me the nerdy details
On ARM devices, kernel/driver behavior can differ slightly from x86. In-kernel drivers reduce maintenance risk because they update with the kernel, while out-of-tree modules can break unexpectedly. Stable interface naming reduces “wrong device” mistakes when you have multiple WLAN interfaces.
Monitor mode checklist (the pass/fail gates)
This is the part where most guides get dramatic and vague. We’re not doing drama. We’re doing gates. Each gate answers one question: “Can this adapter behave the way a monitoring workflow needs?” If you fail a gate, you fix the cause or you change hardware—no shame, no spiraling.
Gate 1: interface can enter monitor mode and stay there
- Pass if the interface remains in monitor mode through a reboot of the tool stack (not necessarily the OS), and doesn’t revert silently.
- Fail if it toggles back to managed mode or drops entirely when traffic increases.
Gate 2: you can hop channels without “sticking”
- Pass if the adapter consistently follows channel changes and your capture view reflects it.
- Fail if channel changes appear to work but traffic behavior suggests it’s stuck on one channel.
Gate 3: captures are real (not empty files with confidence)
“I have a capture file” is not the same as “I have useful capture data.” Your capture should show realistic frame counts over time in a known-busy environment (like your own lab with controlled devices). If everything looks empty, don’t assume your tools are “broken.” Assume you’re not actually seeing what you think you’re seeing—and when you do sanity checks, it helps to confirm what “real” looks like in traffic analysis with Wireshark so you’re not chasing ghosts.
Here’s what no one tells you—“it says monitor” isn’t proof
Tools can report monitor mode even when the driver is half-cooperating. Think of it like a door that’s “unlocked” but still stuck to the frame. The status looks right. The function isn’t.
- Stable mode + channel control + real capture data = success.
- Random drops, sticky channels, empty captures = fix environment or change hardware.
- Repeatability beats “worked once” stories.
Apply in 60 seconds: Run your monitor-mode checks twice (back-to-back). If “success” isn’t repeatable, treat it as a fail.
Show me the nerdy details
“Sticky channel” issues can come from driver limitations, USB 3 RF noise near 2.4 GHz, or power instability that resets the radio. Empty captures can result from wrong interface selection, mode instability, or a driver that doesn’t report frames correctly in monitor mode.
Injection testing (lab-only) without the false positives
This section needs a careful line: we’re talking about authorized, lab-only testing. The purpose is to validate that your hardware behaves correctly—not to teach anyone to target networks they don’t own or manage. If you don’t have explicit permission, don’t do it. Full stop.
Micro-story: The first time I “tested injection,” I got output that looked like a standing ovation. I felt unstoppable. Then I tried the same setup again—same room, same everything—and it failed completely. That’s when I learned a life lesson: tools can flatter you. Your job is to make them prove it twice.
The safe, controlled way to test injection (no drama, no guessing)
Use a controlled lab with devices you own, and focus on repeatability. The cleanest validation is not “did I see fancy output once,” but “does the adapter behave consistently under controlled conditions, across multiple runs.” If you’re learning, keep the scope small: one lab AP, one client, one channel, and a short time box.
How to spot “fake injection” output that tricks beginners
- Single-run success: works once, then never again without explanation.
- Distance fragility: “works” only at extremely close range and collapses immediately.
- Mismatch behavior: results don’t correlate with the lab environment you can observe.
Curiosity gap: why injection “works” at 2 feet… then dies in real range
At very close range, radios can behave “good enough” even when they’re borderline. Step back, add interference, or increase traffic—and the shortcomings show up. This is why a stable chipset/driver combo is your real performance upgrade.
When USB adapter A is “good enough”: You only need reliable monitor mode for visibility checks in your own lab, and your captures are stable over 10–15 minutes.
When you should upgrade: You see repeated drops, sticky channels, or “works once” behavior—especially after updates or under load.
Neutral action: Run the same validation twice on two different days. If stability changes, prioritize a more proven chipset.
Show me the nerdy details
Injection-like behavior is sensitive to driver support, transmit control, and RF conditions. A borderline setup can appear functional under ideal conditions (short distance, low interference) and then fail once you introduce realistic variables. That’s why you validate stability, not just capability.
Power, USB, and heat: the hidden stability killers
If your Wi-Fi interface drops mid-capture, it’s tempting to blame drivers. Sometimes it is drivers. But on a compact device like a Pi 5, power delivery and USB behavior can be the quiet saboteurs. This is where your setup becomes less “cool hacker rig” and more “reliable instrument.”
Micro-story: I’ve had sessions where everything worked until I opened a browser tab. One extra spike and—poof—the adapter disappeared. It felt personal. It wasn’t. It was power headroom. The Pi wasn’t “mad.” It was underfed.
Undervoltage symptoms that masquerade as “driver bugs”
- USB device resets or vanishes under load.
- Random Wi-Fi disconnects that don’t correlate with channel changes.
- Behavior changes when you swap cables or power supplies.
USB 3 noise + placement: when your fast port sabotages 2.4 GHz
USB 3 can generate interference near 2.4 GHz in some setups. This doesn’t mean “never use USB 3.” It means: be mindful of placement. If your adapter sits close to noisy ports or cables, your RF environment can degrade in ways that look like “bad drivers.” A short USB extension cable can sometimes improve real-world stability simply by moving the radio away from noise.
Thermal throttling: how it quietly ruins long captures
Long sessions can raise temperatures. Heat can reduce performance and stability in subtle ways. Even if your Pi 5 is “fast,” throttling can change timing, USB behavior, and the overall smoothness of your session. If you’re doing longer lab monitoring, basic cooling is less about speed and more about consistency.
Use this as a quick mental model (not a precision spec):
- Input 1: Is your power supply rated for Pi 5 recommended current (Yes/No)?
- Input 2: Do you have extra USB devices attached (Yes/No)?
- Input 3: Do drops happen more under load (scans/captures + browser) (Yes/No)?
Output: If you answered “No/Yes/Yes,” treat power headroom as a prime suspect and simplify the USB load first.
Neutral action: Test with only the Wi-Fi adapter connected and no extra peripherals, then add devices back one by one.
Show me the nerdy details
USB device resets can occur when power dips or when the bus is stressed. RF interference can reduce effective sensitivity and stability, especially on 2.4 GHz. Thermal throttling can alter system behavior under sustained load. These issues can mimic “driver flakiness,” so it’s worth isolating them early.
Kali + NetworkManager conflicts (stop the interface tug-of-war)
Kali is perfectly happy to offer you a nice desktop experience. NetworkManager is also perfectly happy to “help.” The problem is that Wi-Fi auditing workflows often want the interface to behave differently than “normal Wi-Fi.” If you let both sides grab the wheel, you get the dreaded: “It worked… until it didn’t.”
Micro-story: I once lost 15 minutes to a silent conflict because I clicked the Wi-Fi icon out of habit. Just one click. The interface politely reconfigured itself, and my monitoring session became a ghost town. My mistake wasn’t technical—it was human. Muscle memory is powerful.
When to disable NetworkManager (and when not to)
If you’re using the same interface for both internet access and monitoring, conflicts are more likely. The cleaner approach is to separate roles: keep a “connectivity” interface (often built-in) and a “monitoring” interface (USB). If you must use one interface, consider pausing automatic Wi-Fi management during lab sessions.
The “random disconnect” fix: power saving and roaming behavior
Power saving can be useful for laptops. For sustained monitoring, it can be counterproductive. Roaming logic can also trigger behavior changes if the system thinks it should optimize connectivity. For lab work, you want stable and predictable behavior.
Mistake to avoid: mixing GUI Wi-Fi clicks with CLI monitoring sessions
This is the easiest mistake to make because it doesn’t feel like a mistake. It feels like “checking Wi-Fi.” If your monitoring interface is active, treat the GUI as a different control plane that can override your intent. (And if you’re doing any proxied lab traffic as part of your broader workflow, make sure you aren’t quietly sabotaging yourself with DNS exposure—fixing ProxyChains DNS leaks is the same philosophy: less mystery, more proof.)
Show me the nerdy details
NetworkManager can change interface states and settings to maintain connectivity. Monitoring workflows may require different modes and channel behaviors. When both systems attempt to manage the same interface, you can see mode changes, disconnects, and inconsistent behavior.
Common mistakes (the ones that waste entire weekends)
Think of these as banana peels on the sidewalk. Everyone steps on them once. The goal is to step on them fast—and then never again.
Mistake #1: choosing an adapter by star ratings, not chipset
Star ratings mostly reflect “works on Windows” and “arrived on time.” They rarely reflect “stable monitor mode on Kali after updates.” Prioritize chipset disclosure and community-tested support.
Mistake #2: trusting “supports monitor mode” marketing copy
Some listings copy-paste that phrase like it’s a decorative sticker. Treat it as an unverified claim until you confirm chipset + driver reality.
Mistake #3: testing on crowded channels and blaming your setup
Busy RF can hide your own problems. Or it can create them. If your lab testing is inconsistent, simplify: pick a controlled channel and environment before you judge the hardware.
Mistake #4: forgetting region settings and wondering why channels vanish
Regulatory domains vary. Channel availability can change depending on settings and location. If you’re seeing confusing channel behavior, verify your system’s regulatory domain configuration and keep your lab work compliant with local rules.
- Chipset > brand name.
- Repeatable tests > one-time success.
- Separate interfaces > shared interface chaos.
Apply in 60 seconds: Write a tiny lab log: adapter model, chipset (if known), kernel version, and whether NetworkManager was managing the interface—this is exactly the kind of habit that compounds with note-taking systems for pentesting.
Who this is for / not for
For: lab learners, CTF/try-at-home auditing, field note-takers who want portability
If you’re building a legal learning lab, documenting your own network behavior, or you want a portable rig for authorized work, the Pi 5 + Kali + a good USB adapter can be a sweet spot: low power, small footprint, and surprisingly capable when tuned properly. It also pairs well with a broader learning stack—whether you’re building fundamentals through a practical pentesting tools guide or keeping your daily cadence consistent with a 2-hour-a-day OSCP routine.
Not for: “one-device-does-all” expectations, long unattended captures without tuning
If you expect built-in Wi-Fi to be a universal pentesting interface, you’ll be frustrated. If you plan to run unattended sessions for long periods, you’ll need stronger stability controls: cooling, power headroom, careful USB placement, and a genuinely proven adapter.
If you’re in the “not for” camp: the smarter alternative setup
Consider using the Pi 5 as a lightweight companion and move heavy workflows to a laptop or dedicated rig. Another option is to keep the Pi as a “capture device” (authorized environments only) and analyze data elsewhere. The point is to match the tool to the job, not your optimism—and if your lab access depends on VPN reliability, don’t ignore the “boring” layer there either (this is where TryHackMe OpenVPN disconnect fixes can save you from blaming the wrong subsystem).

FAQ
Can Raspberry Pi 5’s built-in Wi-Fi do monitor mode and packet injection?
Sometimes you can enter monitor mode, but reliability varies and it often falls short for stable lab workflows. For consistent results, most users rely on a USB Wi-Fi adapter with a proven chipset/driver combo.
What’s the best USB Wi-Fi adapter for Kali on Raspberry Pi 5 in the US?
Look for adapters with clearly stated chipsets and strong Linux driver support. The “best” choice depends on whether you need 2.4 GHz, 5 GHz, or both, and whether you prioritize stability over peak throughput. Avoid listings with unclear chipset information.
Do I need USB 2.0 or USB 3.0 for a Wi-Fi adapter on Pi 5?
Throughput isn’t the main limiter for monitoring; stability is. USB 3.0 can be fine, but be aware of potential RF noise near 2.4 GHz depending on placement. If you see weird instability, a short extension cable or different port placement can help.
Why does monitor mode work once, then fail after reboot?
Common causes include driver changes after updates, interface management conflicts (NetworkManager), and power/USB resets. Treat “worked once” as a signal to validate repeatability and isolate one variable at a time.
How do I check what chipset my Wi-Fi adapter uses on Kali?
In Kali/Linux, you can check the detected USB device and driver association using standard system hardware tools. The key is to confirm what the OS sees, not what the product box claimed.
Why is my adapter detected but won’t enter monitor mode?
That usually points to driver limitations, firmware issues, or an adapter revision using a different chipset than expected. It can also happen if something else is managing the interface state.
How can I stop my Wi-Fi interface from disconnecting during captures?
Start with power stability, then check USB placement, then confirm power-saving settings, and finally reduce conflicts from automatic network management. Disconnects often come from “environmental” issues, not just software.
Does channel hopping work the same on 2.4 GHz and 5 GHz?
Not always. Hardware support and regulatory settings can affect available channels and hopping behavior. If hopping is inconsistent, test one band at a time and confirm channel control is reliable before expanding scope.
What power supply do I need so the Pi 5 doesn’t drop Wi-Fi under load?
Use a quality power supply that matches the Raspberry Pi 5’s recommended specifications and avoid cheap cables. If you see USB device resets or undervoltage warnings, treat that as a primary stability issue to fix.
Is Wi-Fi injection illegal in the US?
Laws depend on authorization and context. In general, interfering with networks you don’t own or have explicit permission to test can be illegal and harmful. Keep work authorized, documented, and lab-based. If you’re doing professional testing, follow a written scope and rules of engagement and consult qualified legal guidance for your situation.
Next step (one concrete action)
Do a 5-minute “proof run” in your own authorized lab: verify which interface you’re using → confirm the chipset/driver path → validate monitor-mode behavior with gates → sanity-check capture reality → write down the working recipe. The goal is to leave this page with a setup you can repeat tomorrow without re-debugging your own life.
- USB adapter choice is the highest-leverage decision.
- Gate-based checks prevent false confidence.
- Power + USB placement can make or break stability.
Apply in 60 seconds: Create a tiny note titled “Pi 5 Wi-Fi Lab Recipe” and store: adapter model, port used, and what you changed to keep it stable—if you want a ready-to-reuse structure, borrow from note-taking systems designed for pentesting.
Short Story: The best lab rigs feel like good chairs: you stop noticing them. One winter night, I was testing a setup and realized I’d gone 30 minutes without touching anything. No reconnects. No mystery errors. No “why is wlan1 gone?” panic. I didn’t feel triumphant. I felt calm. That’s the real win: when your gear disappears into the background and your attention stays on learning—on understanding how systems behave, not how your adapter behaves on a bad day.
Last reviewed: 2025-12.